
Azure Container Instances - Using Managed Identity to access Key Vault secrets with C#
Azure Container Instances with Azure Managed Identity, accessing data in a Key Vault without using any stored credentials - all done in C# with .NET Core. Tag along!
Table of Contents
Recently I've blogged about a couple of different ways to protect secrets when running containers with Azure Container Instances. Here's yet another option for you, if you want to explore the Azure Managed Identity services and what it can offer you when running containers - In my examples, I'm using the Azure Key Vault, because true to this series, we want to keep our secrets safe without spilling credentials.
See the other posts in this series about secrets:
- ACI: Creating secret volumes and consume secrets using C# .NET Core
- ACI: Using Secure Environment Variables
See the introductory post for ACI and ACR and how to push your C# apps to run as containers in Azure Container Instances:
Background
If you ever came across Managed Service Identity, then you'll be familiar with Azure Managed Identity, because they're the same thing but with an upgraded name.
TLDR; Why?
- No need to put secrets in code.
- No need to put secrets in configuration.
- No need to actually know/manage the AAD identities that have access to the services (ACI in the case of this article).
- Identities are automatically generated and managed, hence you can put that out of your mind and not risk spreading credentials somewhere.
- Only the containers running (using these identities) can access the resources you define; in my case, the Key Vault.
What is Azure Managed Identity - the short version?
Managed identities enable you to use Azure AD to authenticate to services, rather than specify credentials like ClientId and Secret in your code or config files.
During my many adventures with cloud architecture and development, one thing has struck me as odd for a lot of services, including the ones from Microsoft; You pretty much had to specify your credentials in code or config to connect to them.
With AMI, the scenario changes. You don't have to specify any credentials at all - not even the ones to connect to e.g. your Key Vault.
Microsoft has an excellent overview document with what services in the Azure cloud has support for Azure Managed Identity. ACI is one of them.
Key Vault + Managed Identity - the short version!
Microsoft's documentation specifies the services that support Azure AD authentication, which includes Key Vault that we're going to dig into in this post.
In the past, I've always thought: what is the use of having a Key Vault to store your secrets, to avoid having them in configuration files, when the only way to access the key vault was with yet another set of credentials you had to store in the config? Until Azure Managed Identity came around, there was a lack of reliable solutions to handle this with ease.
The reason I want to look specifically at Key Vault and Managed Identities is because Key Vault usually play a critical and central role to a lot of deployments in the cloud, housing all kinds of secrets and sensitive data. Certificates, keys, secrets - many things you wouldn't want to give unwanted access to, nor to have any accidental credential-spills.
Using Azure Managed Identity and Azure Container Instances with C# .NET Core
As an example for this article and demonstrating how Managed Identity works, I'm continuing my post series about Azure Container Instances - and this time we'll be using a Key Vault to store our secrets, and then Azure Managed Identity will be the player that have access to the vault automatically, without us needing to pass any credentials into our Container Instances as they run - not even in the yaml files or CLI.
There are two types of identities you can use with ACI:
- User-assigned. This is an identity that lives separately from the lifecycle of your container group. When your containers die, this identity lives on - so you can use it again when you are spinning up new resources.
- System-assigned. This is an identity that only lives during the lifecycle of your container group. When your container group is deleted, this identity is removed from the system and will not be accessible or used again.
In this post we'll take a look at how we can use the system assigned identity, which is automatically cleaned up once I'm done with an ACI group. Especially when it comes to burst-deployments that I deploy regularly but are independent from one another - it means one less thing to clean up and think about, and no need to actively think about separation of security concerns - and when the ACI group isn't there, there are no credentials lying around with access to my Key Vaults.
Azure Instance Metadata Service - the short version!
When we have code running inside of our container, it can reach out to the Azure Instance Metadata Service. You'll notice a few places that say you should send a request to 169.254.169.254 - this is the AIMS endpoint.
If your container group has a managed identity and you've given it access to some resources in your Azure Subscription, you can query AIMS to get a Bearer token, which you'll then pass on to the required services of your choice.
Update 2019-04-15:
The sample code and article now supports theAzureServiceTokenProvideras well, making it even easier to use the Managed Identities from C#.
The nuget is available here: https://www.nuget.org/packages/Microsoft.Azure.Services.AppAuthentication
Source code and sample YAML files
They're all available on GitHub if you want to try it out yourself and follow along. For the steps of creating, building and pushing the C# code to your ACR and run it as a container in ACI, please refer to my previous blog post on this topic, that covers it extensively.
That's what we're going to do today. Tag along!
1. Create Managed Identity during Container Group creation
A benefit with managed identities is that they are just that - managed. We can easily specify, during creation-time, that we want to use a managed identity as part of our Container Group deployment.
A lot of my deployments are managed using YAML files (read: Azure DevOps + YAML = life becomes easier); because of this I really like how easy it is to enable managed identities straight out of the blue with a new container group creation in YAML. Make a note of the identity property below:
apiVersion: 2018-10-01
name: aci-demo-app-with-managed-identity
location: westeurope
type: Microsoft.ContainerInstance/containerGroups
identity:
  type: SystemAssigned
properties:
  osType: Linux
  restartPolicy: Always
  containers:
  - name: aci-demo-app-with-managed-identity
    properties:
      image: acrdemomagic.azurecr.io/aci-demo-app-with-managed-identity:latest
      resources:
        requests:
          cpu: 2.0
          memoryInGB: 2.0
  imageRegistryCredentials:
  - server: acrdemomagic.azurecr.io
    username: acrdemomagic
    password: YOUR_ACR_PASSWORD
Using my YAML definition, I can now create a new container group, pointing to my file:
az container create -g demos -f ..\..\yaml\aci-demo-with-managed-identity.yaml
In the output of the creation command I will now notice the identity.principalId property. This shows up because we've specified identity.type as SystemAssigned:
{
  "id": "/subscriptions/YOUR_SUBSCRIPTION_ID/resourceGroups/demos/providers/Microsoft.ContainerInstance/containerGroups/aci-demo-app-with-managed-identity",
  "identity": {
    "principalId": "78845615-8d77-4d89-bc0a-80a0f899f297",
    "tenantId": "YOUR_TENANT_ID",
    "type": "SystemAssigned",
    "userAssignedIdentities": null
  },
  "kind": null,
  "location": "westeurope",
  "managedBy": null,
  "name": "aci-demo-app-with-managed-identity",
  ...
  ...
}
In the above (shortened) json response from the creation command, you can see the identity.principalId property. This is the value of the automatically generated Service Principal that is ties to this container group as a SystemAssigned identity. When we later delete our container group, this principal should be deleted automatically as well.
2. Set a policy for your new identity to access your Key Vault
To grant permissions for this new identity to other resources, for example our Key Vault that I've created in my "demos" resource group, we need to define the policy for it:
az keyvault set-policy --name myacidemovault --resource-group demos --object-id 78845615-8d77-4d89-bc0a-80a0f899f297 --secret-permissions get list
Notes:
--secret-permissionsindicates what this service principal is allowed to do; In my case I want to enable both Get and List operations, as my code might want to "List all secrets" - if you don't want this, removelistand keep only theget.
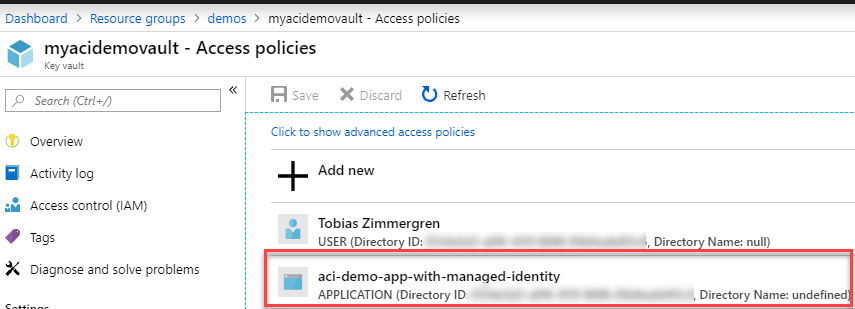
Navigating to the portal and look into my Kee Vault's Access Policies, I can see that there's a new Service Principal that have access now, with the permissions I've specified:
3.1 Option 1 (Recommended): Get a token using AzureServiceTokenProvider
While I previously explained how to do this manually by reaching out to the AIMS endpoint and grab a new token (which is still very valid to do), the updated NuGet that contains the AzureServiceTokenProvider class makes it a lot easier to wrap our code neatly.
Getting a token with this option is super slick:
private static string GetSecretFromKeyVault_ManagedIdentity_TokenProvider(string secretName)
{
    AzureServiceTokenProvider tokenProvider = new AzureServiceTokenProvider();
    var keyVault = new KeyVaultClient(new KeyVaultClient.AuthenticationCallback(tokenProvider.KeyVaultTokenCallback));
    var secretResult = keyVault.GetSecretAsync($"https://myacidemovault.vault.azure.net", secretName).Result;

    return secretResult.Value;
}
In the demo code here, the nuget provides us with the AzureServiceTokenProvider that can do the underlying requests to get the token. 🚀
That's all there's to it if we use this approach.
Thanks Arthur for the tip in the comments.
3.2 Option 2: Get a token from AIMS using C#
At this point, the infrastructure is prepared and all we need to do is deploy our sample code. To understand what that code does, I'm elaborating a bit on that in the following steps.
To gain access to the resources we want, already granted the identity the proper privileges to access our Key Vault; Now we need to grab a Bearer token that we can use to authorize to the key vault. For this to work, you need to execute this code from inside the containers in your container group.
That's why I've made this C# sample that you can use, in case you're also building a .NET Core solution.
Getting a token is done by making a POST request to this endpoint, from INSIDE your running container:
http://169.254.169.254/metadata/identity/oauth2/token?api-version=2018-02-01&resource=<URL_ENCODED_ENDPOINT_FOR_AZURE_SERVICE>
Here's how I'm doing it in C#:
private static async Task<string> GetAccessTokenAsync(string authority, string resource, string scope)
{
    // If the token expires within the next thirty seconds, we'll grab a new one.
    if (_cachedToken != null)
    {
        if (_cachedToken.ExpiresOn > DateTime.UtcNow.AddSeconds(30))
        {
            // Use the existing token, it's still valid.
            return _cachedToken.AccessToken;
        }
    }

    var aimsEndpoint = "169.254.169.254";
    var apiVersion = "2018-02-01";

    var aimsUri = $"http://{aimsEndpoint}/metadata/identity/oauth2/token?api-version={apiVersion}&resource={HttpUtility.UrlEncode(resource)}";

    HttpClient client = new HttpClient();
    var response = client.GetStringAsync(aimsUri).Result;

    // Parse the Json response and pick the "access_token" property, which has the value of our Bearer authorization token.
    var rawResponse = JObject.Parse(response);
    var accessTokenValue = rawResponse["access_token"].Value<string>();
    var expiresOnValue = rawResponse["expires_on"].Value<int>();

    // There's frameworks and helpers for this, but for clarity in this example
    // I think it makes sense to explain exactly how this is happening, which should
    // be clear from the below code sample. (expires_on in a jwt token is in seconds since Unix epoch).
    var epoch = new DateTime(1970, 1, 1, 0, 0, 0, DateTimeKind.Utc);
    var expiryDate = epoch.AddSeconds(expiresOnValue);
    _cachedToken = new CachedAccessToken(accessTokenValue, expiryDate);

    return accessTokenValue;
}

private static CachedAccessToken _cachedToken;
The CachedAccessToken is a class that just holds the token and expiration date, to help make the above code easier.
public class CachedAccessToken
{
    public string AccessToken { get; }
    public DateTime ExpiresOn { get; }

    public CachedAccessToken(string accessToken, DateTime expiresOn)
    {
        AccessToken = accessToken;
        ExpiresOn = expiresOn;
    }
}
Notes:
- aimsEndpoint is set to
169.254.169.254, which is the official endpoint for the Azure Identity Management Service, so there's no magic here. - This endpoint is on HTTP, NOT HTTPS. This is important to know when you make the request - at least if you want to get a token back.
resourceparameter is for the Azure resource type you want to access. In my case, this ishttps://vault.azure.com- but as you'll see in the next code snippet, I've handled this automagically in the code using the C# NuGet package for Microsoft.Azure.KeyVault.
4. Get the Secret from the Key Vault using our new access token, in C#
Now that we have ways to get our tokens, we can easily decide how we want to get it. Using Option 1 above, we only have to call this line:
// Option 1 (Recommended):
var secretValue = GetSecretFromKeyVault_ManagedIdentity_TokenProvider(secretName);
The method for getting the token with Option 1:
private static string GetSecretFromKeyVault_ManagedIdentity_TokenProvider(string secretName)
{
    AzureServiceTokenProvider tokenProvider = new AzureServiceTokenProvider();
    var keyVault = new KeyVaultClient(new KeyVaultClient.AuthenticationCallback(tokenProvider.KeyVaultTokenCallback));
    var secretResult = keyVault.GetSecretAsync($"https://myacidemovault.vault.azure.net", secretName).Result;

    return secretResult.Value;
}
If we want to use Option 2, as this post originally described, we can call it like this:
// Option 2 (Manually obtaining token..)
var secretValueOption2 = GetSecretFromKeyVault_ManuallyGettingToken(secretName);
The method for getting the token:
private static string GetSecretFromKeyVault_ManuallyGettingToken(string secretName)
{
    var keyVault = new KeyVaultClient(GetAccessTokenAsync);
    var secretResult = keyVault.GetSecretAsync($"https://myacidemovault.vault.azure.net", secretName).Result;

    return secretResult.Value;
}
Notes:
- Using the KeyVaultClient from the nuget makes this a breeze.
- I've hardcoded my Key Vault path, but you can change this to whatever you want - or make it more dynamic with environment variables, etc.
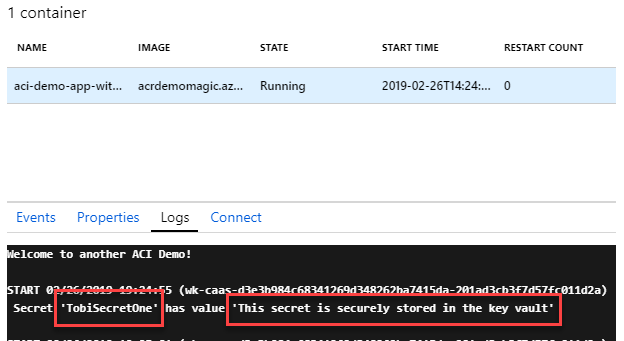
When the code runs, we can see that we get results in the logs. In a production scenario we would never log any type of secrets or credentials; for the PoC in this demo, it helps us to know that it works - without any credentials entered anywhere. It works. 🚀
We have just done a couple of simple yet powerful things:
- Created a managed identity
- Configured the identity to have access to our Key Vault
- Executed code to retrieve the Bearer token for the identity (only works from inside the containers in this group).
- Executed code to retrieve secrets from Key Vault using the Bearer token we just got.
- Not entered, or even viewed a single piece of credential data. No clientId, no secret - the new Service Principal has access, and we handle the rest inside the container.
Summary
This was a fun endeavor. There were some glitches and bumps along the way, but once figuring out exactly how to do these things, it's straight forward and works every time. So there we have it.
Using C# with .NET Core we can now use Azure Managed Identity with our Azure Container Instance groups and avoid have any credentials lying around anywhere. Just like magic, but more reliable.
Docs and links worth noting:
- GitHub: C# Demo Code
- GitHub: YAML definition file used in this article
- ACI - C# .NET Core apps running as containers in ACR
- Services that support managed identities for Azure resources
- Azure Container Instances support in managed identities
- What is managed identities for Azure Resources?
- Azure Instance Metadata service
- NuGet: Microsoft.Azure.Services.AppAuthentication


Recent comments