
Getting started with Office 365 development - Part 2 - Communicate with the Exchange REST API
Table of Contents
In this article we will take a quick look at how you can get started with constructing your own queries to fetch information from Exchange Online hosted in your Office 365 subscription. We will take a look at how you can dig into the REST API’s and how we can fetch the information we require quickly and easily from Exchange Online in Office 365 using a simple ASP.NET MVC web application.
Posts in this series
- Part 1 – Setting up your environment
- Part 2 – Communicate with the Exchange REST API
- Part 3 – Building a sample Web Forms application that integrated with Office 365
- Part 4 – From development to production: Publish your app to Windows Azure Web Sites
Setting the scene
In my previous post I talked about how to setup your environment, and I created a project called Zimmergren.O365.MyContent there, which is a sample application that I will use throughout this article series – check out that post if you need more information on the project type etc.
Investigating the sample code
Before we dig into the Office 365 Exchange REST API’s and create our own application to retrieve information from your inbox, we’ll dig into the existing samples that come with the MVC project using the Office 365 tools (see previous post) and we’ll take a look at what we need to modify in order to fetch the proper information from the service.
In our freshly created sample project, we’ve got the following setup:
View: Mail.cshtml
<span class="citation">@model</span> IEnumerable

@{ ViewBag.Title = "Exchange Sample"; }

<span class="citation">@ViewBag.Title</span>.

### Recent emails

    <tr>
        <th>
            Subject
        </th>
        <th>
            From
        </th>
        <th>
            Received
        </th>
    </tr>

    @{
        //To display dates and times using the user's local timezone:
        //   * On the server-side, calculate the number of milliseconds elapsed since the Date epoch
        //     used by JavaScript.
        //   * In JavaScript, convert the milliseconds to a timezone-aware string.
        DateTime JavaScriptDateEpoch = new DateTime(1970, 1, 1, 0, 0, 0, DateTimeKind.Utc);
    }
    @foreach (var item in Model)
    {
        <tr>
            <td>
                @Html.DisplayFor(modelItem => item.Subject)
            </td>
            <td>
                @Html.DisplayFor(modelItem => item.From.Name)
            </td>
            <td>
                @* Create an empty span, tagged with a "data-datetime" attribute representing the
                   milliseconds since JavaScripts epoch time.
                   A JavaScript function (below) will then convert the attribute into a timezone-aware string. *@
                <span data-datetime="@item.DateTimeReceived.Subtract(JavaScriptDateEpoch).TotalMilliseconds"></span>
            </td>
        </tr>
    }
// Create a URL for retrieving the data:
string[] queryParameters =
{
    "$orderby=DateTimeSent desc",
    "$top=20",
    "$select=Subject,DateTimeReceived,From,Importance,IsRead"
};
File: ExchangeSampleController.cs
/// <summary>
/// Displays recent messages in the user's inbox.
/// Minimal permission required: permission to read users' mail.
/// </summary>
public async Task<ActionResult> Mail()
{
    // Obtain information for communicating with the service:
    Office365ServiceInfo serviceInfo = Office365ServiceInfo.GetExchangeServiceInfo();
    if (!serviceInfo.HasValidAccessToken)
    {
        return Redirect(serviceInfo.GetAuthorizationUrl(Request.Url));
    }

    // Create a URL for retrieving the data:
    string[] queryParameters =
    {
        "$orderby=DateTimeSent desc",
        "$top=20",
        "$select=Subject,DateTimeReceived,From"
    };
    string requestUrl = String.Format(CultureInfo.InvariantCulture,
        "{0}/Me/Inbox/Messages?{1}",
        serviceInfo.ApiEndpoint,
        String.Join("&", queryParameters));

    // Prepare the HTTP request:
    using (HttpClient client = new HttpClient())
    {
        Func<HttpRequestMessage> requestCreator = () =>
        {
            HttpRequestMessage request = new HttpRequestMessage(HttpMethod.Get, requestUrl);
            request.Headers.Add("Accept", "application/json;odata=minimalmetadata");
            return request;
        };

        // Send the request using a helper method, which will add an authorization header to the request,
        // and automatically retry with a new token if the existing one has expired.
        using (HttpResponseMessage response = await Office365CommonController.SendRequestAsync(
            serviceInfo, client, requestCreator))
        {
            // Read the response and deserialize the data:
            string responseString = await response.Content.ReadAsStringAsync();
            if (!response.IsSuccessStatusCode)
            {
                return Office365CommonController.ShowErrorMessage(serviceInfo, responseString);
            }
            var messages = JObject.Parse(responseString)["value"].ToObject<SampleModel.Exchange.Message[]>();

            return View(messages);
        }
    }
}
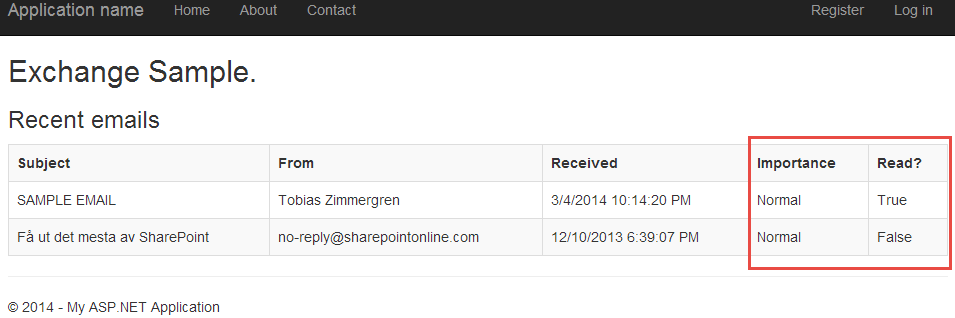
Default sample results
If we just run the sample code without modifying it, and visit the /ExchangeSamples/Mail url in our application, this will be the result:

This is a great sample of how the code can be constructed in order to retrieve these results. However, if we want to modify the above result by for example adding a few properties like “Read/Unread” and “Priority” to the query in order to see how we can fetch more information from the API’s.
Final results when we are done
This is what the final results of our walkthrough will look like:
We simply want to add more fields to our query in this sample to investigate how we can find and fetch information from the Office 365 API’s.
So, keep the final result above in mind, even if it’s a simple one, because the next few sections will explain exactly how you achieve this result.
The next section will discuss how we can explore the Exchange REST API. Keep reading!
Investigating the Exchange REST API references
In order to understand how to add the information we want (Importance, Read/Unread flags like in my picture above), we need to understand how the information is provided and structured. The easiest way to do this is to explore the REST API endpoints directly using a REST tool of choice. My favorite tool is the Chrome-plugin called “Advanced Rest Client”. Read more about this and many other tools in a previous post here.
Finding the REST endpoint that we want
There are a few ways to find the correct REST endpoint. One is to visit MSDN and read their articles on the REST API (recommended), and the other is to investigate where our code is executing the request and copy it from there.
If we dig into the “How to: Work with email by using the Mail REST API” on MSDN, we can see that the API is pretty nice and covers a lot of ground already.
In our sample code provided by the Office 365 extension tools, we see that the request is made through the following call:
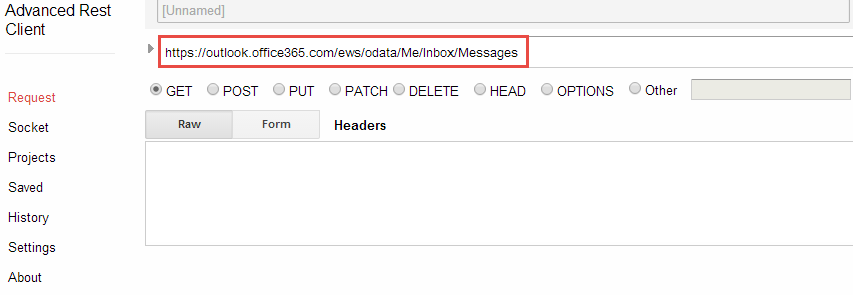
https://outlook.office365.com/ews/odata/Me/Inbox/Messages
Now, if we’re interested in learning more about what comes out of that
REST endpoint we can use the tool of your choice (Advanced Rest Client in Chrome for me..) and just type in that Url like so:
This will yield a result in JSON similar to this, including the highlighted data which is the most interesting to us for now:
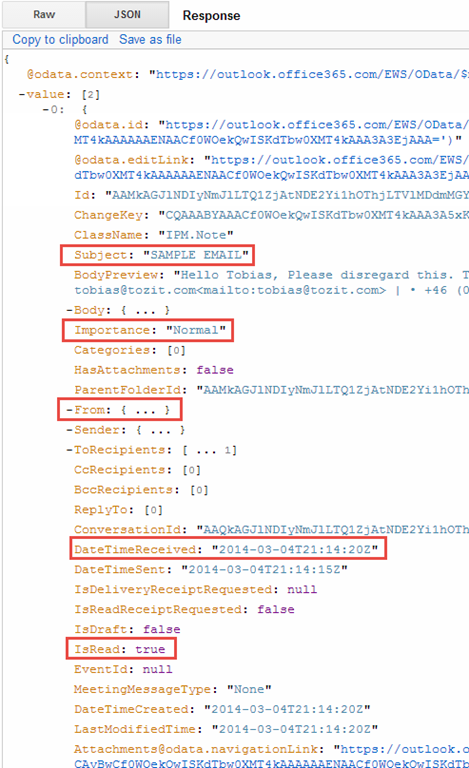
If we take a look at the highlighted properties, we can see that they contain the data we are interested in – and so we have secured what properties/data we need to fetch from our code.
The next step will be to modify the sample code to include the two additional things we want: “Importance” and “IsRead“.
Modify the query, view and controller to include the Importance and IsRead data
We’re almost done. The last thing we need to do is to modify the existing code samples by extending them with the two new fields we want from the REST endpoint.
First, we modify the controller, then the view and then we smile and enjoy the result. Happy times!
Modify ExchangeSampleController.cs
In order to include our two new requirements, we should modify the query parameters for our existing query. This is done very easily but just adding “,Importance,IsRead” to the existing $select statement like this:
Great, so the actual Mail task in the Controller has been modified to fit our requirements. Nothing special happening here.
The second things we need to modify the the placeholder class for our Message-data so it will include thw two new fields:
File: Message.cs
public class Message{ public DateTime DateTimeReceived { get; set; } public Recipient From { get; set; } public string Subject { get; set; }
// Zimmergren: Added the Importance-field to the samplespublic string Importance { get; set; }
// Zimmergren: Added the IsRead-field to the samplespublic string IsRead { get; set; }
}
Modify Mail.cshtml
First, we modify the HTML table to include two new table headers called “Importance” and “Read?”:
Next, we modify the actual foreach-loop in the view to include the same fields:
File: the cshtml
@foreach (var item in Model) {
    <td>
        @Html.DisplayFor(modelItem => item.Subject)
    </td>
    <td>
        @Html.DisplayFor(modelItem => item.From.Name)
    </td>
    <td>
        @* Create an empty span, tagged with a "data-datetime" attribute representing the
            milliseconds since JavaScript's epoch time.
            A JavaScript function (below) will then convert the attribute into a timezone-aware string. <em>@
        <span data-datetime="@item.DateTimeReceived.Subtract(JavaScriptDateEpoch).TotalMilliseconds"></span>
    </td>
    <strong>@</em>zimmergren: Added to the sample<em>@
    <td>@Html.DisplayFor(modelItem => item.Importance)</td>
    @</em>zimmergren: Added to the sample*@
    <td>@Html.DisplayFor(modelItem => item.IsRead)</td></strong>
</tr>

}
Okay, so we’ve added the last few lines there with the two new properties to match the updated model we’re using. This should be enough to collect the e-mails and include the two new fields.
After dropping myself a few new sample-emails we can see that the application works and it’s reflecting the changes as expected, including the importance/read flags:
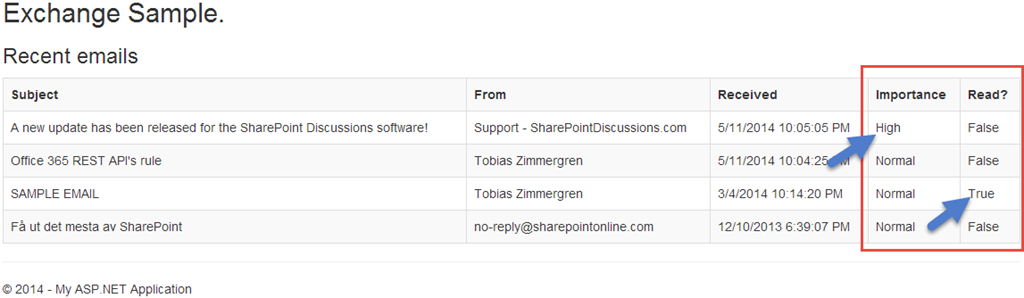
Pow!
Summary
This post should give you enough information to get started with the new Office 365 API’s for Exchange including ways to explore the REST API and modify the code to reflect our changes. We haven’t done anything fancy yet, but this should serve as a plate for future modifications – now we know how it works.
This concludes part 2 in this article series, keep an eye out for the next few articles in the series.
Enjoy!


Recent comments