Integrate SharePoint Code Analysis Framework (SPCAF) in your TeamCity build configurations–Improving your SharePoint and Office 365 ALM
Previously I’ve written an article about “Automating SharePoint Development – Iterative Development Process” which is essentially just scraping the surface of ALM in SharePoint. In that article I mention the use of SPCAF as a code quality tool for SharePoint.
Since there’s been a lot of people asking how to integrate it into TeamCity, I thought I’d draft up a how-to article about it.
Introduction
So, let’s kick this off.
SPCAF is also known by its full name “SharePoint Code Analysis Framework” and is a tool for securing the quality and reliability in your Apps and Solutions.
My friend and fellow SharePoint MVP Matthias Einig created the tool many years back, and I have followed its development since. Now it has become a full-feathered code quality tool for SharePoint Apps and Solutions, which I use in most of my projects today.
In order to make things easy I don’t have every developer install SPCAF on their dev-machines every time, but I integrate the Server-version of SPCAF into my build ALM processes. In some of my projects I’m using TFS Build and in some projects I’m using TeamCity.
This article will guide you though integrating SPCAF Server edition (using the PowerShell extensions) with TeamCity specifically.
With this integration we can add an overview and summary of the code quality which will be reported to the build log. Additionally the SPCAF reports can be generated and you can add build steps to easily copy these reports to a specific folder on the build server, to a network share or somewhere else that fits your requirements.
What can you expect from this article?
By following along with the steps in this article you’ll learn how to configure TeamCity to use the SPCAF PowerShell version in order to run analysis and collect the reports.
We will look at:
- Where to find SPCAF PowerShell
- Collecting the SPCAF PowerShell files in your source control as a Visual Studio Solution
- Configure TeamCity and add a PowerShell build step to your build configuration
- Run analysis with parameters that suit your specific project and build environment
- Automatically fail the build if there are any Critical Errors
- This is configurable and only your own team can decide what these rules would be for your specific projects.
Pre-requisites
- You need a TeamCity build server available and configured for packaging SharePoint Projects (More on this can be found here)
- You must already have basic knowledge of how to administer TeamCity and create and manage your build configurations.
- You need Visual Studio and a source control system where your projects are located.
- Basic knowledge of PowerShell is recommended if you want to make changes to the scripts to work with specifics in your own environments.
How To: Configure TeamCity to run the SPCAF PowerShell cmdlet
To run SPCAF through TeamCity, we’ll be focusing on the PowerShell cmdlet because it gives us full flexibility of the output and post-processing and can easily be extended with your own custom requirements.
Note: You do not need to install SPCAF on the build server! The SPCAF PowerShell assembly is pulled on each build from source control to avoid installing them on the build machines. By doing this they can be updated centrally in source control when a new SPCAF version is released and you can assure that all build servers are always using the latest version of SPCAF.
Step 1: Download SPCAF PowerShell
In order to start, we need to download the SPCAF PowerShell cmdets.
- Download the latest SPCAF PowerShell release from here: https://gallery.technet.microsoft.com/SharePoint-Code-Analysis-0ae4227e - Save it and extract the files to a temporary location on your development machine. - Example: C:-PSWe will add these files to a new Visual Studio solution in a later step.
Step 2: Save your license file
In order for the SPCAF PowerShell version to give you full functionality an SPCAF Server license is required. When you have a Server license you will also have a License.lic file which contains your license key.
- Save your license file into the same temporary folder as you saved the SPCAF PowerShell files - Example: C:-PS.lic
Step 3: Download SPCAF.TeamCity.ps1
As a helper script, there is a SPCAF.TeamCity.ps1 file available for download which will aid us in executing SPCAF from TeamCity.
- Download the file from here - Save it to the same temporary folder as you saved the other files - Example: C:-PS.TeamCity.ps1
Step 4: Setup a new SPCAF Visual Studio solution
After we’ve downloaded the files we need, we’ll create an empty Visual Studio solution and add the files to it and have it checked into our source control system.
Note: This project is not a requirement for running SPCAF PowerShell, but is a requirement for this walkthrough because we want to centrally manage the binaries of SPCAF so we don’t have to install it on the build servers. You could just add them directly to your source control as well, but I tend to like having them in Visual Studio for easy edit of the PowerShell scripts and simple replacement of the binary files.
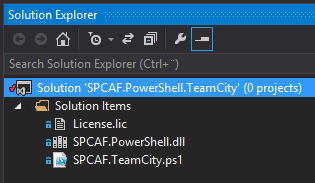
- Create an Empty Solution in Visual Studio and add all the files from your temporary location to it (for example all the files from C:-PS). It should look similar to this:
[ et/content/images/2015/04/image.png)
Note: You’ll have the License.lic file, the SPCAF.PowerShell.dll file and a file called SPCAF.TeamCity.ps1
- Check it into your source control system!
Optional Step: Add custom rules to your existing SharePoint solutions
An optional step is to also modify what rules are executed during analysis. A good practice if you have many different project is to modify exactly what rules will be run for your specific solutions and projects, and keep the ruleset files in your actual SharePoint project. Reasoning behind this is of course that most projects will use different rules and configurations.
Tip: I’m adding a .spruleset files to my actual SharePoint solution as seen below. This way I can pass the path to this file in from my build configuration in TeamCity and execute these custom rules for this specific project. Since I do the same thing with my other projects, I can simply just change the parameter in TeamCity to point to a different file if needed.
[ et/content/images/2015/04/image1.png)
Note: If you want to make this more automated, you could modify the powershell script to automatically look for any .spruleset files and just pass the name of the file through the script. That would require some PowerShell modifications though and is a task you will have to do yourself.
Step 5: Configure TeamCity
When we have reached this point, we already have checked in the required files for running the SPCAF PowerShell version and we’ll start configuring TeamCity to utilize these files when building our SharePoint project.
Create a new TeamCity build configuration
In order to demonstrate all the required steps I will walk through how to setup a new build configuration for your build project in TeamCity and configure it according to our requirements.
Important: It is already a pre-requisite to have knowledge of how to setup a basic Build Project and have it configured to your source control system. The following steps will create a new build configuration in one of your existing build projects. If you do not have a project, please create one first and connect it to your source control system – then continue with the steps below.
All the steps below are performed from the TeamCity web interface.
- In the General Settings, click Create build configuration - Enter a name and description. I have entered the following:
[ et/content/images/2015/04/image2.png) - Click Create - (pre-requisite) In the next dialog you need to attach it to your VCS (source control). Since you should already have a project in TeamCity, you should be able to just attach it to the same VCS. If not you will need to create a connection to your VCS first – make sure you have that configured and then continue. - Click on Build Steps in the left navigation of your build configuration, here:
[ et/content/images/2015/04/image3.png) - Click Add build step andselect Visual Studio (sln) as the runner type. This enables us to build a Visual Studio solution with our SharePoint code:
[ et/content/images/2015/04/image4.png)
Note**: (1) is the name of your build step, it can be anything. (2) is the path to the .sln file you want to build. You may use the tree-icon to the right to browse to it. (3) is where you select what version of Visual Studio should be built and (4) is required in order to tell the build engine that it should also package the projects, which will generate the .wsp/.app packages etc.
- Click **Save** - Click on Triggers in the left menu - Click Add new trigger - Select Schedule Trigger and make sure you enter the details of when you want the build to run. I have configured mine like this:
[ et/content/images/2015/04/image5.png) - In order to test and make sure our build can actually generate our .wsp packages from the project, click the Run button at the top right, like so:
[ et/content/images/2015/04/image6.png) - Verify in the build log that your build step works. It should have generated your .wsp package for you. You can either see that in the working directory or in the build log.Should your build fail at this point, you need to review your build log in order to verify what happened. If everything works as expected, continue to the next step in order to add a build step for the SPCAF PowerShell cmdlet.
Add Build Step: Run SPCAF PowerShell
In order to successfully integrate SPCAF using the PowerShell cmdlet into TeamCity, we’ll be adding another build step to run a custom PowerShell script (the script you added to the project in the beginning of this article).
- Start by going back to Build steps and click Add build step - Select PowerShell from the drop down list. This enables us to run a PowerShell file or script block when our solution has been packaged:
[ et/content/images/2015/04/image7.png)Note: (1) should be PowerShell. (2) is the platform target and should be x64. (3) is the location of the Script-file you already have checked in from the beginning of this article. (4) tells TeamCity that we want to run a file and not just a script block. (5) are the arguments that will be passed in from TeamCity to the PowerShell Script. See more about the arguments below.###### PowerShell arguments
The arguments that we’re passing to the script are mandatory and needs to be implemented in the same order as I describe here. Here’s a description of the parameters in the sample-script.
|---------------------|--------------------------------------------------------------------------------------------------------------------------------------------------------------------------------------------------------------------------------------------------------------------------------------------------------------|-------------------------------------------------------------------------------|
| Parameter name | Description | Example value |
| CheckoutDirectory | This should be the root of the TeamCity working directory, and must be passed in when calling the script (see the previous steps) | %teamcity.build.checkoutDir% |
| SPCAFLocation | Relative to CheckoutDirectory, this is the location of the SPCAF.PowerShell.dll binary file. In my previous steps I’ve added it to a solution in my source control repository for easy access. | SPCAF.PowerShell.TeamCity |
| LicenseFileLocation | Relative to the CheckoutDirectory, this is the path and filename of the License file (.lic), also added in a previous step. | SPCAF.PowerShell.TeamCity.lic |
| SourceFileInput | Relative to the CheckoutDirectory, this is the location of the source files to analyze (.wsp, .app, .dll, .exe etc). | SPCAF.SupressedWarningSample
SPCAF.SupressedWarningSample |
| ReportOutput | An absolute path for the report output. In my example I’ve used C:, where my TeamCity agent has permission to modify and add files. You could alternatively make some slight modifications to the script and use a Dropbox location, UNC Network Share or other method of your liking to output the reports. | C: |
| ReportFormats | The Report formats to generate. One or more of the following needs to be added, separated by commas: HTML,PDF,DOCX,XML,CSV,DGML | HTML,XML,PDF |
| CustomRulesetFile | Relative to the CheckoutDirectory, this is where you specify the path to any custom .ruleset file you want to use for analysis.
(This can be an empty string, in which case the default ExtendedRules will be run) | “ “ (whitespace string for empty value) or the path to a custom ruleset file. |
Note: this script and the passed parameters can and should be adjusted to your own environment. The PowerShell script can easily be modified and checked into source control in order for new changes to take effect – just remember that if you modify the parameters you’ll need to update them in TeamCity as well.
Note: The values passed from TeamCity to the PowerShell script are examples and could (should) be modified and customized according to your own requirements. Since we’re using the PowerShell approach, we can extend and modify any type of post-analysis processing exactly to our needs.
Here’s the actual PowerShell script for your reference:
```
File: Zimmergren.SPCAF.TeamCity.ps1
<#
.SYNOPSIS SPCAF Integration with Team City build server. This powershell file is designed to be run from Jetbrains TeamCity build server in order to add SPCAF integration. Please use this script as a guidance for configuring your own builds with TeamCity. Alternations and customizations to your organizational needs may be required in order to fit your environments. .NOTES Author: TOBIAS ZIMMERGREN (@zimmergren) Date: March 31, 2015. Updated: -- Updated by: --
param
( [Parameter(Mandatory=$true)] [string] $CheckoutDirectory = $null, # This should be the Root of the TeamCity working directory [Parameter(Mandatory=$true)] [string] $SPCAFLocation = $null, # Relative to the CheckoutDirectory root: The location of the SPCAF.powershell.dll file [Parameter(Mandatory=$true)] [string] $LicenseFileLocation = $null, # Relative to the CheckoutDirectory root: The path and filename of the license file [Parameter(Mandatory=$true)] [string] $SourceFileInput = $null, # Relative to the CheckoutDirectory root: The location of the source files to analyze (.wsp, .app, etc) [Parameter(Mandatory=$true)] [string] $ReportOutput = $null, # Absolute path for Reports (UNC for network share, a dropbox folder, a local filesystem folder etc). [Parameter(Mandatory=$true)] [String] $ReportFormats = $null, # The Report Formats (One or more of these HTML, PDF, DOCX, XML, CSV, DGML) [Parameter(Mandatory=$true)] [string] $CustomRulesetFile = $null # Relative to the CheckoutDirectory root: If you want to use a custom ruleset, this parameter needs to be configured )
$ErrorActionPreference = "Stop"
Try
{ # CheckoutDirectory must contain the checkout directory from TeamCity build server. if ([string]::IsNullOrEmpty($CheckoutDirectory)) { # # # # # # # # # # # # # # # # # # # # # # # # # SPCAF PARAMETER CONFIGURATION STARTS HERE # # # # # # # # # # # # # # # # # # # # # # # # #
    # SPCAF PowerShell Cmdlet takes an array of parameters matching this design. Let's initiate the array with empty values and populate it further down in the script.
    $params = @{
        InputFiles = @()
        OutputFile = ""
        Reports = @()
        LicenseFiles = @()
        Timeout = 0
        LogFile = ""
        SettingsFile = ""
    };

    # Add input files to the parameter array. This value comes from the TeamCity build agent when running the build, and should contain the path (relative to the root) of the files to analyze
    if(![string]::IsNullOrEmpty($SourceFileInput))
    {
        $InputFiles = "$($CheckoutDirectory)\$($SourceFileInput)"
        $params.InputFiles = $InputFiles;
    }

    # Add the path (relative to the root) to your License file.
    if(![string]::IsNullOrEmpty($LicenseFileLocation))
    {
        $LicenseFiles = "$($CheckoutDirectory)\$($LicenseFileLocation)"
        $params.LicenseFiles = $LicenseFiles;
    }
    else
    {
        $params.LicenseFiles = $null;
    }

    # Configure the parameters to include the reports you've specified in the TeamCity build configuration
    if(![string]::IsNullOrEmpty($ReportFormats))
    {
        [string[]]$reportArray = $ReportFormats.Split(',',[System.StringSplitOptions]::RemoveEmptyEntries)
        $params.Reports = $reportArray
    }

    # Add the settings file location. This is the path (relative to the root) of your .spruleset file.
    if(![string]::IsNullOrEmpty($CustomRulesetFile))
    {
        $SettingsFile = "$($CheckoutDirectory)\$($CustomRulesetFile)"
        $params.SettingsFile = $SettingsFile;
    }

    # Format and add the OutputFile location.
    # In this example, I'm using a fixed location (C:\Reports) which is passed in from the build server.
    # You can, and should, adjust this according to your own requirements.
    if(![string]::IsNullOrEmpty($ReportOutput))
    {
        $DateStamp = $(get-date -f "yyyyMMdd-HHmmss");
        $reportFolder = "$($ReportOutput)\$($DateStamp)_SPCAFReports"
        New-Item -ItemType directory -Path "$($reportFolder)"

        # This will create a new folder (named for example 20150401-170631_SPCAFReports) inside the specified report folder, and all output files will land in that folder.
        $params.OutputFile = "$reportFolder";
    }

    # Specify the path to the SPCAF PowerShell binary file, relative to the root.
    if(![string]::IsNullOrEmpty($SPCAFLocation))
    {
        $binaryLocation = "$($CheckoutDirectory)\$($SPCAFLocation)"
    }

    # # # # # # # # # # # # # # # # #
    # SPCAF INVOCATION STARTS HERE  #
    # # # # # # # # # # # # # # # # #

    # The path to the SPCAF PowerShell Binaries.
    Import-Module "$binaryLocation\SPCAF.PowerShell.dll"

    # Invoke SPCAF Code Analysis PowerShell cmdlet using the arguments configured previously in this script.
    Invoke-SPCAFCodeAnalysis @params -Verbose:$true;

    # # # # # # # # # # # # # # # # # # # # # # # # # # # #
    # POST-PROCESSING AND TEAM CITY BUILD FAILURE OUTPUT  #
    # # # # # # # # # # # # # # # # # # # # # # # # # # # #

    # The path to the file containing the summary, including the count of errors (these files are now in the SPCAF output directory).
    $rulesOutputXmlFile = "$($reportFolder)\SPCAFResult_Rules.xml"
$ruleXmlOutFile = Get-Content $rulesOutputXmlFile
    # Fetch the amount of Errors from the analysis
    $totalErrors = $ruleXmlOutFile.RulesReport.Summary.Errors;

    # Fetch the amount of Critical Errors from the analysis
    $totalCriticalErrors = $ruleXmlOutFile.RulesReport.Summary.CriticalErrors;

    # Let TeamCity know how many occurances of errors we found during analysis.
    Write-Host "SPCAF CRITICAL ERRORS FOUND: $totalCriticalErrors"
    Write-Host "SPCAF ERRORS FOUND: $totalErrors"
}
else
{
    Write-Host "Checkout Directory is null...." -ForegroundColor Red
}
} Catch
{ Write-Host $_.Exception.Message Break } ```
#### Add Build Failue Conditions
In the PowerShell script there’s two statements near the end which outputs to the pipeline whether or not any occurrences of Error or CriticalError has been found during analysis.
These statements look like this in the script:
Write-Host “SPCAF CRITICAL ERRORS FOUND: $totalCriticalErrors”
Write-Host “SPCAF ERRORS FOUND: $totalErrors”
Since we’re writing that to the PowerShell pipeline, TeamCity can pick this up and perform actions on them according to your requirements.
In this example, I’m adding a Build Failure Condition if any Critical Errors are reported, hence failing the build entirely.
Select to Edit you Build Configuration Settings and from there click the “Failure Conditions”:
[ et/content/images/2015/04/image8.png)
Then click the “Add failure condition”****and specify what your conditions are:
[ et/content/images/2015/04/image9.png)
Make sure the first text box reads exactly as above. You can put any text you want in the second box (Failure message), which will then be displayed in the log and build history of the failed build.
When you’ve saved the failure condition, it could look like this if your build fails due to SPCAF Critical Errors:
[ et/content/images/2015/04/image10.png)
Review report location
In this example, I’ve configured C:as my destination folder on the build server. That is to make it easy during configuration. You could of course change it to a network path instead, making the reports accessible from your normal computers as well, or to dropbox and have them automatically upload to a shared dropbox folder. The possibilities are endless since we do everything from PowerShell.
In order to make sure we can actually review the reports after a failed (or successful) build, go to your report location and verify that there’s a folder which corresponds to the build time and date:
[ et/content/images/2015/04/image11.png)
Inside that folder you will find all the generated reports, ready for review:
Note if you had enabled more report types, they would have been added here automatically when the analysis is run.
Note you may want to change the formatting of the folders and report names. This is all done from inside the PowerShell script and can be modified to your own likings.
Tip! If you want to include the Build Number in the folder name, you could pass that parameter from TeamCity down to the PowerShell script, and have it included when creating the folder. This would ensure that you review the exact reports from a given build!
Summary
SharePoint Code Analysis is important. Hopefully this post have given you some insights to how “easy” it is to get SPCAF up and running with Team City in order to automate code quality checks. Since I’m doing this with SPCAF PowerShell edition, you could of course run the same type of implementation in other scenarios as well – this is not bound to TeamCity.
Here are some useful links related to what we just discussed:
- SPCAF homepage - SPCAF PowerShell edition - TeamCity build server - Automating SharePoint Development – Iterative Development Process


%20in%20your%20TeamCity%20build%20configurations%26ndash%3BImproving%20your%20SharePoint%20and%20Office%20365%20ALM)
Recent comments