SP 2013: Using the JSLink property to change the way your field or views are rendered in SharePoint 2013
Table of Contents
Recently I’ve had the pleasure of upgrading a few SharePoint 2010 solutions to SharePoint 2013. One of the things that comes up in literally every project I’m involved in is the ability to quickly and easily change how a list is rendered. More specifically how the fields in that list should be displayed.
Luckily in SharePoint 2013, Microsoft have extended the SPField with a new proprety called JSLink which is a JavaScript Link property. There’s a JSLink property on the SPField class as well as a "JS Link" property on for example List View Web Parts. If we specify this property and point to a custom JavaScript file, we can have SharePoint render our fields in a certain way. We can also tell for example our List View Web Parts to point to a specific JavaScript file, so they’re also extended with the JS Link property.
In this blog post I’ll briefly explain what the "JS Link" for a List View Web Part can look like and how you can set the property using PowerShell, C# and in the UI. I’ll also mention ways to set the SPField JSLink property, should you want to use that.
Final results
If you follow along with this article, you should be able to render a similar result to this view in a normal Task List in SharePoint 2013:
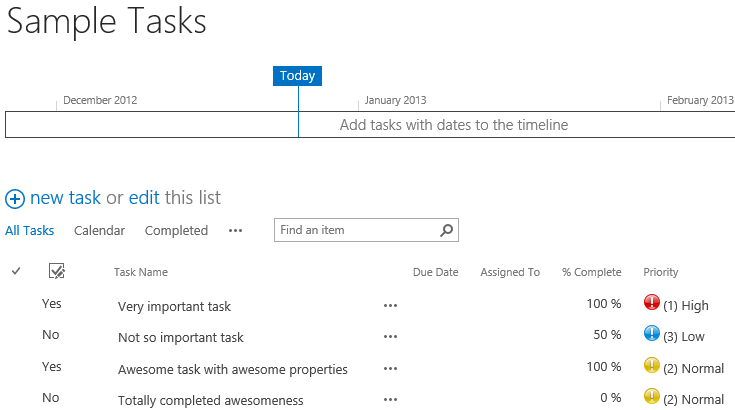
You can see that the only modification I’ve made right now is to display an icon displaying the importance of the task. Red icons for High Priority and Blue and Yellow for Low and Medium.
Since it’s all based on JavaScript and we’re fully in control of the rendering, we could also change the rendering to look something like this, should we want to:
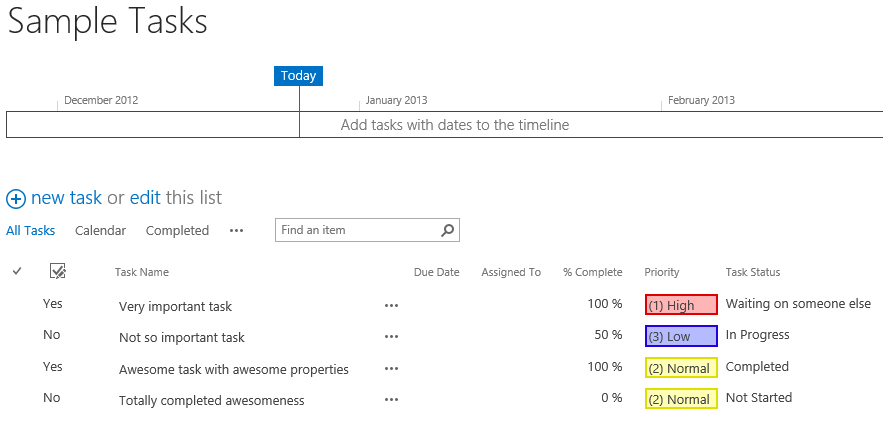
As you’ve may have noticed I haven’t put down a lot of effort on styling these elements – but you could easily put some nicer styling on these elements through the JavaScript either by hooking up a CSS file or by using inline/embedded styles.
Configuring the JSLink properties
Okay all of what just happened sounds cool and all. But where do I actually configure this property?
Set the JS Link property on a List View Web Part
If you just want to modify an existing list with a custom rendering template, you can specify the JSLink property of any existing list by modifying it’s Web Part Properties and configure the "JS Link" property, like this:
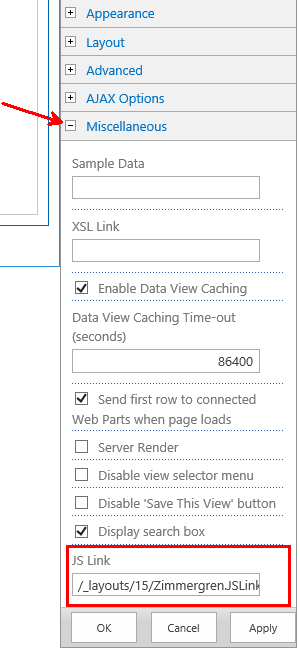
If you configure the aforementioned property on the List View Web Part your list will automatically load your custom JavaScript file upon rendering.
Set the SPField.JSLink property in the Field XML definition
If you are creating your own field, you can modify the Field XML and have the property set through the definition like this:
Set the SPField.JSLink property using the Server-Side Object Model
Simply set the SPField.JSLink property like this. Please note that this code was executed from a Console Application, hence the instantiation of a new SPSite object:
using (SPSite site = new SPSite("http://tozit-sp:2015"))
{
    SPWeb web = site.RootWeb;
    SPField taskPriorityField = web.Fields["Priority"];
    taskPriorityField.JSLink = "/_layouts/15/Zimmergren.JSLinkSample/AwesomeFile.js";
    taskPriorityField.Update(true);
}
If you’re the PowerShell-kind-of-guy-or-gal (and you should be, if you’re working with SharePoint…) then you may find the following simple snippets interesting, as they should come in handy soon enough.
PowerShell: Configure the JSLink property of an SPField
$web = Get-SPWeb "http://tozit-sp:2015"
$field = $web.Fields["Priority"]
$field.JSLink = "/_layouts/15/Zimmergren.JSLinkSample/Awesomeness.js"
field.Update(true)
PowerShell: Configure the JSLink property of a Web Part
Note that this is what I’ve been doing in the sample code later on – I’m not setting a custom JSLink for the actual SPField, I’m setting it for the List View Web Part.
$web = Get-SPWeb "http://tozit-sp:2015"
$webPartPage = "/Lists/Sample%20Tasks/AllItems.aspx"
$file = web.GetFile(webPartPage)
$file.CheckOut()

$webPartManager = web.GetLimitedWebPartManager(webPartPage,
[System.Web.UI.WebControls.WebParts.PersonalizationScope]::Shared)
$webpart = $webPartManager.WebParts[0]
$webpart.JSLink = "/_layouts/15/Zimmergren.JSLinkSample/Awesomeness.js"

webPartManager.SaveChanges(webpart)

$file.CheckIn("Awesomeness has been delivered")
As you can see in the PowerShell snippet above we’re picking out a specific page (a Web Part page in a list in my case) and picks out the first Web Part (since I know I only have one Web Part on my page) and set the JS Link property there. This will result in the Web Part getting the proper link set and can now utilize the code in your custom javascript file to render the results.
So what does the JS Link JavaScript logic look like?
Okay, so I’ve seen a few ways to modify the JS Link property of a list or a field. But we still haven’t looked at how the actual JavaScript works or what it can look like. So let’s take a quick look at what it could look like for a List View Web Part rendering our items:
// Create a namespace for our functions so we don't collide with anything else
var zimmergrenSample = zimmergrenSample || {};

// Create a function for customizing the Field Rendering of our fields
zimmergrenSample.CustomizeFieldRendering = function () {
    var fieldJsLinkOverride = {};
    fieldJsLinkOverride.Templates = {};
    fieldJsLinkOverride.Templates.Fields =
    {
        // Make sure the Priority field view gets hooked up to the GetPriorityFieldIcon method defined below
        'Priority':
        {
            'View': zimmergrenSample.GetPriorityFieldIcon
        }
    };

    // Register the rendering template
    SPClientTemplates.TemplateManager.RegisterTemplateOverrides(fieldJsLinkOverride);
};

// Create a function for getting the Priority Field Icon value (called from the first method)
zimmergrenSample.GetPriorityFieldIcon = function (ctx)
{
    var priority = ctx.CurrentItem.Priority;

    // In the following section we simply determine what the rendered html output should be. In my case I'm setting an icon.
    if (priority.indexOf("(1) High") != -1)
    {
        return "<img src='/_layouts/15/images/Zimmergren.JSLinkSample/HighPrioritySmall.png' /> " + priority;
    }

    if (priority.indexOf("(2) Normal") != -1)
    {
        return "<img src='/_layouts/15/images/Zimmergren.JSLinkSample/NormalPrioritySmall.png' /> " + priority;
    }
    if (priority.indexOf("(3) Low") != -1)
    {
        return "<img src='/_layouts/15/images/Zimmergren.JSLinkSample/LowPrioritySmall.png' /> " + priority;
    }

    return ctx.CurrentItem.Priority;
};
With the above script, we’ve simply told our field (Priority) that when it’s rendered it should look format the output HTML according to the contents in my methods. In this case we’re simply making a very simple replacement of text with image to visually indicate the importance of the task.
Summary
With a few simple steps (essentially just a JavaScript file and a property on the LVWP or Field) we’ve changed how a list is rendering its data. I’d say that the sky is the limit and I’ve already had one of my clients implement a solution using a custom JS Link to format a set of specific lists they have. What’s even better is that it’s so simple to do, we don’t even have to do a deployment of a new package if we don’t want to.
The reason I’ve chosen to do a Farm Solution (hence the /_layouts paths you see in the url’s) is that most of my clients still run Farm Solutions – and will be running them for a long time to come. And it wraps up a nice package for us to deploy globally in the farm, and then simply have a quick PowerShell script change the properties of the LVWP’s we want to modify and that’ll be that. Easy as 1-2-3.
Enjoy.


Recent comments