Automating SharePoint Development - Iterative Development Process
When dealing with SharePoint development, there’s tons of things to consider. There’s the aspects of code quality, aspects of proficient testing taking place and of course having a reliable process to re-do and fix anything that comes up along the way. Most importantly in my opinion is to not do all iterative work manually over and over. Most of these things are part of any common ALM (Application Lifecycle Management) cycles in a modern-day development team. In this article I’ll talk briefly about how I’ve set up most of my recent projects with routines for the daily iterative development work. This includes Continuous Integration, Nightly Builds, Automated SharePoint Deployments and Automated UI testing. Pretty slick.
Background: Why automate?
One of the most common questions I’m getting today when I introduce the concept of code and deployment automation is "Why?". Why would you invest time to set up an automated environment for iterative builds, deployment and automated tests? For obvious reasons (to me) I shouldn’t need to answer that question because the answer lies within the question itself. That’s just the point – it’s automated and you don’t have to do it yourself over, and over, and over.. and over and over and over again!
As a quick go-to-guide for automation benefits, this should make do:
- Continuously finding problems and fixing them in time.
- Revert the entire code base back to a state where it was working, in case trouble arises.
- Early warnings of things that could be a potential danger to the success of the project.
- Frequent check-in policies forces developers to validate their code more often.
- We can iteratively have an up-to-date testing environment for stakeholders to verify our work continuously.
- Automate testing by PowerShell.
- Automate UI Testing.
- Etc etc etc.
The list can grow pretty long, and I’ll try to cover a pro/con list of things to consider in the ALM process, but for now I think it’s important to focus on what’s important for your team. For me and my teams the most important thing is to make the processes more efficient and managing some of the daily tasks automatically. In one of my latest projects I’ve taken the time to enforce a new type of development routine for the team which did not exist before – an iterative development process. This has been key to our development in the upgraded SharePoint solutions where we’ve upgraded older projects from SharePoint 2010 to SharePoint 2013.
See my previous article about Iterative Upgrade Process. It discusses another type of automation that I set up – namely a full SharePoint 2010 to SharePoint 2013 upgrade – every week – before the real upgrade finally approaches.
So if the "why’s" are clear, let’s move on to an overview of what the process could look like.
Implementation: How are we enforcing code- and test automation?
First of all, our main process of automatic development looks something like this:
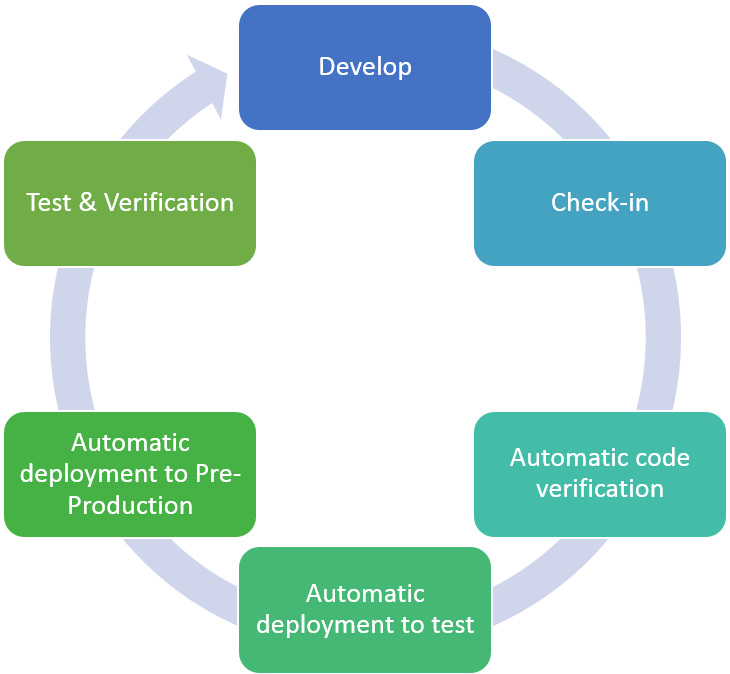
This is similar to one of the processes I’ve introduced in one of my projects, but as always it’s individual for each project and can vary quite widely with your requirements and setups. Once we’ve done enough iterations and fixes in this simple ALM cycle, we move on to pushing this out to the production environments. But before we get into that, let’s break these steps down a bit:
Develop
During the development phase we focus on getting things done .Taking the collected requirements, nailing them down into a technical implementation and finally checking the code into our code repository. This is the first step of the technical ALM cycle where we actually start to implement the code to fulfill the requirements. But it can also be the last step in the cycle, where bugs have been reported in the "Test & Verification" step, resulting in additional code fixes – which causes the cycle to start all over. For most people this is common sense, and in most experienced teams there are some type of ALM routines in place.
Check-in
When you commit or check-in your code, we can set up rules for the actual check-in. In my case there’s always a few things I tend to do:
- Build projects and package SharePoint solutions to make sure there’s no basic issues in the project files etc.
- Execute tools to check the quality of the code, for example the SPCAF tool which is doing a good job of analyzing the packages and resources.
- Automatically deploy the new packages to a dev-test farm for quick tests by the developers themselves.
Automatic code verification
So as mentioned in the earlier step, we perform automatic verification of various things in our code and packages. You can use the code analysis tools for this, and the SPCAF tools and so on. I will automatically fail the build instantaneously if there are any errors reported, which will cause the build server to e-mail the entire team saying "the latest build broke, here’s why…". The reason for having the build server notify everyone is of course that we should be aware of any issues that occur due to our recent changes – better have everyone know about it than nobody.
In short, we can perform these types of tasks here:
- Unit Tests (if any)
- Code analysis
- SPCAF analysis for SharePoint artifacts
- etc etc.
Automatic deployment to dev-test farm
When we check-in, we perform a new deployment on the developer test environment, which is a separate farm setup for only the developers to verify their changes and code. Each time a check-in is found in the TFS, we trigger a new deployment to this environment. If a developer is doing tests in the environment for some reason, he/she can flag to the build server that no builds should push any deployments until he/she is done with their tests. Then the build server will pick it up right where it left off before pausing.
Automatic deployment to pre-production farm
After the code is automatically verified and the solution packages are flagged as OK we proceed with deploying the packages to a test environment. This is also a fully automated step but instead of having this triggered on every check-in I’ve chosen to trigger this once per day in my current setup. The reason for this is that we generally want a better uptime on this environment so we can do some actual tests both automatically and manually. I’ve set up rules that first checks that everything went fine when deploying to the dev-test environment. If not, it’ll flag it as a failed build – otherwise it’ll continue to do the full deployment in the pre-production environment as well.
Our pre-production environment is a place where more of the UAT and QA tests happen. We have this environment connected to the proper Domain (AD), proper services and the exact same setup (and even content) as in our production environment. Read more about how we duplicate the content in my previous article, more precisely on the "Copy fresh databases" section.
Summary of the pre-production environment: An almost exact replica of the actual production environment. Proper, life-like tests can be performed here.
Automatic SharePoint & UI Tests
With our coded UI Tests, we can simply record logical tests in the UI from our web browser, have Visual Studio convert these recorded actions into a sequence of commands in C# which then are executed automatically once they are run. We’ve made sure that our build server are executing the UI tests on a remote machine, enabling us to test graphical changes and things in the user interface by automatic measures so we don’t have to do this every time ourselves. This is awesome. I promise this is very, very awesome.
On top of the UI tests that we can have automated, we can also have some logical tests performed by PowerShell. In this step we also conduct generic tests to make sure we can create all types of sites based on our templates, that we can change all settings that we have designed in our applications, that we can create all types of lists and so on. In other words: Automating the boring dirty work that otherwise may be very redundant and you normally fall asleep while doing ;-)
Technicalities: Team City as a build server
All of the aforementioned tasks are things that happen automatically by utilizing a build environment. Personally I am pretty hooked on Team City these days. Best part is that it’s free for up to 20 configurations. Cor blimey!
Why use this specific build server? Some people argue that using a TFS build server is the best, some argue that Jenkins beats all else, some argue that Team City is the most awesome tool in the world and so on. They are all good, and they all serve a purpose. For me, the core benefits of Team City are:
- Installation is done in less than 1 minute (pow!)
- Configuration and setup of new builds is as easy as 1-2-3
- Build agent statistics to keep track of build performance etc.
- It works with multiple version control systems out of the box
TeamCity supports a broad range of version controls out of the box, from the most popular ones to somewhat deprecated but still used systems.
For a single build TeamCity can take source code from several different VCS repositories. You can even mix different types of VCS.
I’m not going to sell you either TeamCity or any other build server, you can just have a look for yourself at the various options there are out there:
- Jetbrains TeamCity
- Microsoft Visual Studio and Team Foundation Server 2013
- Jenkins
My recommendations falls on TeamCity and TFS. It all comes down to where you are, what the projects and budgets look like and what features you’re prone to have included. Some of my projects are on TFS build and some are with TeamCity – most of them in TeamCity actually.
In a future post I might describe in more detail how I’ve technically set everything up for my build environments.
Build Server Configuration: Setting up proper routines
It doesn’t really matter which build server configuration you prefer, as long as it fulfills your requirements. My normal requirements in any type of long-running project for example intranets may look like this:
Continuous Integration
- Configure a trigger to automatically execute a build, package and code analysis on each check-in.
- Deploy to dev-test on each check-in
Nightly Deployment
- Configure a trigger to automatically execute a build, package and code analysis each night.
- Configure a trigger to automatically execute a deployment to dev-test and pre-production each night.
Weekly Deployment
This is a special configuration that doesn’t really tie into just this ALM cycle, but also to my previously described "Iterative Upgrade Process" cycle. Every week in a current project, we’re tearing down the entire SharePoint environment and we’re building it up again automatically and performing an upgrade. This configuration can trigger that full scheme of things, but it can also be used to just deploy all the latest artifacts. Hence, it’s a pretty special step that we manually trigger today in order to keep the chaos to a minimum.
PowerShell Verification Tests & Nightly UI Tests
By using PowerShell to verify that artifacts exist, can be created and seemingly contain the right properties and by using coded UI tests to perform recorded tests of UX interaction tasks, we’re pretty confident that we’re continuously finding out any issues along the way with less manual work.
As always though; The tests are only as good as the person who wrote them – if you create bad tests, the results will be bad. Keep this in mind and don’t just trust the green lights :-)
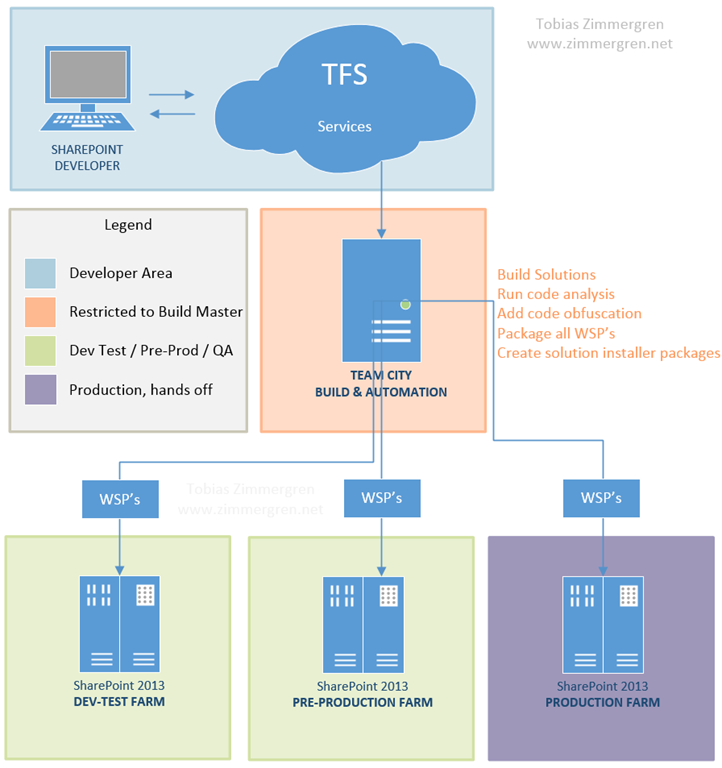
Visual overview: Common setup in my projects
My thoughts are along the lines of "the less work you have to manually do yourself, the more work you get done" which are pretty common if you’re into making routines more efficient. I’ll try to describe from a birds perspective what our routines are technically doing by showing you an awesome visualization of my most common type of setups. Following is an illustration of my setup, and below the illustration I’ll describe each section more precisely:

Description of the legend
In the legend (the gray box) you can see that I’ve marked some of the areas in different colors.
Developer Area is where the devs are playing around. Nobody else are touching those environments.
Build Master Area is where the build master (usually me) and potentially a few more designated build administrators hang out. Nobody else are allowed on this environment – it is strictly locked down to only the few people with the required skillset to configure them. If we make a mistake here, we could easily screw up our deadlines in the projects.
Dev Test Farm is where the developers do their initial tests. A rather simple environment with only one goal: Successfully deploy the packages and activate the required artifacts.
Pre-Production Farm is where the artifacts are deployed right after they are verified in the dev-test environments. When we push things to this environment we enable the business decision makers and product owners to get in the game and finally try out what we’ve created. Normally this means that they perform initial requirement matching (that is; did we create what they wanted) and then we’ll connect parts of the organizations users in order to perform the UAT (User Acceptance Tests) properly. Once that is done, and we’ve iterated the cycles enough times to fix all the bugs (yay!) then we’ll push it on to the production environment.
Production Farm is where everything is going live. This is the real deal, and nobody has any access to this environment except the farm administrators. The exception is that the build environment have permission to remotely deploy SharePoint solution packages and execute the required PowerShell commands in order to successfully (and automatically) ensure that the proper artifacts are deployed in a safe manner. We don’t want to allow people to perform manual deployments here! Hands off please :-)
Summary
Well that’s a short story about what my current ALM adventure looks like. I’ve been rigging up some pretty cool environments lately, and I’m loving every bit of it. The confidence of automation is unbeatable – not to mention how much time we actually save.
I could easily hand any of my clients a presentation saying how many man-hours they’ve saved by investing the hours needed to set this up. Priceless!
In the future I might write about the technical implementation of the build servers and so on, but that’ll be a post for another time.
Enjoy.


Recent comments