Every cycle of SharePoint comes with challenges around upgrades and migrations. In one of my current projects I’ve been part of designing an iterative upgrade process – as I like to call it – which means we’ll be upgrading our Farm (all content databases) from SharePoint 2010 to SharePoint 2013 every week. Yes, that’s right – we upgrade SharePoint 2010 to SharePoint 2013 every single week with the latest content from the production environments. This of course happens on a separate SharePoint 2013 farm setup specifically for this purpose.
In this article I’ll talk about the benefits of my “Iterative Upgrade Process” and what it means in terms of benefits for the teams and people involved with your Intranet, Extranet, Public site or whatever you are using your SharePoint farm for.
Please do note that this is not an article describing the steps to upgrade your SharePoint environment – this is a process for iterative development and iterative testing in environments that we tear down, build up and upgrade from SharePoint 2010 to SharePoint 2013 every week.
Background: Everyone is effected by an upgrade or migration
It’s not uncommon that you bumb into a lot of problems while upgrading your farms from one version to the other. Common problems include customizations, faulty configurations and general bad practices being implemented in the original farm. But for most organizations an upgrade doesn’t “just happen” overnight and then everything works flawlessly – on the contrary there’s always a bunch of problems brought to light that needs to be taken care of.
Working a lot on SharePoint Intranets like I currently do, we often see problems before, during and after upgrades. Not only technical issues that we can handle, but issues with people in the organization not reaching the right information or not being able to perform their daily tasks. This can have very complicated impacts on the organization if the migration fails to run smoothly and everything isn’t up and running after the service windows you’ve specified.
The end-user is affected in terms of downtime and possible being hindered to perform their tasks, which in the end hurts the organization since these guys are the thing that keeps the organization running! The IT-departments (or technical folks in your organization involved with SharePoint) may be affected if the migration or upgrade doesn’t go as planned. The business as a whole relies on the system to be functioning and for every minute or hour that the systems aren’t fully available the organization may loose both time and money.
So in order to minimize any pain in upgrading from one version of SharePoint to another, we need to consider the implications of a troublesome upgrade. With the iterative upgrade process we’ve got in place right now at one of my clients you can test and verify all your changes and customizations and whatever you want to assure the quality of – over and over again before the real deal.
Implementation: How am I doing this?
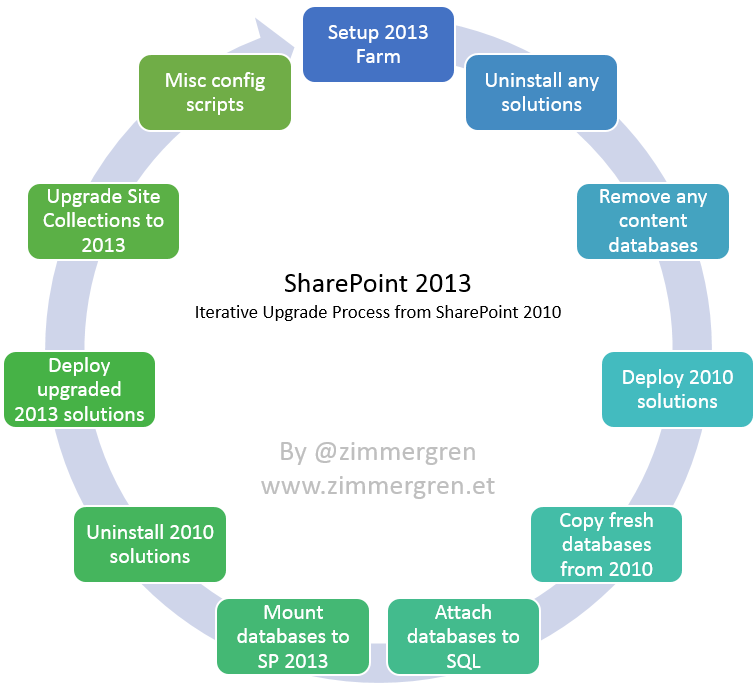
So boiling down the steps included in our iterative upgrade process, gives something similar to this:

In a nutshell this is what the process looks like from a bird perspective, even though some of the steps require extensive amount of preparation-work and time to get done. Below is an explanation of all these steps in more details, to give you an understanding of what this really means.
Setup SP 2013 Farm
The very first step that we need to do is to setup and configure the SharePoint 2013 Farm where our upgraded content will eventually land. In our case we’ve set up this as a one-off configuration, re-using the 2013 farm on every new iteration. You could – as an alternative – argue that it would be beneficial to tear down the entire farm and have it set up again. It would be theoretically possible, but in our specific case it simply doesn’t work that easily – too many dependencies rely on things outside of my and my team’s control.
Uninstall any custom solutions
This step is of course only necessary if you’ve already upgraded at least once in the new farm, then by the time you’ve scheduled your next iterative upgrade you’ll need to uninstall any and all old solutions in order to clean up the farm a bit before we proceed.
Remove any content databases
Again, this step is only necessary if you’ve already upgraded at least once in the new farm. If you have, there’ll be upgraded content databases that you need to get rid off before we commence the process to the next step. We’re doing this with the PowerShell cmdlet Remove-SPContentDatabase.
Deploy SP 2010 Solutions
Deploy your old 2010 solutions. The reason why we would want to do this is that when we later perform the actual mount of the databases, it’s pretty nice if the mounting-process can find the references to the features, web parts and any other resources within those solutions. This is a temporary deployment and the 2010 packages are soon to be removed again.
Copy fresh databases
Next step is to ensure that the SQL Server in our new 2013 farm is up to date with containing the latest content databases from the SharePoint 2010 farm. This is why we’re using Flexclone (described in more detail further down in this article). Actually, Flexclone makes virtual copies which are true clones without demanding additional storage space. Pow! Totally awesome.
Attach databases
After the databases are copied to the SQL Server, we’ll have to attach them to SQL Server as you would normally do.
Mount databases
Next step is where we mount the actual databases to SharePoint. The databases are still in SharePoint 2010 mode, since the copies of our databases comes from the SharePoint 2010 environment. This is why we need to have our 2010 WSP solutions in place before we perform the mount – otherwise reading the mount-logs will be… well, not so fun ;)
We do this with the PowerShell cmdlet Mount-SPContentDatabase.
Uninstall SP 2010 Solutions
When the mounting is done, we’ll need to uninstall the 2010 version of the old solutions and move on to the next step.
Deploy upgraded SP 2013 Solutions
Yay, finally we’re at a much cooler step – deploying SharePoint 2013 solutions. So, to give a little background on what these solutions should be:
You should’ve already upgraded your SharePoint projects to SharePoint 2013 solutions, have them ready to go and use in this step.
Notes: ****This is probably the most time-consuming step if you have custom solutions. Anything you’ve built in SharePoint 2010 and customized there needs to be upgraded to SharePoint 2013 and work there as well. Good thing we’ve got an iterative upgrade process so we can fine-tune this iteratively every day and just hit a button to re-upgrade the farm with the latest builds in our test- and pre-production environments. Yay!
Upgrade-SPSite with all Site Collections
Once the new and freshly upgraded 2013 packages have been deployed, we’ll continue by upgrading the actual Site Collections from SharePoint 2010 mode to SharePoint 2013 mode.
We’ll be using the PowerShell cmdlet Upgrade-SPSite for every one of our Site Collections.
Misc automated configuration scripts
We’ve got a lot of custom scripts getting run after the upgrade, as part of the finalization process of the actual upgrade. This includes custom re-branding scripts, re-creation of My Sites and moving content between old and new My Sites, custom scripts to disable and remove artifacts that aren’t used in SharePoint 2013 projects and solutions anymore, modification to removed or altered Content Types etc etc. The list can be made long – if you’re reading this you’ve probably already understood that each scenario is unique, but this process can be applied to most scenarios with a tweak here and there.
Tools: What tools are we using to make this happen?
Obviously things doesn’t get done by themselves, so I’ve automated much of the process with various tools and techniques, defined below.
Deployment Automation with Team City
There’s tons of ways to automate things in any ALM cycle. Be it a development lifecycle or an infrastructural upgrade lifecycle like this – something to automate the process will be your best bet. Since we’re doing this every week, and the process in itself is pretty complex with plenty of steps that needs to be done properly, I’ve chosen to go with Team City for all of the automation work.
I’ve gotten the question why use Team City instead of TFS Build or Jenkins or any other available build automation tools. Simply put: Team City is free for up to 20 configurations, easy (very very easy) to configure, works with multiple data sources and repositories and it just works – every time. But that’s a discussion for another day.
Database copies with Flexclone
In order to easily get set up with the databases in our environments, we’ve been using Netapp’s Flexclone software very successfully the last year. As quoted from their own website:
[blockquote]NetApp® FlexClone® technology instantly replicates data volumes and datasets as transparent, virtual copies—true clones—without compromising performance or demanding additional storage space.[/blockquote]
So in essence, the usage of Flexclone allows us to with a single click (almost) replace all of the databases in our test- and pre-production environments and get real copies of the actual production environments in a matter of minutes. There’s no denying that this is awesomenss in its true form.
Iterative code upgrades with Visual Studio 2013
In order to maintain and upgrade the new codebase (upgraded from SharePoint 2010), we’re using Visual Studio 2013 like most professional Microsoft-related developers do today. You can use VS 2012 as well, should you like – but do try out 2013 if you can, it’s multiple times faster than previous versions of Visual Studio.
I have pushed hard for implementing a real ALM process in the team, and we’ve finally got that in place and it’s working pretty nicely right now. We’re using TeamCity to automate builds with continuous integration, nightly builds and scheduled and on-demand deployments to our environments. I will cover code automation more thoroughly in another post in the future, as it would be too much info to cover in this single post.
Summary
So this is a process we follow every week. Once a week I tear down the entire SP 2013 test farm and rig up a new snapshot of the databases on the SQL environment. Then I re-iterate this upgrade process (Team City, PowerShell and PowerShell Remoting to the rescue). This means we can literally try what the real upgrade will be like once we get there. Every week. Also we can have a nice agile iterative way of handling bugs that appear in the environments.
Oh yeah, should we break something – we click a button or two and we’ve got a freshly upgraded environment with the latest builds from the SP 2013 dev rigs.
It simplifies the overall process:
- When time comes for the real upgrade, everything including upgraded code base and automated upgrade scripts is in place!
- Find and report errors early in the upgrade process of your project
- Find compatibility errors in code and solutions
- Find out what will upgrade, and what will not upgrade before its too late
- Be confident that once we reach the point of upgrade, we’ve done it so many times already that we know what might go wrong
- The Product Owners, Project Managers, Testers and any other involved people have already verified the state of the system, so once we hit the button in the Production environments – we’re pretty much in a “accepted release” state already.
I hope you enjoyed this little read about my iterative upgrade process. It’s pretty darn good if you ask me – but requires some time to set up initially, but in larger projects it’s definitely worth it!
Enjoy.
Comments are closed
Archived comments
Would love to see a post on your build and deployment automation on this project!
Pranav,
I'm planning on writing something on that topic as well. It's pretty neat and it just works :-)
Cheers,
Tob.
thank you tobias for this. very interesting approach and it seems like a good thing to do before upgrade. we upgraded a couple of weeks ago but we have lots of problems of course because we didnt test it before and did like this. i know better for my next project to do something like what you say here. can you pls post any details about how can we set this up in our environments ourselvs like if we want to automate this for our next implementation? what do we need to set up and how do we start with this? seems very good!!
Hi Yvan,
Thank you for your comments.
Details about setting it up would take forever to write down, but following the steps outlined should get you started. As mentioned in the article as well, it's not a trivial and small task to set up - it takes some time and you'll have to invest both time and resources in getting everything configured properly. Once done, you're set to go and can more reliably tackle the upcoming upgrade.
I've listed some tools needed in the bottom of the article. Foremost I'm using TeamCity for all the automation, then PowerShell scripts and SQL scripts for everything else. And of course Flexclone for the virtual database copies. That's essentially what I've done and it just works.
Can't really get more detailed than that, since it differs for every single project and farm. Feel free to hit me with questions though :-)
Cheers,
Tob.
Thanks for sharing, sounds like a very good and controlled approach to upgrading!
Thank you for reading ;-)
It works very well and we're clearing a ton of bugs or post-upgrade issues every iteration (week) which is a very good. When the time comes, we're pretty certain that the upgrade will run smoothly.
HI Tobias,i followed your step while upgrading from sharepoint 2010 to 2013 . we have bunch of custom solutions and all goes good now. your steps are really helpful for us to complete our upgrade without any issues. but we already had some issues in sharepoint 2010 custom solutions like , some times after application pool recycled in the morning , we are getting system.null reference ,iis sharepoint site stop and start or iisreset helps us to fix this issues . while we are getting system.null reference , and if i try the ~/_layouts/settings.aspx or ~/_layouts/viewlsts.aspx , i could see the sharepoint site without customization . i'm using spmetal to generate the datacontext file and using the linq to get the sharepoint list items in our custom user control . here we are getting issues after application pool recycle. this happens rarely ..in the production . for now i'm using spwakeup to make sure the sites are running good and send us alerts .Appreciate if get any help.
Thankyou.
Rooba
Hi Rooba,
Thank you for your comments. Appreciate it.
As for your problem with null reference exceptions, which seems to potentially be caused by your custom solutions, I would start out by digging into the ULS Logs to find out what is going on. This is a common problem with custom solutions and app pool recycles - it could be memory consumption that gets too high (memory leaks) or it could be timeouts or anything else, but without reading the logs there's really no way for me to aid you from here :-)
Good luck!
Cheers,
Tobias.
Thank you So much Tobias ,for your reply. in all our dev,qa,uat,training environment we have only one web front end servers. production is the one having two web front end servers. also we usually have problem with the server WFE 2. other than prod we don't get any problems . is there anything to do with AAM?. default Url is with WFE01 server name. and extended to the interntet zone with the public url like https://mysharepoint.portal.... I read from this link http://technet.microsoft.co... ,that default zone url should not be a computer name of web front end server. how AAM's should be configured for the two web front servers. we get issues in WFE2 after application pool recycle. stop and starting the site or iisreset helps to resolve the issues. Thanking you once again.
Thanks
Rooba
Hi Rooba,
Honestly I wouldn't know straight from the top of my head without digging into the environment myself. If it fails after every application pool recycle but starts to work after a full IISRESET seems a bit odd - perhaps some warmup-scripts in place would do it?
I think that www.mssharepointforums.com would be a better place to ask these questions to be honest :-)
Cheers,
Tob.
Hi Tobias,
so far now we have setup the sharepoint wakeup scripts to run in both web front end servers.how can i check whether which server is responding for the web request?. can i have a entry in host file on each WFE's pointing to internet zone public url ?. Please advise and appreciate your help.
Thanks
Rooba
Rooba,
You should really post these questions to the MSDN SharePoint forums in order to get adequate replies instead of commenting here on this article, which doesn't quite relate to the problems you are having.
After you've posted your questions on the forums, please post the link here and I'll have a look :-)
Tob.
thx for the post mr tobias. we want to to something that is like this processs but we cant not have the time to fix it. how can we make this process in place fast so we don thave to spend time to implement it because it takes too much time please
Hi Sudarshana,
There's no such thing as a shortcut to the road of success in this case. You have to make details for a plan that works in your scenario and can be implemented with your setup - however there's no fast way to "just do it". Also, it depends on what you mean by "implement it" because "it" can be various things :-) I hope you get it sorted and started :-)
Cheers,
Tobias.
Great Post Tobias, I like the weekly iterative tear down approach. Means you are not "hoping for the best". Hope all is well with you!
Hey Gus,
Nice to see you drop by mate :-)
Thanks for the comment - indeed it's a great routine and the fact that we iteratively check our code and solutions with the latest production content, every single week, makes me a whole lot more confident that we'll succeed in the actual upgrade of the farm.
Cheers bud.
Tob.
Nice Article, Can you also share some insight on SP2013- remediate mode for custom solutions
Hi AJ,
Thank you.
I'd be happy to elaborate, but I need to know more specifically what you are asking?
Thanks,
Tobias.
Hi Tobias,
Thank you for a great guide. I did have a question though - after mounting databases, you have mentioned that we should uninstall old solutions and then install the upgraded VS2013 solutions. In some cases, uninstalling a solution can, for example, corrupt already created lists etc. (if the solution has a list definition for example). How would you suggest we approach this when we can't uninstall an already existing solution. Is using Update-SPSolution good enough?
Thanks
Sulabh.
Hi Sulabh,
Thank you for the comment.
Uplgrade-SPSolution should do the trick to upgrade your solutions to the latest version, but this is unfortunately not an exact science - testing, testing and testing is the most important thing in this process.
I'd urge you to do a test in a test environment to see what happens if you upgrade the definitions to 2013 (as per MSDN official documentation) and then retract the old and deploy the new solution, then perform the upgrade on the site collections. This is what worked best for us, and have worked best in most of our upgrades unless we've chosen to use a third-party migration tool.
So really the final answer would be "it all depends" and "you need to test in your own environment" :-)
As for future development however, here's a few good links to dive into.
- Avoid using XML and definitions, create artifacts by code: http://blogs.msdn.com/b/ves...
- Office 365 Patterns & Practices (works for on-premises too mostly): https://github.com/OfficeDe... (Available as source code or NuGet Package)
- https://github.com/SubPoint... (Source code or NuGet)
Moving forward, all of my development efforts are leaning toward a non-declarative approach using the CSOM (Client Side Object Model) in order to align it with Office 365 at the same time, so when a move to the cloud is approaching we have most of the provisioning code ready-to-go already.
I hope this helps :-)
Tobias.
That makes a lot of sense. The detailed response is much appreciated.
Hi Grimmjow,
Don't mention it; I'm just glad you find the blog helpful :-)
Cheers
Tobias.
Hi Zimmergren,
We have upgraded sharepoint from 2010 to 2013 but in health analyser, we see that there is an error "missing server side dependencies". Should I worry about this? because we have checked and everything is working fine. Is that possible that those missing "Assemblies", "webparts", "features" are being used in 2013 with different GUID's?
Please let me know if you need more information.
Appreciate your help!
Thanks
Abhishek
Hi Abhi,
When running pre-flight checks before upgrading, this should've been indicated as well. Did you run Test-SPContentDatabase for example? It should yield a log with missing dependencies.
Even if things seem to work fine, upgrades, migrations and activation of certain features <or a="" horde="" of="" other="" problems=""> may still occur down the road due to missing dependencies.
Some references existed in 2010 but not in 2013; However I'd make sure that none of your custom solutions have missing dependencies first of all, then fitlter down the remaining and work your way through them.
All-in-all, incomplete upgrades (seemingly OK, but with issues in the logs) leads to problems down the road more often than not.
Cheers,
Tobias.