Getting started with Office 365 development - Part 4 - From development to production: Publish your app to Windows Azure Web Sites
This article is part of a series about “Getting started with Office 365 development”.
- Part 1 – Setting up your environment
- Part 2 – Communicate with the Exchange REST API
- Part 3 – Building a sample Web Forms application that integrated with Office 365
- Part 4 – From development to production: Publish your app to Windows Azure Web Sites
In this article we’ll take a look at how we can publish our application for public access. We will utilize Windows Azure Web Sites and will see how we can do this in a few simple steps in this article. The benefit of publishing your application to Windows Azure is that it’s so extremely easy to get rolling, and in a matter of minutes you’ll be live and “in production” with your applications.
Prerequisites for this guide
First: In order to be able to follow along with these steps you’ll need to have a Windows Azure account set up already so you can publish to Azure Web Sites. For those of you who’s thinking about pricing in Azure to be a problem, think again – you get 10 free azure web sites (see pricing here). If you’re thinking big and need to scale out and up, you’ll need to upgrade from the free sites of course – but to get started this works like a charm.
Second: An Office 365 application to publish. You should check out my previous articles on the topic (see intro of this article for links), and you’ll be able to get an application up and running quickly.
Prepare your application in Visual Studio
Before we can publish our application to Windows Azure and have it publically available, we need to change a few settings and configurations, all detailed below.
Decide on application usage
You can decide how your app should be published and used. If it should be configured for one organization only, or for multiple organizations.
In my case I want the application to be available for anyone who wants to try it out, so I’ll just click “App properties…“in the Services Manager (same place as you add more O365 API’s to your application…):
[ et/content/images/2014/05/image35.png)
In the dialog presented to you, you can now change to “Multiple Organizations” in order for your application to be available to anyone after it’s published:
[ et/content/images/2014/05/image36.png)
Choose where you want to publish
Next up is to choose where we want to publish our application.
First, you right-click on your project and select “Publish” and you’ll be presented with this dialog, where you will click “Windows Azure Web Sites“:
[ et/content/images/2014/05/image37.png)
If you are not logged in already, you’ll be asked to login with your account details – make sure you log in before continuing (you can’t continue unless you do…).
You’ll be presented with a dialog where you can either choose to publish to any existing web site in Azure or create a new one. Click “New…“:
[ et/content/images/2014/05/image38.png)
Once there, you’ll be able to specify the details of your new web site. I’ve specified Northern Europe for my region and selected an existing database that I’ve got – you can select to create a new one if you don’t have one already:
[ et/content/images/2014/05/image39.png)
Click on the awesome-o-matic button, “Create” and you’ll be presented with the final dialog before the actual publishing commences:
[ et/content/images/2014/05/image40.png)
Note: Copy the “Destination URL” to the clipboard, we’ll use it in the next step!
Now, simply click “Publish” and see how Visual Studio takes care of the entire process for you – after a few seconds it’ll say “Publish succeeded” and open a browser window with your application (the url you saw above)…
Note: Upon launching the application, it will most likely say that it cannot sign you in or process the application because of an invalid request or something similar. This will be resolved in the next step!
We’re essentially done with the actual publishing process at this point, but need to do one more final tweak before we can access our application.
Configure the ReturnUri
Now that we know where our application is published, we can change the ReturnUri to correctly reflect the value of our web application. This is a setting in your project’s web.config file, and looks something like this:
```
File: web.config.partial.xml
</noscript>You should make sure that the RedirectUri property is prefixed with your published url (the one I said to copy to your clipboard), and may look something like this when you’re done:<script src="https://gist.github.com/1daeb3b8a4d43777dd69.js"></script><noscript>```
File: web.config.partial.xml
----------------------------

<add key="ida:RedirectUri" value="https://office365-demo.azurewebsites.net/aa6de431-dd28-42a2-8530-bd429a4567ba.axd" />
Important! You need to make sure you specify HTTPS (SSL) and not just HTTP in the url above, and when visiting your application make sure to use HTTPS as well!
Once you’ve set the ReturnUri, you should go back go the “Services Manager” dialog and you’ll be prompted with this dialog:
[ et/content/images/2014/05/image41.png)
It has verified that your redirect url from web.config isn’t configured in your Azure Active Directory, which it needs to be. Simply click “Yes“in this dialog.
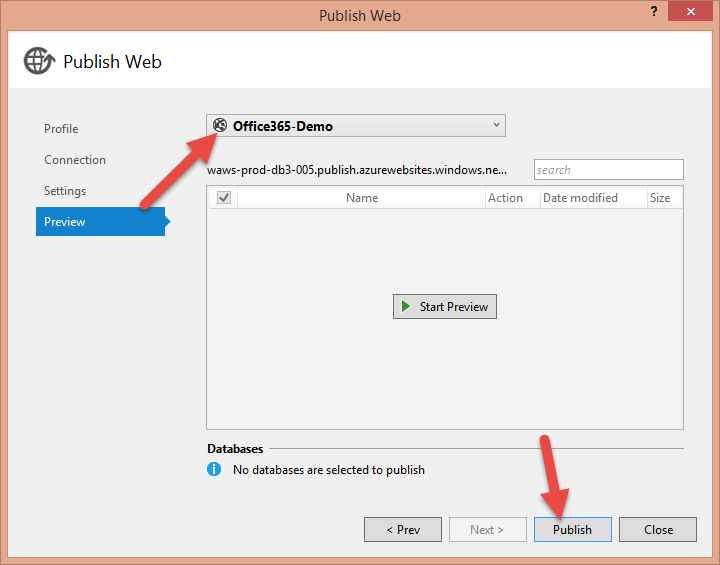
Once that’s fixed, we’ll re-publish the application by simply right-clicking your project and selecting “Publish“. The azure website you created in the previous step should now be pre-selected:
[ et/content/images/2014/05/image42.png)
After you’re done, you should be able to see your application in the cloud, offering Office 365-powered magic to your visitors. After the application has been published, you can visit it to see that it (hopefully) works:
[ et/content/images/2014/05/image43.png)
You might encounter the consent dialog when you first visit the application, because you need to agree to the rules of the application (that it can read your e-mails):
[ et/content/images/2014/05/image44.png)
Upon pressing “OK” you agree to the application rules and the web application will now work, and communicate with Office 365.
Pretty darn cool!
Additional tips!
- Revert the ReturnUri configuration so you can debug locally again
- SSL! USE HTTPS.
Summary
Publishing applications to Windows Azure isn’t very complicated. Actually, it’s extremely straight forward and doesn’t require a lot of steps at all. Once you’ve figured out the various small pieces and settings specific to Office 365 like we did above, publishing applications that work with the Office 365 API’s isn’t very complicated either. Winning!
Enjoy.


Recent comments