Getting started with Office 365 development - Part 3 - Building a sample Web Forms application that integrates with Office 365
This article is part of a series about “Getting started with Office 365 development”.
Over a discussion a few days back someone asked if there weren’t any API’s for working with Web Forms instead of only MVC. The preview tools were previously only targeting MVC, Win Phone 8 and Windows 8 apps but have now been updated to include support for more project types, including Web Forms. See my previous article for a quick intro to using the API’s with MVC.
In this article we’ll build a sample application which will display stats about the e-mail inbox with gauges (Total Count + Unread Count).
Create a new Web Forms project
Using the latest Office 365 developer extensions for Visual Studio 2013 we are going to create a new Web Forms project that connects to and communicates with different parts of Office 365.
I’ve created a project and named it “Zimmergren.O365.VisualDashboard“.
Peak of the final result of our quest
Upon completion of this rather quick demonstration, we’ll have a final result that looks something like this:
[ et/content/images/2014/05/image25.png)
A simple web form with a Gauge.js indicator displaying the amount of unread e-mails in our Office 365 inbox.
Add integration to your Office 365
In this step we will add code to fetch information from our Office 365 Exchange mailbox. In my sample I want to collect a few simple variables like “Unread Mail” and “Total Mails” and display this in a simple javascript Gauge for visualization awesomeness. So, with that said – let’s get to it.
Once you have created your ASP.NET Web Forms application project, simply right click and select “Add” – “Connected Service…”:
[ et/content/images/2014/05/image26.png)
Make sure you click the “Sign in..” button first if you aren’t authenticated. Once signed in, you should be able to select the service you want to connect to. In my case, I’ll start with the Exchange integration by selecting “Mail“:
[ et/content/images/2014/05/image27.png)
Upon clicking “OK” in this dialog, a new option will appear that that makes us decide what permissions our application should have. In my case, I don’t want the application to accidentally cause any problems, so I’m only going to allow it to “Read” the current user’s e-mail by selecting it like this:
[ et/content/images/2014/05/image28.png)
Hit “Apply” and Visual Studio will add all the required things to your project.
New references have been added:
[ et/content/images/2014/05/image29.png)
A new file called “SampleMailApi.cs” was created as well, where we can find some code to help us:
[ et/content/images/2014/05/image30.png)
This file contains some sample code for fetching e-mails. I want to take some of the code from this file and put it into a new class so we can manipulate it however we want without interfering with the tools (which may override the sample-file otherwise). More on this in the following sections.
.NET strongly typed Office 365 API’s with ASP.NET Web Forms
When using Web Forms as we are in this project, the REST API’s service description has been translated into strongly typed objects that we can get full access to through the object model which also means we’ll get a lot of help from Visual Studio with Intellisense etc.
[ et/content/images/2014/05/image31.png)
So with that said let’s crank up the volume and create our new sample code.
Sample: Creating a visual indicator for the amount of read and unread e-mails in your inbox
The remainder of this article will focus on showing some of the sample code in my application that will display the amount of read vs. unread e-mails in your Office 365 inbox.
Create a new web form in the project
We will start by creating a new Web Form called “StatsDashboard.aspx“where we’ll be putting our controls and logic into play.
[ et/content/images/2014/05/image32.png)
After the page is added, we need to add some controls and logic. Here’s the things I’ve chosen to put into my form in order to achieve the results we saw in the beginning of the article:
```
File: StatsDashboard.aspx
    <h1>Tobias Zimmergren's Office 365 Statistics Visualization Sample</h1>
    <p class="bs-callout bs-callout-warning">
        <table>
            <thead>
                <tr>
                    <td width="200px"><strong>Description</strong></td>
                    <td><strong>Count</strong></td>
                </tr>
            </thead>
            <tbody>
                <tr>
                    <td>Total emails</td>
                    <td><asp:Label runat="server" class="stats-totalemailcount" ID="lblTotalEmailCount" /></td>
                </tr>
                <tr>
                    <td>Unread emails</td>
                    <td><asp:Label runat="server" class="stats-unreademailcount" ID="lblUnreadEmailCount" /></td>
                </tr>
            </tbody>
        </table></p>

        <canvas width="150" height="100" id="mail-stats-gauge"></canvas>
    </div>

</div>

<script src="/Scripts/Custom/gauge.min.js" type="text/javascript"></script>
<script src="/Scripts/Custom/CustomScripts.js" type="text/javascript"></script>

</noscript>The important things to note for our sample in the code above are the following things:- A **canvas** object which will be where our visual gauge will be pushed in


- A label for Total Email Count (with css class **stats-totalemailcount**)


- A label for Unread Email Count (with css class **stats-unreademailcount**)


- We call the **gauge.min.js** script (included in my project, downloaded [from here](https://bernii.github.io/gauge.js/))


- We call the **CustomScripts.js** which is a custom script file I’ve created, see more below.


    After we’ve created this web form with the appropriate yet simple HTML markup, we’ll take a look at how we can put the data from Office 365 into play into our application.

#### Creating a custom class for MailStats

In order to hold the statistics I want to create a very simple class to hold this data. It’s called **MailStats** and looks like this:<script src="https://gist.github.com/d06152d11bde7c62f66e.js"></script>

<noscript>```
File: MailStats.cs
------------------

/// <summary>
/// Mail Statistics wrapper
/// </summary>
public class MailStats
{
    /// <summary>
    /// Gets or sets the Total Email count
    /// </summary>
    public int TotalEmails { get; set; }

    /// <summary>
    /// Gets or sets the Unread Email count
    /// </summary>
    public int UnreadEmails { get; set; }
}
#### Creating the logic for fetching the stats from Office 365
In addition to our newly created class, we need to write the logic to fetch the proper information from Office 365. The sample code from the tools provide a great starting point, and with some modifications we can easily construct it the way we want to.
In my case, I’ve created a new class called “MailApi“which essentially is a copy of the MailApiSample class which I will use as a base for my modifications.
My MailApi.cs class looks like this:
```
File: MailApi.cs
public static class MailApi
{ const string ExchangeResourceId = "https://outlook.office365.com"; const string ExchangeServiceRoot = "https://outlook.office365.com/ews/odata";
/// <summary>
/// Gets statistics about your inbox from Office 365
/// </summary>
/// <returns>MailStats object with statistics about your inbox</returns>
public static async Task<MailStats> GetMailStats()
{
    MailStats stats = new MailStats();

    var client = await EnsureClientCreated();

    var inbox = await client.Me.Inbox.ExecuteAsync();
    stats.TotalEmails = (int)inbox.TotalCount;
    stats.UnreadEmails = (int)inbox.UnreadItemCount;

    return stats;
}

private static async Task<ExchangeClient> EnsureClientCreated()
{
    Authenticator authenticator = new Authenticator();
    var authInfo = await authenticator.AuthenticateAsync(ExchangeResourceId);
    return new ExchangeClient(new Uri(ExchangeServiceRoot), authInfo.GetAccessToken);
}
public static void SignOut(Uri postLogoutRedirect)
{
    new Authenticator().Logout(postLogoutRedirect);
}
}
</noscript>The interesting parts of this code in our case is the GetMailStats() method which is the only thing that differs from the sample file. In this method we’ll simply make sure to call the service with a query telling Office 365 what information we want to fetch. We simply want to fetch the inbox-object with the related data (TotalCount, UnreadItemCount).   #### Creating the logic for binding the data from Office 365 to your web form

So, we have a web form and we have a class and method for calling Office 365 and fetching the information we need. But how do we try this out? We start by modifying the **StatsDashboard.aspx.cs** file that we created to look like this:<script src="https://gist.github.com/1da41bbc6c39bababdad.js"></script>

<noscript>```
File: StatsDashboard.aspx.cs
----------------------------

public partial class StatsDashboard : System.Web.UI.Page
{
    /// <summary>
    /// We need to hook up the Page Load method to our GetMailStats asynchronous method call, which we do here.
    /// </summary>
    /// <param name="sender"></param>
    /// <param name="e"></param>
    protected void Page_Load(object sender, EventArgs e)
    {
        // Zimmergren: Hook up the GetMailStats to Page Load.
        RegisterAsyncTask(new PageAsyncTask(GetMailStats));
    }

    /// <summary>
    /// Gets the statistics in your Office 365 inbox.
    /// The stats include a count of Read and Unread e-mails.
    /// </summary>
    /// <returns></returns>
    private async Task GetMailStats()
    {
        // Zimmergren: Load the e-mail statistics
        var stats = await MailApi.GetMailStats();

        // Push the results (numbers) into the labels on the aspx page.
        lblTotalEmailCount.Text = stats.TotalEmails.ToString();
        lblUnreadEmailCount.Text = stats.UnreadEmails.ToString();
    }
}
As you can see we bind the PageLoad method to a method with the RegisterAsyncTask method. The method we tie together with the PageLoad event is the GetMailStats() method defined in the code block. Easy as 1-2-3.
If we run the application now, we’ll see a result similar to this:
[ et/content/images/2014/05/image33.png)
Now, we obviously want to hook some type of awesomeness to it. In our case what would mean a visualization of the read vs. unread e-mails.
Enabling the gauge to visualize the results
When the gauge.js does its job, and in combination with my custom scripts to actually hook up the gauge the results will be visually appealing. At least in comparison to the above result.
CustomScript.js contains this simple snippet of code that executes when the page is fully loaded:
```
File: CustomScript.js
function GaugeIt()
{ var opts = { lines: 12, angle: 0.15, lineWidth: 0.44, pointer: { length: 0.9, strokeWidth: 0.038, color: '#000000' }, limitMax: 'false',
colorStart: '#C63D0F',
colorStop: '#C63D0F',
strokeColor: '#DCE3A1',
generateGradient: true };
// Find the label for total email count and fetch the number
var mailTotalCount = document.getElementsByClassName('stats-totalemailcount')[0].innerHTML;

// Find the label for unread email count and fetch the number
var mailUnreadCount = document.getElementsByClassName('stats-unreademailcount')[0].innerHTML;

var mailTarget = document.getElementById('mail-stats-gauge'); // your canvas element
var mailGauge = new Gauge(mailTarget).setOptions(opts); // create sexy gauge!
mailGauge.maxValue = mailTotalCount; // set max gauge value
mailGauge.animationSpeed = 32; // set animation speed (32 is default value)
mailGauge.set(mailUnreadCount); // set actual value
}
$(document).ready(function () { GaugeIt(); }); ```
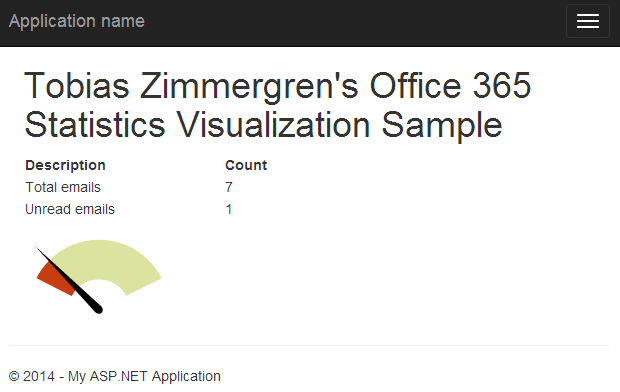
The application now shows some information from our Office 365 inbox and visualizes it using a small js gauge script, giving us this final result:
[ et/content/images/2014/05/image34.png)
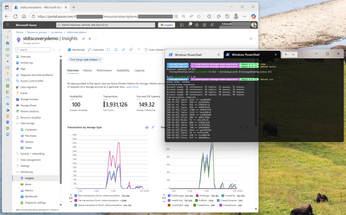
Taking a look in my developer inbox (the account used in this demo), I can see that there’s 1 unread e-mail and a total of 7 e-mails just like the application states:
[ et/content/images/2014/05/outlook.png)
Summary
Alright, so that was an introduction to how you can get started with traditional web forms and the Office 365 API’s as well. With the sample code provided from the tools, we really get an amazing start-point for all of our coding endeavors related to Office 365.
In future posts I’m considering taking a look at how you can dig deeper into how authentication works, how you publish your applications and so on.
In any case, I hope you enjoyed this.
Cheers,
Tobias.


Recent comments