
Creating an ASP.NET 5 site with Visual Studio Code - Part 1: Ensure pre-requisites
ASP.NET 5 introductory article series navigation:
- Part 1: Ensure installation of pre-requisites
- Part 2: Create your Visual Studio Code project using Yeoman
- Part 3: Adding npm packages and automatic tasks with Gulp – adding Office UI Fabric
- Part 4-n: Coming soon…
Introduction
This is an article series about building asp.net 5 web applications using Visual Studio Code. In this article series I will simply focus on preparing your developer machine with the tools and utilities required for creating asp.net 5 applications. I am focusing on Visual Studio Code rather than full blown Visual Studio because I want to show that it’s not really all that difficult to get things running – and you can use it from Windows, OSX or Linux alike!
Oh, and if you’re a SharePoint or Office 365 developer, building asp.net 5 applications as backend for your Add-ins and Apps might be interesting for you. This is something I’m already looking at, and I really love the simplicity and control I have with ASP.NET 5 over previous versions.
Instead of re-iterating what others have said, you can catch up on this whole new thing called ASP.NET 5 from these awesome links which I’m pretty sure you’ll find interesting:
- MSDN: What’s new in the .NET Framework
- Stephen Walter: Top 10 Changes in ASP.NET 5
- Microsoft Virtual Academy: What’s new with ASP.NET 5
- ScotGu: Introducing ASP.NET 5
Ensuring the pre-requisites
In order to tag along for the ride in this article series, a few things and tools need to be installed on your system. We’ll walk through each of those steps here one by one, so you can get things configured properly.
1. Install ASP.NET 5!
In order to build an ASP.NET 5 site, it’s pretty obvious we need to have it installed on our system. The ASP.NET GitHub repository has a great guide called “Upgrading DNVM or Running without Visual Studio” which is what we really want to do since we’re not using Visual Studio. We’re going to be using Visual Studio Code, hence we need to manually install these bits – but don’t worry, everything is outlined here and it’s pretty straight forward!
Following the instructions in the above link (as of this writing, 2015-09-30) you only need to run either the cmd or the PowerShell script as described in that article on your system where your development will take place:
&{$Branch='dev';$wc=New-Object System.Net.WebClient;$wc.Proxy=[System.Net.WebRequest]::DefaultWebProxy;$wc.Proxy.Credentials=[System.Net.CredentialCache]::DefaultNetworkCredentials;Invoke-Expression ($wc.DownloadString('https://raw.githubusercontent.com/aspnet/Home/dev/dnvminstall.ps1'))}
You’ll see something like this happening:  Please note: You may want to restart your cmd window or PowerShell window if you’ve got any open. This way the new paths will get hooked properly.
2. Run DNVM Upgrade
Now when the previous step is done, you can start running DNVM (Dot Net Version Manager). The first thing we need to do is to fetch the latest package from NuGet. This can be done by running the following command:
DNVM upgrade
When you’ve ran the DNVM upgrade command you should be able to run “DNVM list” to just get a list of the versions:
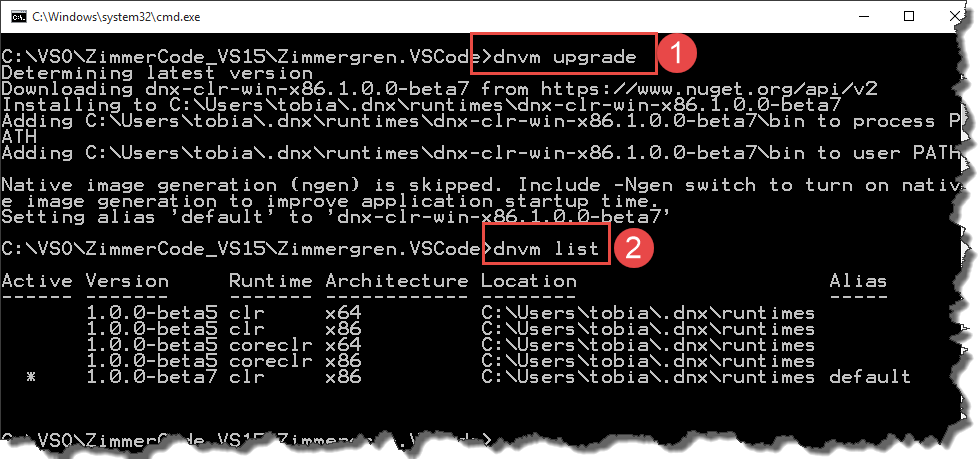
As you can see, the asterisk/star which indicates the Active version is pointing to the 1.0.0-beta7 version which as of this writing is the latest published runtime.
Pro Tip: If you’re looking for the latest bits in the Continuous Integration flow, not just the latest published bits, then you can run “DNVM Upgrade -u” which will give you the latest unpublished bits directly from the ASP.NET 5 “dev” branch feed (MyGet.org).
3. Install Node.js
If you’re a web developer it’s unlikely that you haven’t got node.js on your environment already. But if not, please follow the link (https://nodejs.org/en/) and download and install it on your machine. With node.js we’ll be able to install all the various packages we need through npm (Node.js package system).
Too easy, next!
4. Install Yeoman
Once node.js is installed you can start utilizing the npm (Node.js Package System) in order to fetch and install various packages that we will need. One of these is Yeoman, which is a web scaffolding tool for web applications. Essentially, using Yeoman we can with very little effort provide your projects with the tools, frameworks and files you need.
In order to be prepared for the next part in this article series, make sure you run this command in a cmd-window:
npm install -g yo
The output should look similar to this:  If things went well (they usually do) you’re good to proceed to the next step. Tip: I’m using the -g flag when installing to make yeoman a global installation…
5. Install generator-aspnet
Next up: The ASP.NET 5 Yeoman generator! This npm package is a generator which will help you create asp.net 5 projects without Visual Studio. And as mentioned, since we’re doing this with Visual Studio Code this is a good option for us. As quoted from the package page (the link above):
The goal of
generator-aspnetis to provide an experience consistent with creating new ASP.NET 5 (DNX) projects and files in Visual Studio 2015.
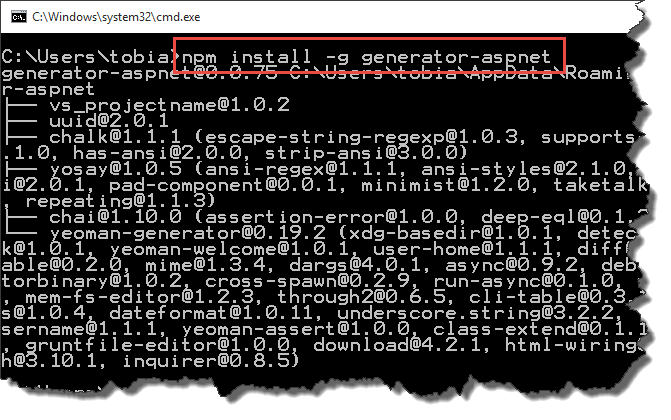
So, to install the asp.net 5 generator, please run this node.js command:
npm install -g generator-aspnet
The command and output would be similar to this:
Okay! We have the asp.net 5 generator. Proceed to the next step!
1. Install bower
Another thing we may want to add is Bower.io!
As stated on their website, Bower is a package manager for the web. It makes a lot of things easier – including adding frameworks, libraries, tools and more to your web projects. It is gaining a lot of popularity and you’ll see a lot of all the previously mentioned tools and additions from now on, if you haven’t already.
Bower can, like the rest of the things above, be installed through npm.
Here’s how:
npm install -g bower
Optional step: Install all at once
Well, hey. If you’re a productivity geek and you don’t care for all the fancy words above – you can install all the aforementioned things using a one-liner like this instead:
npm install -g yo generator-aspnet bower
So, yeah. That’s a lot smoother than running them one by one as you can see. Once you’ve acquainted yourself with these aforementioned tools and methods (which I know many already have), I’m pretty sure you’ll be using this approach instead. Because who doesn’t love a good one-liner.
Summary
With these steps done, you have prepared your environment with:
We could spend a lot more time here adding more fun stuff to our environment before kicking off. But right now this is what I want in order to continue my series. Should we require more things along the way, we’ll fetch them as required.
Now, go check out Part 2 in the series to learn how to get started creating your own ASP.NET 5 projects with Visual Studio Code. You’ll find the link in the top of this article.
Enjoy!


Recent comments