Creating an ASP.NET 5 site with Visual Studio Code - Part 2: Create your Visual Studio Code project using Yeoman
ASP.NET 5 introductory article series navigation:
- Part 1: Ensure installation of pre-requisites
- Part 2: Create your Visual Studio Code project using Yeoman
- Part 3: Adding npm packages and automatic tasks with Gulp – adding Office UI Fabric
- Part 4-n: Coming soon…
Introduction
In Part 1 of this article series I walked through how you prepare your environment for development with asp.net 5 and Visual Studio Code.
Here, in Part 2 of this article series when we have the proper tools installed, I’ll show the required steps to get up and running with a new ASP.NET 5 web site built using Visual Studio Code.
Since it sounds amazing, let’s continue.
Build an ASP.NET 5 project with VS Code & Yeoman
With the installation of the previous tools, simply bring up your command window (cmd) and we’ll take it from there. Also, please navigate to the folder where you want your new project structure to be created. (It’ll be created in a subfolder by the name you specify).
- Running yo aspnet
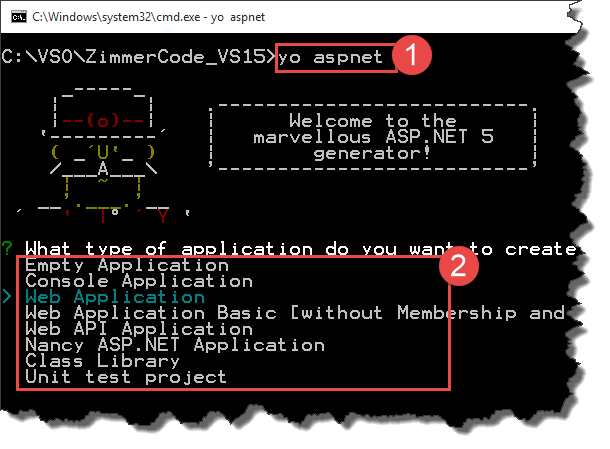
Once in your preferred folder on the file system, simply type the following command to bring up the scaffolding creation dialog:
yo aspnet
It should look something like this:
<img src="/content/images/2015/10/SNAGHTML770af7c.png "SNAGHTML770af7c"" alt="SNAGHTML770af7c" />
As seen in the picture (1), you’ll first call Yeoman to create an asp.net 5 project. Then as seen in (2) you will have to select the type of application you want to create. In my case it’ll be a “Web Application“.
Select it and continue.
2. Set a name for your project
The name you supply here will also be the name of the folder it creates when setting things up. So in my case I’m currently located in “C:\VSO\ZimmerCode_VS15” and I’m giving my project the name “Zimmer.VSCode” which should generate a folder called Zimmer.VSCode as well.
Once the generation is complete, you should see something like this:
<img src="/content/images/2015/10/image.png "image"" alt="image" />
So that essentially means we have our project structure set up. Automatically hooked here using Yeoman. Checking our the file system in Windows Explorer means you’ll see the new files in its entirety:
<img src="/content/images/2015/10/image1.png "image"" alt="image" />
**Note: **When you’ve navigated into your folder structure with the command window, you can run “dnu restore” if you want – but I’m saving that for later so I can show you that it’s also possible to do this straight from within Visual Studio Code.
3. Launch Visual Studio Code to work with the new project
Okay, so now we have all the bits we need in place to start working with the new asp.net 5 web application.
First of all, make sure you follow the instructions on the previous command dialogue (navigate into the new project folder). From there, simply start VS code by typing “code .“:
<img src="/content/images/2015/10/image2.png "image"" alt="image" />
Great, that should give you your project structure in VS Code, like this:
<img src="/content/images/2015/10/SNAGHTML77f97b5.png "SNAGHTML77f97b5"" alt="SNAGHTML77f97b5" />
4. Restore all packages required to run, using the DNX
With Visual Studio Code up and running, all we really need to do to get our project up to date is to download the NuGet packages required. This can be done from within the tool using the following command (as I mentioned previously, you could’ve done this in the cmd window too..):
dnx: dnu restore - (Zimmer.VSCode)
From within Visual Studio Code you can press “Ctrl+Shift+P” to bring up the command window (or select it from the View-menu). From there, you’ll get a nice auto-complete for this command so you don’t have to know it all by head:
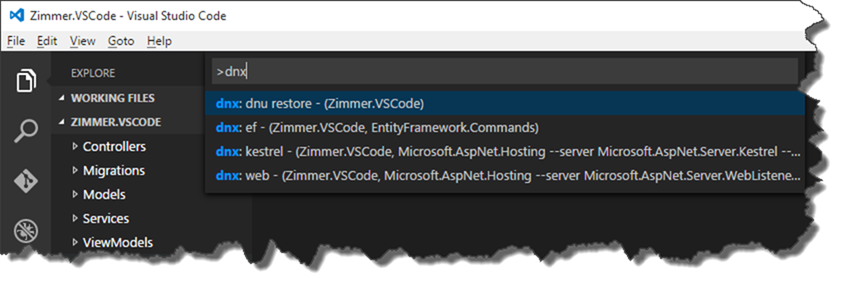
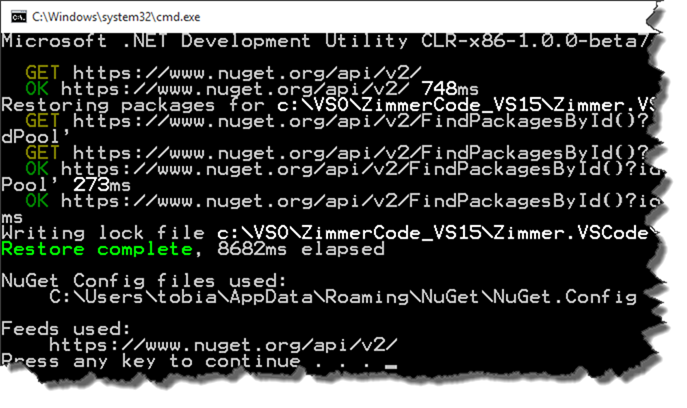
Hit it! (Run the dnx: dnu restore command). This will make sure that the project is updated with the correct packages as they are restored. It will look colorful and nice like this:
- Run the Web Application locally to see it in action
Yes, the title of this section means we’re essentially done for now. We can from here simply run the web application by doing two things.
First:
Check out the file hosting.ini and set the port number to something you prefer. The default value of 5000 suits me very well and I’m happy with keeping the file as-is for now:

Second:
Run the web application with the dnx: kestrel command if you’re on Linux/OSX or run with dnx: web if you’re on Windows:
dnx web
Like before, Visual Studio Code offers pretty neat auto-complete so you can simply start typing “dnx” and the rest will follow:

I normally want to do it from the cmdline though, so once you’ve ran the dnx web command, the web server will be running:

- Visit your new web site
How about them apples. You can now go to http://localhost:5000 (or whatever your .ini file says) and you should be able to see your new asp.net site:

Summary
Visual Studio Code is setup and ready to go – you’ve done all the setup through various command line tools and utilities, and we haven’t had any requirement to rely on the traditional bulky Visual Studio at all.
There’s a lot of things Visual Studio offers that Visual Studio Code doesn’t – but that’s for another post. Right now we should be happy to be up and running ;-)
Now go build some amazing ASP.NET 5 projects with Visual Studio Code. Things like awesome Office 365 Apps perhaps?
Enjoy.





Recent comments