
Creating an ASP.NET 5 site with Visual Studio Code - Part 3: Adding npm packages and automating tasks with Gulp (adding Office UI Fabric)
ASP.NET 5 introductory article series navigation:
- Part 1: Ensure installation of pre-requisites
- Part 2: Create your Visual Studio Code project using Yeoman
- Part 3: Adding npm packages and automatic tasks with Gulp – adding Office UI Fabric
- Part 4-n: Coming soon…
Introduction
Wow, that was a very long title for a blog post. With that said, this post will cover a range of fun things, including this:
- Using Node Package Manager (npm) to install the Office UI Fabric package
- Using Gulp to automatically copy the distribution files we need into the wwwroot folder
- Figuring out how Visual Studio Code can handle and monitor these tasks
Quick intro: What is npm?
First of all: Before we dig into how to use npm, let me just start by saying that this is the Node Package Manager. The package base has over 190 000 packages ready to be used in your projects. Simply put, it’s a way to easily add the packages/frameworks you want into your projects and an easy way to keep them up to date – if you’re not familiar with npm, check out the Documentation and you’ll be all set.
Quick intro: What is Gulpjs?
Gulp, or gulpjs, is a way to automate tasks on the client. It’s a task runner that can be used by developers to automate a lot of tasks in your development lifecycle. Things like minifying scripts, merging files together on build to produce optimized files for the web, compile LESS into CSS and a lot more.
This is normally the point where people start to wonder: What else can I do with Gulp?
Well, Gulp comes with a lot of Plugins, which you easily can use in your Gulp setup.
It can be used to reduce effort for developers once it’s setup. See the Gulp documentation for more info and digging deeper.
Note: There’s also an alternative to Gulp which is extremely popular, called Grunt. There’s a lot more Plugins for grunt. Perhaps we’ll cover that in a future post.
Quick intro: What is the Office UI Fabric?
The Office UI Fabric, announced by Microsoft in August 2015, is a set of components to make your web application look more like the Office suite. If you’re an avid user of Office 365, OneDrive, any of the online editions of the Office suite or other modernized Microsoft products; You’ll be happy to hear that if you want to develop your apps and applications to have the same look and feel as the standard components of Office, now you can – easily.
Office UI Fabric on GitHub offers full insight into the process and progress.
This is a way to make your own apps, applications and services look like the Microsoft products. I like what I’ve seen so far, but have yet to try it out in production. If you encounter any issues, please submit an issue to the github project here.
Tip! If you want to see all the demos of Office UI Fabric in action, Andrew Connell has setup a demo-site where you can simply browse through the components. This site will be replaced with http://dev.office.com/fabric once Microsoft has prepared one for themselves. Pretty slick, and thanks AC!
Adding Office UI Fabric to our ASP.NET 5 project in Visual Studio Code
Let’s get to the steps for adding Office UI Fabric to our asp.net 5 application using npm and gulp.
Installing Office UI Fabric from npm
First things first; Make sure you’ve got nodejs installed! (See Part 1 in this series for an intro).
I have created a fresh ASP.NET 5 project for this using the Yeoman generator. See Part 2 in this series for the exact steps to get to where I am right now.
- Find and add the correct npm package
So this is an easy one. Search for “Office UI Fabric” from https://www.npmjs.com/ and you’ll get the proper name and current version for the Office UI Fabric package. The name we’re looking for is “office-ui-fabric” and that’s all we need to know in this step.
An alternative way to get the proper name is by using IntelliSense from Visual Studio Code, from the package.json file:
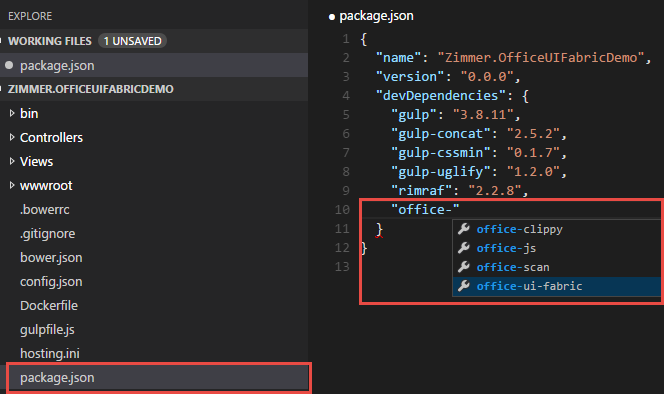
When I’ve edited my package.json and added the office-ui-fabric it should look something like this:
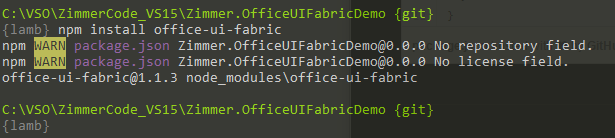
npm install office-ui-fabric
The command will install all packages that you specify, or if you only run “npm install” will install all packages configured in your packages.json. In my example I only want to install the Office UI Fabric at this point. The output could look like this:
When this is done, you’ll see in your project folder that there’s something called “node_modules” now which contains the restored packages for Office UI Fabric:

This means we’ve successfully added the package we want to the project, and it’s installed properly into our node_modules folder.
Edit: As Luis Mañez points out in the comment section of this post, you could just run the following command to get the devDepencendies set directly:
npm install office-ui-fabric –save-dev
This way you don’t need to modify the package.json file yourself. Thanks for the tip and heads up for what I missed Luiz!
Now the next step is to setup a task to copy the files we want from the office-ui-fabric folder into the wwwroot folder. Tag along.
Configure Gulp to automatically copy the required files into our asp.net 5 wwwroot
While there’s at least a dozen ways to get the right files into the right place, a common option is to use a task runner like Gulp or Grunt. With the generated project we’re using, there’s already some preparations for Gulp – so we’ll just extend that ever so slightly in order to get our stuff working.
- Install gulp if it hasn’t been installed already
In order for me to successfully be able to run the Gulp commands, I had to first install it globally and then locally in my project. Requirements to install gulp may differ in your environment if you’ve already installed it of course.
First run the following command, which will install it globally on your system:
npm install gulp
Output could look something like this:
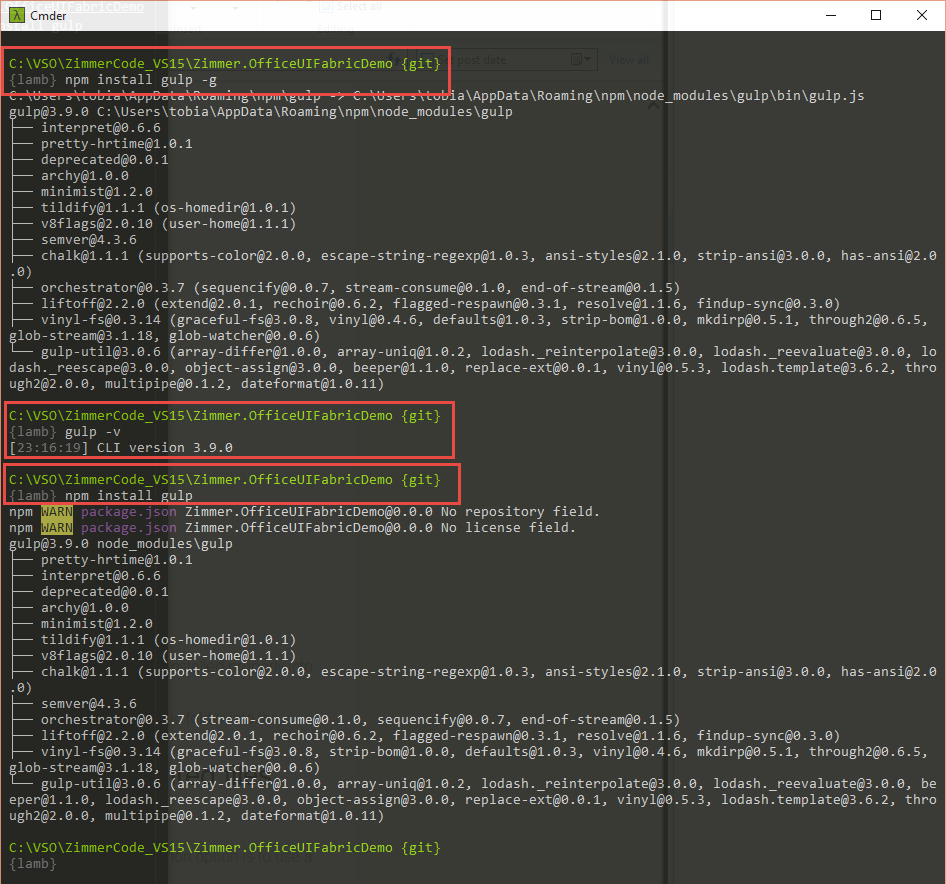
Note: I’m just running the “gulp -v” command to verify that the cli (command line interface) version looks alright!
- Modify the tasks.json file
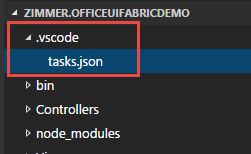
In your Visual Studio Code project there’s a file called Tasks.json. If you don’t have this file it may be because you haven’t launched the task runner yet.
Note: If you can’t find the tasks.json file, launch the task runner (Ctrl+Shift+B).
In my sample I’m replacing all of the content in the tasks.json file with the below snippet. I’m essentially telling VSCode that I want to run a gulp taskrunner, and I want to define a task with the name default as the task to be executed:
{
  "name": "Zimmer.OfficeUIFabricDemo",
  "version": "0.0.0",
  "devDependencies": {
    "gulp": "3.8.11",
    "gulp-concat": "2.5.2",
    "gulp-cssmin": "0.1.7",
    "gulp-uglify": "1.2.0",
    "rimraf": "2.2.8",
    "office-ui-fabric": "*"
  }
}
Okay, easy enough. We have told the VSCode tasks.json file to run the task named default. But we haven’t created that one yet – let’s do that.
3. Modify the gulpfile.js file
In your project you already have a file called gulpfile.js. This file is generated when we created our project in the beginning of this article series. I have slightly modified the content of the default file and added some references to Office UI Fabric specific things – they are all commented inline:
/// <binding Clean='clean' />
'use strict';
var gulp = require("gulp"),
  rimraf = require("rimraf"),
  concat = require("gulp-concat"),
  cssmin = require("gulp-cssmin"),
  uglify = require("gulp-uglify"),
  project = require("./project.json");

var paths = {
  webroot: "./" + project.webroot + "/",

  // Added for Office UI Fabric
  officeuifabricsource: "node_modules/office-ui-fabric/dist/**/*"
};

paths.js = paths.webroot + "js/**/*.js";
paths.minJs = paths.webroot + "js/**/*.min.js";
paths.css = paths.webroot + "css/**/*.css";
paths.minCss = paths.webroot + "css/**/*.min.css";
paths.concatJsDest = paths.webroot + "js/site.min.js";
paths.concatCssDest = paths.webroot + "css/site.min.css";

// // Added for Office UI Fabric
paths.officeuifabricdest = paths.webroot + "office-ui-fabric/";

gulp.task("clean:js", function(cb) {
  rimraf(paths.concatJsDest, cb);
});

gulp.task("clean:css", function(cb) {
  rimraf(paths.concatCssDest, cb);
});

gulp.task("clean", ["clean:js", "clean:css"]);

gulp.task("min:js", function() {
  gulp.src([paths.js, "!" + paths.minJs], {
      base: "."
    })
    .pipe(concat(paths.concatJsDest))
    .pipe(uglify())
    .pipe(gulp.dest("."));
});

gulp.task("min:css", function() {
  gulp.src([paths.css, "!" + paths.minCss])
    .pipe(concat(paths.concatCssDest))
    .pipe(cssmin())
    .pipe(gulp.dest("."));
});

gulp.task("min", ["min:js", "min:css"]);

 // Added for Office UI Fabric
gulp.task('copy-officeuifabric', function() {

  gulp.src([paths.officeuifabricsource])
    .pipe(gulp.dest(paths.officeuifabricdest));

});

// Added for Office UI Fabric
gulp.task("default", ["clean", "min", "copy-officeuifabric"]);
If you compare the changes in this file with the ones in the default file (see your own file before modifying it for a sample), you can see I’ve only added a few additional things:
- At the bottom there’s a new task called “default”, which when executed is calling the clean, min and copy-officeuifabric tasks.
- Above that task, the copy-officeuifabric task is defined – which essentially just takes the /dist folder of the office-ui-fabric node package and copies it into the wwwroot-ui-fabric folder.
- Added some variables for the paths for source and destination of the office ui fabric files.
- Run the gulp task and verify that our wwwroot looks alright
Now that we’ve defined our very simple automation flow with gulp using the gulpfile.js and the tasks.json files, we can easily run the task either from inside Visual Studio Code or from the cmdline. Let’s check out both options.
Run our gulp task from the command line
You can now choose to run only the copy-officeuifabric command like this:
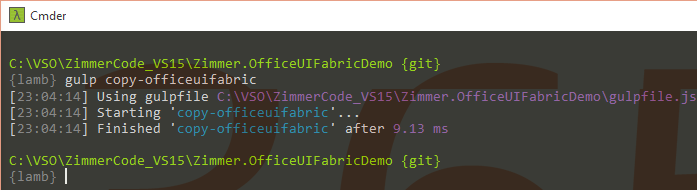
This will only execute the task copy-officeuifabric and no other tasks. The result of this is that the files we want will be copied to the wwwroot folder, as I’ll show you in a second.
You could also choose to run just gulp as a command and it would run all the tasks defined in your default task.
Run our gulp task from Visual Studio Code
From within Visual Studio Code, we can run the tasks as well. Either hit (Ctrl+Shift+B) to launch the task runner, or simply go into the command bar (Ctrl+Shift+P) and start typing “task”:
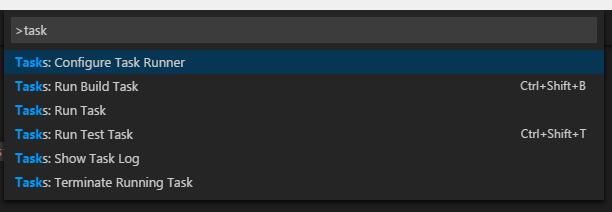
From this menu you can see that if you directly choose to run build task (the Ctrl+Shift+B command) it will run the tasks defined in the tasks.json file. If you only want to run a specific task (which is what we want at this point) then you can select “Run task” and select the task you want to run:
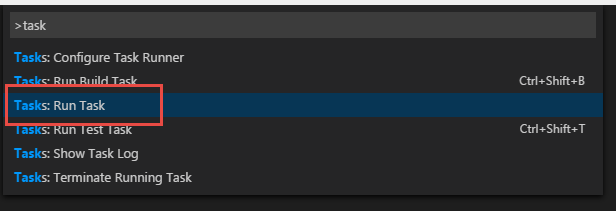
This will bring you a new dialog where you can simply select/type the name of the task you want to run. We obviously want to run the copy-officeuifabric task:

When you hit enter and run this specific task, you’ll see the output window pop up with the results, which should look something like this:

- Make sure the Office UI Fabric landed successfully
When you’ve done the previous steps, you’ll find that the wwwroot folder now contains your Office UI Fabric files:
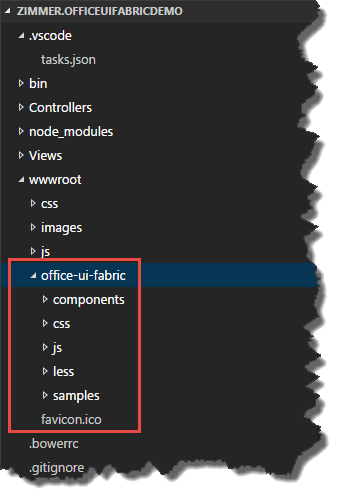
Alright. The files are there, we’ve successfully hooked up Office UI Fabric from the node package manager and into our Visual Studio Code project. We’ve also added a very simplistic gulp task for copying the source files from the dist folder in the node module to the wwwroot folder where we can access them from our source html.
- Make use of the Office UI Fabric from your source code
Most of the rocket science tasks has already been taken care of, so now we just need to add references to the files from our files.
Since this is an asp.net 5 MVC project, we can modify the _Layout.cshtml file and add the references there:
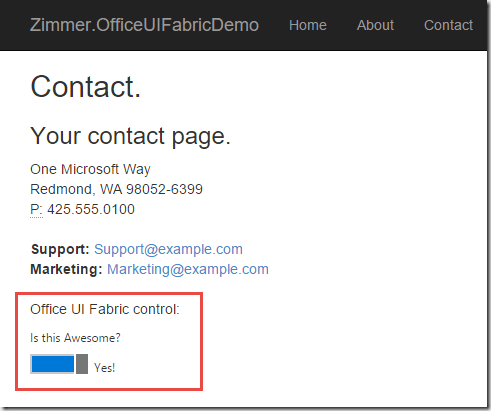
<p>Office UI Fabric control: </p>
<div class="ms-Toggle ms-Toggle--textAbove">
    <span class="ms-Toggle-description">Is this Awesome?</span>
    <input type="checkbox" id="toggleGulp" class="ms-Toggle-input">
    <label for="toggleGulp" class="ms-Toggle-field">
        <span class="ms-Label ms-Label--off">Nope</span>
        <span class="ms-Label ms-Label--on">Yes!</span>
    </label>
</div>
This will yield this modest result, where we now can fully utilize the components of the Office UI Fabric:
Summary
While this post isn’t covering what we can do with the Office UI Fabric (I think the demo-site by AC covers this quite extensively!), this post walked through the very basics of adding an npm package and automatically copying the required files from the package to our asp.net 5 wwwroot folder. The package we are playing with just so happens to be the Office UI Fabric, which was released only just a few days ago.
If you don’t want a lot of hassle, you could of course fetch Office UI Fabric through a CDN or just copying the files manually into your project folders. But then I wouldn’t get a chance to walk through these steps ;-)The reason why I’m setting things up with automated tasks and using npm (or bower in other instances) is that it helps manage the full code cycle and workflow – and once I’ve automated one thing I can just keep on adding to that and make the whole project maintainable in a much better fashion than we’re used to in old SharePoint projects. I know you know what I’m talking about.
Alright, enjoy this post and see you all soon again.


)
Recent comments