SP 2010: SharePoint Server 2010 - Creating a custom Document ID provider
Table of Contents
In this article I will talk about how you can create your custom Document ID provider for your SharePoint Server 2010 installation. Sometimes I’ve been getting the question whether or not it’s possible to change the behavior or change the way the Document IDs are generated, and some people have a tendency to say no to that question, just because there’s no interface or out of the box functionality to do so.
I’ll give you a quick walkthrough of how you can extend your Site Collection by adding a custom Document ID provider, that will automatically generate custom ID’s based on your own algorithms entirely!
Recommended reading about Document ID’s before proceeding:
https://learn.microsoft.com/en-us/previous-versions/office/developer/sharepoint-2010/ee559302(v=office.14)?redirectedfrom=MSDN
Document ID overview
This section will give you a very brief conceptual overview of Document IDs in SharePoint Server 2010.
What is Document ID’s?
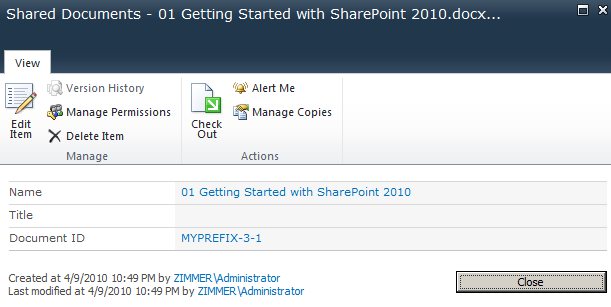
Document IDs in SharePoint Server 2010 provide you with the ability to tag documents with a unique identification number. Something a lot of my clients have done manually or by implementing custom solutions to take care of in SharePoint 2007. With this new feature, you get all the required functionality to tag documents with unique identification numbers based on a specific pre-set formula with a custom prefix.
See this sample screenshot for an example:
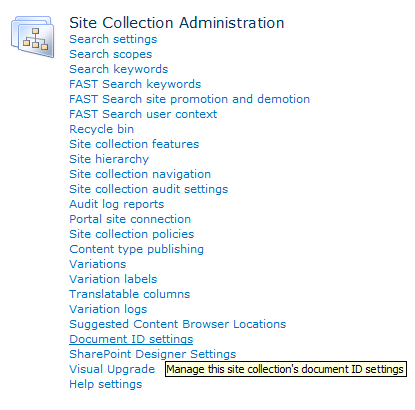
Where do I enable Document ID’s for my Site Collection?
In order to enable Document IDs in your Site Collection, you’ll need to activate the Site Collection Feature called Document ID Service.
*See this screenshot for an example:

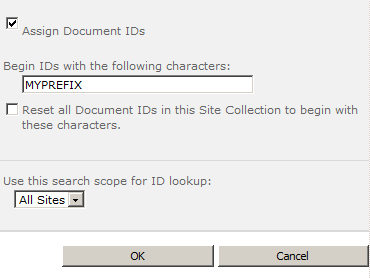
How do I change the way my Document ID’s are generated?
If you want to alter the way the Document ID’s are generated for your documents in your Site Collection, you can do that by navigating to:
Site Actions – Site Settings – Document ID Settings, like so:
From this new settings page, you’ll get the possibility to tell SharePoint how it should generate your unique ID’s. You can specify a prefix for all the generated ID’s:
I want to take it one step further!
If you’re not quite satisfied with the way SharePoint 2010 generates your Document ID’s for you, then you should most definitely follow along with the rest of this article as I will guide you through the steps to create your very own Document ID provider to generate exactly the kind of ID’s you want – based on your very own code/algorithms!
Bring it on!
Learning about a SharePoint 2010 Custom Document ID provider
This section will give you an overview of what you will need in order to create a custom Document ID provider for SharePoint Server 2010!
Note: As of this writing MSDN isn’t fully updated on these new SharePoint Server namespaces. Some details may or may not change when SharePoint Server 2010 is released into the wild (RTM)
Microsoft.Office.DocumentManagement
The namespace Microsoft.Office.DocumentManagement contains a class called DocumentIdProvider, which will be the base for our upcoming project!
Microsoft.Office.DocumentManagement.DocumentIdProvider
This is the class we will derive from when creating our custom provider. It contains three (3) abstract methods and one (1) abstract method that we need to implement:
- GenerateDocumentId (Method)
- GetDocumentUrlsById (Method)
- GetSampleDocumentIdText (Method)
- DoCustomSearchBeforeDefraultSearch (Property)
A description of each of these methods and the property will be made inline in my code in the samples!
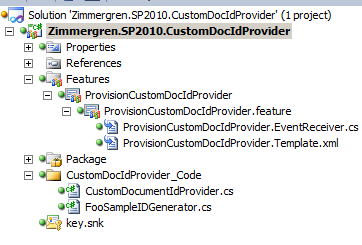
Creating a SharePoint Server 2010 Custom Document ID provider
Let’s code this little piece of functionality, shall we. The final project (very basic) will look something like this:
So, let’s get coding.
- Create a class and derive from DocumentIdProvider
public class CustomDocumentIdProvider :
Microsoft.Office.DocumentManagement.DocumentIdProvider
    {
        // Method to generate the actual document ID. Awesomeness lives here!
        public override string GenerateDocumentId(SPListItem listItem)
        {
            // In this method we will tell SharePoint how it should generate
            // the unique ID we want.
            // In my case, I’ve just created a dummy-generator.
            // Normally you would perhaps want to fetch this from another system or
            // generate it properly instead of like this..

// Points to a method I’ve created that generates foo-ID’s
            return FooSampleIDGenerator.GetFooUniqueID();
        }

public override bool DoCustomSearchBeforeDefaultSearch
        {
            // If set to true: It will call the GetDocumentUrlsById method before search
            // If set to false: It will use SharePoint Search before custom methods
            get { return false; }
        }

public override string[] GetDocumentUrlsById(SPSite site, string documentId)
        {
            // Returns an array of URLs pointing to
            // documents with a specified DocumentId
            // An empty string array

// This is where you will implement your logic to find
            // documents based on a documentId if you don’t want to use
            // the search-approach.
            return new string[] { };
        }

public override string GetSampleDocumentIdText(SPSite site)
        {
            // Returns the default Document ID value that will be initially
            // displayed in the Document ID search web part as a help when searching
            // for documents based on ID’s.
            // This should correspond with the way you’ve designed your ID pattern
            return "AWESOME-12345-67890-SharePointRules";
        }
    }
- Create a Feature Receiver to hook up your custom provider with your Site Collection
public class ProvisionCustomDocIdProviderEventReceiver : SPFeatureReceiver
{
    public override void FeatureActivated(SPFeatureReceiverProperties properties)
    {
        DocumentId.SetProvider(properties.Feature.Parent as SPSite,
                                                                 new CustomDocumentIdProvider());
    }
    public override void FeatureDeactivating(SPFeatureReceiverProperties properties)
    {
        DocumentId.SetDefaultProvider(properties.Feature.Parent as SPSite);
    }
}
Actually, you’re all done with the code for now.
- Go to Document ID Settings page and see this message appear
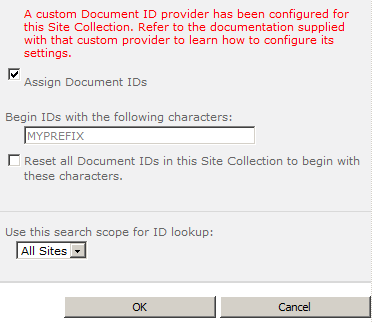
This basically means that your custom provider has been successfully enabled (as per our Feature Receiver).
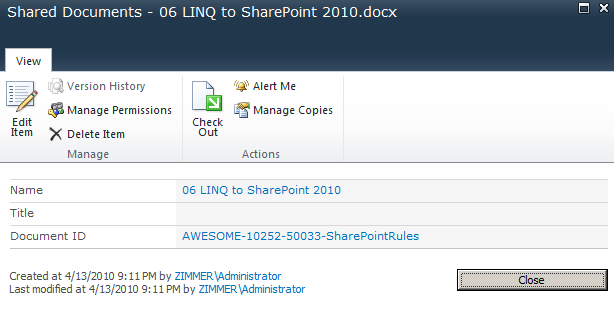
- See that the Document ID’s on your documents now is using your custom provider
(Please allow for some time to pass so the Timer Jobs can do their magic, or manually go into Central Admin and run the timer jobs instantaneously)
Custom Document ID provider in action:
Summary and Download
What did we just do?
What we just did was to create a custom Document ID provider that generates our very own custom Document ID’s based on whatever algorithm or pattern we want. There’s no need to follow the built-in format for your generated IDs – which some people have presented in their seminars and blogs. So there you go, step by step!
This could be especially awesome if you’ve got an external system generating Document ID’s already, and you want SharePoint to use those ID’s alongside whatever other system is running. Use your own imagination as to what can be done. The code is in your hands, Obi Wan Coder!
Enjoy!


Recent comments