Introduction
Tobias Zimmergren (Microsoft MVP) and Jussi Roine (Microsoft Regional Director and MVP), are teaming up to discuss and break down various scenarios and how to get started on your own journey into container-land.
This post is about hosting a public .NET Core C# API inside of a container (ACI), whose image is pulled from a private container registry (ACR) - and enable secure transfer with HTTPS using Application Gateway.
What will we cover in this post?
- Learn how to build a C# API that is suitable for container deployment.
- Learn how to create and publish your container image to Azure Container Registry directly from Visual Studio
- Learn how to utilize Azure Container Instances to host your containers
- Use Azure Application Gateway to enable HTTPS for your API through vnets
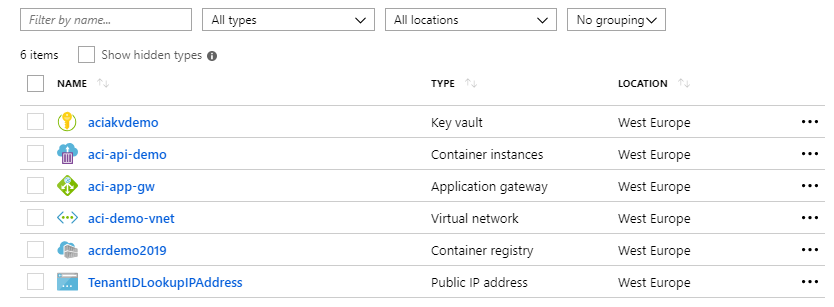
At the end of this blog post, we should have reached a setup with the following resources in our subscription:

Azure subscription with resources included for securing and hosting .NET Core API in Azure Container Instances, with Azure Application Gateway.
ACI, ACR and APIs in Microsoft Azure
Let’s dive into how Azure Container Instances, Azure Container Registry and C# API’s can play together. Then we’ll tie all this together by publishing our container from ACI using Application Gateway.
Pre-requisites
The following utilities are good to have in your arsenal if you’re going to tag along with this post.
- Docker should exist on your machine.
- Azure CLI or you can use the Azure Cloud Shell
- PowerShell, if you want to use variables in the commands with the CLI
Installing Docker
As we’ll be developing our custom API that runs within a Docker container, it makes sense to have Docker available locally. This allows us to perform troubleshooting, debugging and the classic F5 build and deploy pipeline working before we even consider deploying anything to Azure.
We’ll need to download Docker for Windows or macOS depending on our operating system. For the purpose of this post, we’re using Docker for Windows (download). It’s free but has certain requirements - mainly, the Hyper-V role must be available on your Windows workstation. Generally this is not an issue on Windows 10 but be sure to check your BIOS settings if you run into problems.
During the installation Docker asks whether you want to run Linux or Windows based containers. As we aim to built a platform agnostic solution (the API) you should choose the default, Linux based containers.
Once Docker for Windows is installed test that it works by opening your favorite command prompt (cmd.exe is more than fine, but cmder is an absolute favorite) and type docker ps to verify everything is running as intended.
Login with Azure CLI
In order to properly execute the commands that follow, we need to sign in to our Azure subscription using the CLI:
az login
Tip: If you’ve got multiple Azure subscriptions and your user account has access to more than one subscription, it’s a good idea to ensure that you’re targeting the correct account when you execute the commands.
You can do this by executing these commands, in the below order:
az account list
az account set --subscription <GUID>
- The first command will list all subscriptions you can access.
- The second command sets the target for the CLI, where the
is the id you want to point to, as you would get with the first command.
Creating a Resource Group
To deploy and manage our solution in Azure, we’ll need a resource group. This is trivial to create with Azure CLI using az group create command:
az group create \
    --name aci-demo
    --location westeurope
Optionally, you can also use the shorter params -n and -l for name and location, respectively. When the command is done, it will display the properties of your new Resource Group:
az group create -n aci-demo -l westeurope
{
  "id": "/subscriptions/<YOUR_SUBSCRIPTION_GUID>/resourceGroups/aci-demo",
  "location": "westeurope",
  "managedBy": null,
  "name": "aci-demo",
  "properties": {
    "provisioningState": "Succeeded"
  },
  "tags": null,
  "type": null
}
This creates a resource group in the West Europe region. Obviously you can choose to use any other region that is closest and makes the most sense to you.
Creating a private Docker registry with ACR
Before we actually get to create anything we need a place where our private Docker containers will be stored. This is what Azure Container Registry is needed for and it let’s us keep our own containers private and not publish them for public consumption.
Using the resource group we just created, we’ll provision a new ACR instance with:
az acr create \
    --resource-group aci-demo \
    --name acrdemo2019 \
    --sku Basic \
    --location westeurope
Note You’ll need to use a globally unique name for your ACR, thus if you choose to use acrdemo2019 it’s obviously taken ;)
Finally, we’ll enable Admin access to our ACR, as by default it’s disabled. This is useful for testing ACR in different scenarios:
az acr update \
    --name acrdemo2019 \
    --admin-enabled true
Developing an API using .NET Core 2.2 and Visual Studio 2017
Now that we have the services in Azure we’ll initially need, it’s time to start developing our API! We’ll build a simple API based on the Office 365/Azure AD Tenant ID Lookup API. You can see the GitHub repo here.
The API takes a tenant name in the form of tenantname.onmicrosoft.com as parameter, and performs a simple Microsoft Graph query to resolve it’s internal ID, which is in GUID form. This is useful as the ID is often needed for configuration throughout Azure and looking it up using a simple API makes this much easier.
To build the API, open Visual Studio (we’re using VS2017 and VS2019 Preview when we do our projects) and create a new project. Choose Visual C# > Web > ASP.NET Core Web Application.
In the following dialog make sure to select Linux Containers (instead of Windows, as Docker is by default configured for Linux) and do NOT select HTTPS. This is important as otherwise our container will run through the ASP.NET Core middleware that makes development a little bit more peculiar (but perhaps slightly more secure — but for our purposes running over HTTP is fine). In addition we’ll be using Application Gateway to enforce HTTPS for our API endpoint.
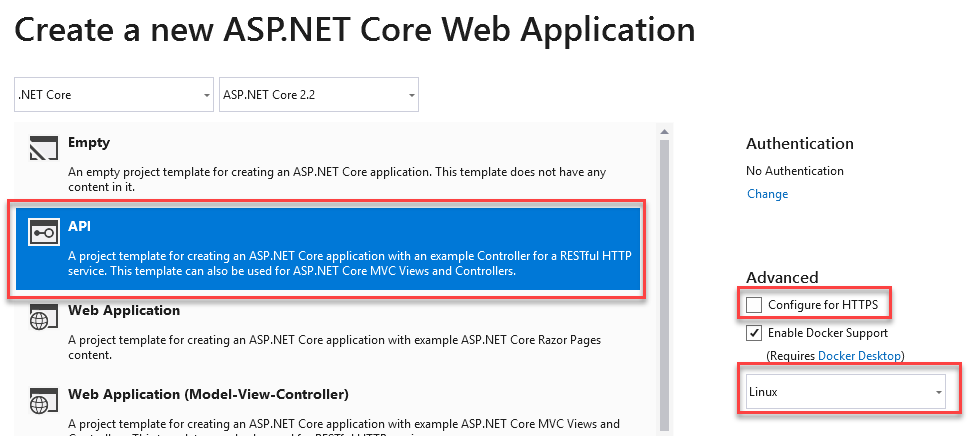
Visual Studio 2019 and the “Create a new ASP.NET Core Web Application” dialog. Make sure to UNSELECT “Configure for HTTPS” and select “Linux” for your docker support.
Once the project is instantiated, open the Controllers folder and open rename the “ValuesController.cs” to “TenantIDLookupController.cs”. This is where we’ll have the logic of our API:
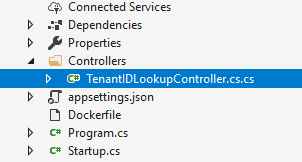
Simple Web API project based on C# .NET Core, alongside it’s Dockerfile configuration for running it inside a container.
Replace the existing code with this class, and mind the [Route("api/)] attribute on the controller (to avoid the need to hit /api/tenantidlookup/yourTenantName and instead just /api/yourTenantName).
[Route("api/")]
[ApiController]
public class TenantIDLookupController : ControllerBase
{
    [HttpGet("{tenantName}")]
    public ActionResult<string> Get(string tenantName)
    {
        HttpClient client = new HttpClient();
        client.DefaultRequestHeaders.Accept.Clear();
        client.DefaultRequestHeaders.Accept.Add(new MediaTypeWithQualityHeaderValue("application/json"));

        // URL for querying tenantName
        var url = "https://login.windows.net/" + tenantName + ".onmicrosoft.com/v2.0/.well-known/openid-configuration";

        string tenantID = "";

        using (var response = client.GetAsync(url).Result)
        {
            if (response.IsSuccessStatusCode)
            {
                var content = response.Content.ReadAsStringAsync().Result;
                dynamic json = JsonConvert.DeserializeObject(content);
                tenantID = json.authorization_endpoint;
                tenantID = tenantID.Substring(26, 36);
            }
            else
            {
                tenantID = "Error: " + response.StatusCode + ": " + response.ReasonPhrase;
            }
        }

        return tenantID;
    }
}
It’s rather simple, but let’s walk through the logic quickly. As we’re expecting a parameter for tenantName through HTTP GET, we then instantiate a traditional HttpClient to make our REST call against Microsoft Graph.
We then construct the URL for our query and check the response, which is a comprehensive JSON structure. From that structure we simply need to pick up the Authorization Endpoint value, which is the GUID we’re after.
Should we run into any errors our API simply returns the HTTP status code back (such as HTTP 400 for a bad request or when a tenant name is not found).
You can now run the solution with F5 — a Docker container will be constructed based on Dockerfile in the project. To test the API, open http://localhost:port/api/zimmergren which should resolve to a valid GUID.
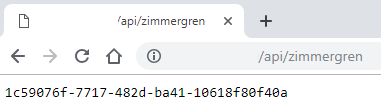
Tenant Id Lookup API running in .NET Core.
While you’re running the solution open a command prompt and type docker ps to see your Docker container in action. Notice that even after you stop debugging your solution the container keeps running via Docker locally.
As the API works now it’s time to push it to Azure!
Publishing the containerized API to ACR
The easiest and visually most meaningful way to publish the containerized API to ACR is to use Visual Studio’s Publish wizard. It’s trivial and holds your hand through the process.
However it is also possible to publish our API using Azure CLI so that’s what we’ll do next. This is also useful should you need to automate this process in the future.
First, login to the recently created ACR using Azure CLI:
az acr login \
    --name acrdemo2019
Note You’ll need to replace acrdemo2019 with the name you designated for your ACR instance previously.
Next, tag your Docker container with a more meaningful name. We’ll use TenantIDLookupAPI as it makes more sense for us. Note that you’ll need to use the ACR location here so that we’ll prepare ACR for our incoming container:
docker tag tenantidlookupapi acrdemo2019.azurecr.io/tenantidlookupapi
And then push the container from localhost to ACR:
docker push acrdemo2019.azurecr.io/tenantidlookupapi
If you log in to Azure Portal and navigate to your ACR, and select Repositories you should see your Docker container listed. Alternatively you can also use Azure CLI to verify how an image in a given repository looks like:
az acr repository show \
    --name acrdemo2019 \
    --image tenantidlookupapi
Success - we can see that the repo indeed has our image that we asked for.
{
  "changeableAttributes": {
    "deleteEnabled": true,
    "listEnabled": true,
    "readEnabled": true,
    "writeEnabled": true
  },
  "createdTime": "2019-03-15T19:03:17.3941572Z",
  "digest": "sha256:4fcb76f0676cd505b25b0846bf488e85811fbfb4e8610c6db6375715761caaf5",
  "lastUpdateTime": "2019-03-15T19:03:17.3941572Z",
  "name": "latest",
  "signed": false
}
Provisioning VNET and Subnets
You could test the container now but as it’s literally the same as what we have just tested locally we’ll skip testing for now.
Our API does not contain anything sensitive at this point, but later on it might evolve into containing something sensitive = we’ll provision an instance of the containerized API to our private network. This lets us control the networking around the API a lot better and doesn’t expose the API for public consumption by default - although this is possible in numerous ways when needed.
Azure Virtual Networks (VNETs) are useful for this, as they allow all sorts of tinkering with network traffic quite easily.
First, we’ll provision our own VNET using Azure CLI:
az network vnet create \
    --name aci-demo-vnet \
    --resource-group aci-demo \
    --address-prefix 10.0.0.0/16 \
    --subnet-name container-subnet \
    --subnet-prefix 10.0.0.0/24
This provisions a new VNET using the IP address space of 10.0.0.0/16. From this address space we’ll split a subnet of 10.0.0.0/24. This subnet will host our containerized API.
However, we also need another subnet for Application Gateway that will publish our API. This subnet must be part of the overall IP address space, thus we can freely allocate 10.0.1.0/24 for it:
az network vnet subnet create \
    --resource-group aci-demo \
    --name appgw-subnet \
    --vnet-name aci-demo-vnet \
    --address-prefix 10.0.1.0/24
Our VNET now holds two subnets - 10.0.0.0/24 for containers and 10.0.1.0/24 for Application Gateway.
The reason we need Application Gateway is that it allows us to act as a front for our containerized API. We’ll use Application Gateway to expose an endpoint using HTTPS, that in turn connects to our internal VNET using HTTP (as the API supports HTTP). Later on, Application Gateway can be configured further to act as a Web Application Firewall also, allowing for added security and monitoring also.
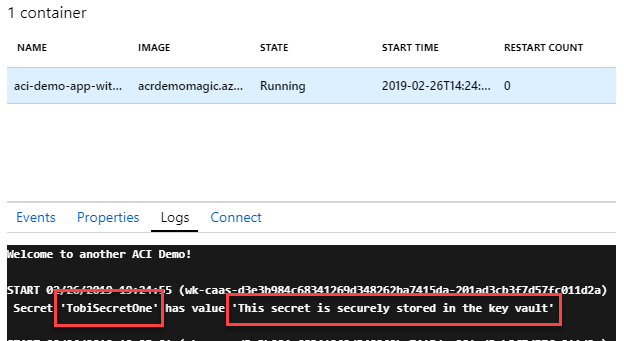
Provisioning Azure Key Vault
We’re also going to need Azure Key Vault in order to authenticate against ACR when provisioning a container to ACI. Azure Key Vault will be responsible for storing our secrets we need during deployment and it can also be leveraged later from our API if needed.
To create Azure Key Vault, run the following:
az keyvault create \
    --resource-group aci-demo \
    --name aciakvdemo
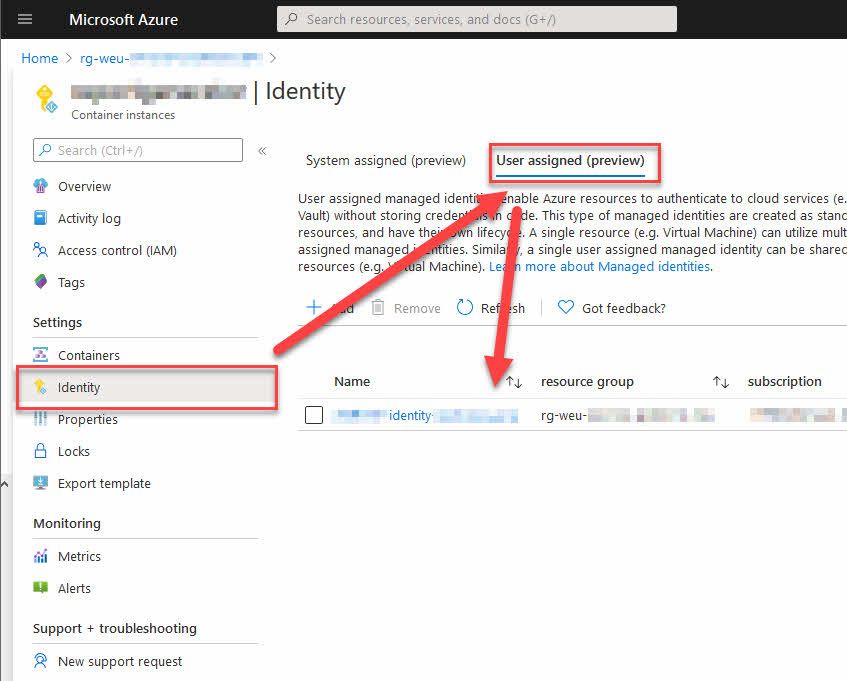
ACI currently does not support Managed Identities when using VNETs, thus we’ll need to provision a service principal in Azure Key Vault. For this, we’ll need to creat a Service Principal. In the future a Managed Identity could be used instead if ACI with VNET-based containers becomes supported.
First, create the secret for the Service Principal in Azure Key Vault:
AKV_NAME=aciakvdemo
ACR_NAME=acrdemo2019

az keyvault secret set \
  --vault-name $AKV_NAME \
  --name $ACR_NAME-pull-pwd \
  --value $(az ad sp create-for-rbac \
                --name http://$ACR_NAME-pull \
                --scopes $(az acr show --name $ACR_NAME --query id --output tsv) \
                --role acrpull \
                --query password \
                --output tsv)
And for this Service Principal we need to store the appId, which acts as the username:
az keyvault secret set \
    --vault-name $AKV_NAME \
    --name $ACR_NAME-pull-usr \
    --value $(az ad sp show --id http://$ACR_NAME-pull --query appId --output tsv)
Provision a new ACI using our containerized API
As ACR is responsible for storing and maintaining our Docker containers, ACI is responsible for actually hosting and running our containers. To provision a new ACI in our resource group is trivial. What makes this slightly more challenging is that we’ll pull our own container image and for that we need to authenticate. The second thing that slightly changes our approach is that we need to bind the ACI-hosted container in our subnet of 10.0.0.0/24. And we need to bind the ACI-hosted container to our subnet (and our VNET) for added security and for publishing the container over HTTPS with Application Gateway.
First, in Azure Cloud Shell (or Azure CLI if you chose that previously) we’ll set a few variables to make this easier:
RES_GROUP=aci-demo
ACR_NAME=acrdemo2019
ACR_LOGIN_SERVER=$(az acr show --name $ACR_NAME --resource-group $RES_GROUP --query "loginServer" --output tsv)

az container create \
    --name aci-api-demo \
    --resource-group $RES_GROUP \
    --image $ACR_LOGIN_SERVER/tenantidlookupapi:latest \
    --registry-login-server $ACR_LOGIN_SERVER \
    --registry-username $(az keyvault secret show --vault-name $AKV_NAME -n $ACR_NAME-pull-usr --query value -o tsv) \
    --registry-password $(az keyvault secret show --vault-name $AKV_NAME -n $ACR_NAME-pull-pwd --query value -o tsv) \
    --vnet aci-demo-vnet \
    --vnet-address-prefix 10.0.0.0/16 \
    --subnet container-subnet \
    --subnet-address-prefix 10.0.0.0/24
There’s quite a lot happening here. az container create provision a new ACI-hosted container by pulling our Dockerized API image from ACR and binding that to our subnet within our VNET.
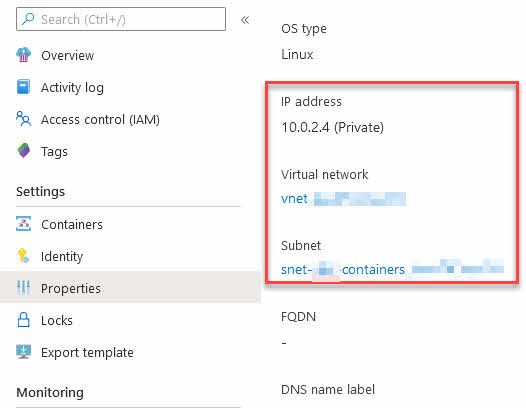
To output the private IP address of the container once it’s running, use the following command:
az container show \
    --resource-group aci-demo \
    --name aci-api-demo \
    --output table
Provisioning Application Gateway
Last and definitely not least, we’ll need to provision the Application Gateway. It’s a very capable service and we aim to do the least to get it working for our needs.
First, provision a public IP address:
az network public-ip create \
    --resource-group aci-demo \
    --name TenantIDLookupIPAddress
To make things more secure, we’ll leverage the HTTPSto-HTTPS redirection capabilities of Application Gateway. This way, all requests to our public IP (exposed by Applicaton Gateway) over HTTP will be redirected to HTTPS, and then Application Gateway acts as a reverse proxy to channel traffic to our containerized API. You can then make this look nice with your own domain name.
To configure the redirection, we’ll need a self-signed certificate. Obviously you’d use a real, trusted certificate in a production scenario but to show how things work, it’s easier to use a self-signed certificate.
There are numerous ways to generate a self-signed certificate. One approach that is fairly easy is to use a tool called OpenSSL. It’s not part of Windows installation by default so you’ll need Win32 binaries first. You can download them here.
To generate the certificate locally - and typically you’ll need to do this in an elevated command prompt - run the following command:
openssl req -x509 -sha256 -nodes -days 365 -newkey rsa:2048 -keyout privateKey.key -out aciappgwcert.crt
Then we’ll need to export the certificate along with its private key to a .PFX file:
openssl pkcs12 -export -out aciappgwcert.pfx -inkey privateKey.key -in aciappgwcert.crt
As a result you should have aciappgwcert.pfx in the same directory you ran the commands in.
Now we can provision Application Gateway, bind it to our VNET and use our own self-signed certificate to secure traffic.
az network application-gateway create \
    --name aci-app-gw \
    --location westeurope \
    --resource-group aci-demo \
    --capacity 2 \
    --public-ip-address TenantIDLookupIPAddress \
    --vnet-name aci-demo-vnet \
    --subnet appgw-subnet \
    --servers 10.0.0.4 \
    --sku Standard_Small \
    --http-settings-cookie-based-affinity Disabled \
    --frontend-port 443 \
    --http-settings-port 80 \
    --http-settings-protocol Http \
    --cert-file c:\OpenSSL\aciappgwcert.pfx \
    --cert-password "Password1"
This takes a while, as Application Gateway provisions quite a bit of logic in the backend.
While mostly everything is in order now, we still need to add something small - a health probe to verify our API is responding. Remember that the API running in the container in ACI is bound to our private VNET and has a private IP address that is non-routable. To test the API, we could spin up a virtual machine in the same VNET and simply call the API, call the API from another container in the same VNET or subnet - or another alternative is to add a health probe in Application Gateway to verify this for us.
To add a health probe using Azure Portal, navigate to the Application Gateway blade and select Health probes.
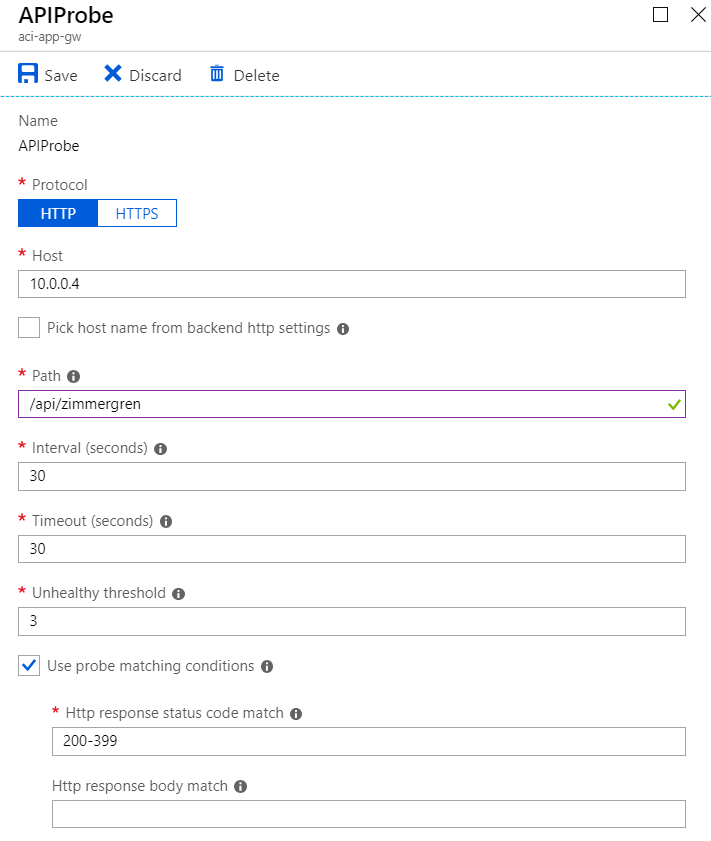
Add a new one with the following values:
- Protocol: HTTP
- Host: 10.0.0.4
- Path: /api/
- Use probe matching conditions
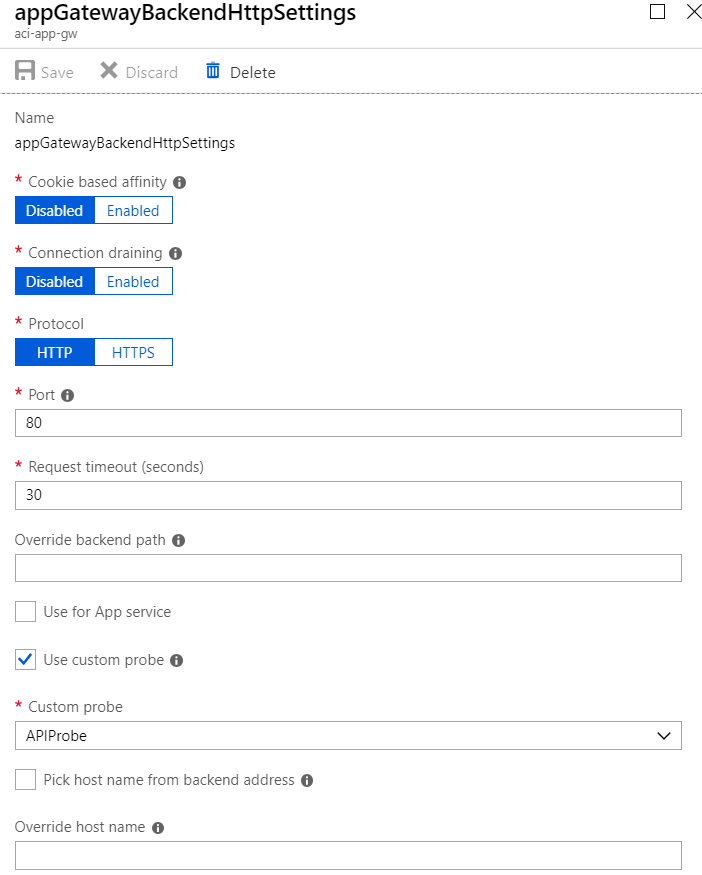
Then, go Rules and select rule1, which is the default. Select appGatewayBackendHttpSettings and from here select Use custom probe - and then just select the Health probe you created.
And that is it! You can test out access to your API end-to-end by navigating to https://<app-gw-address>/api/<tenantname>. Application Gateway address is the public IP you provisioned earlier, and <tenantname> can be any valid (or non-valid!) Office 365/Azure AD tenant.
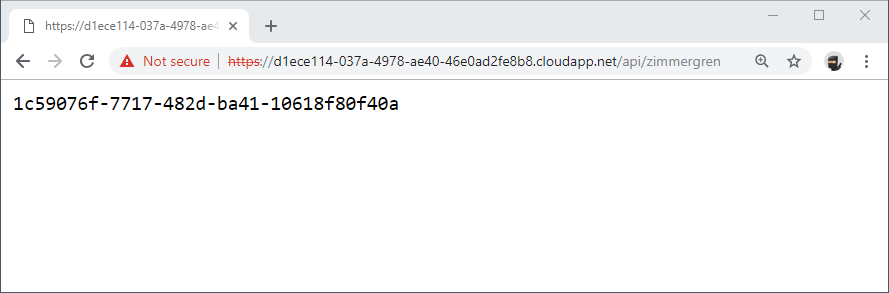
This should return a valid GUID, proving that our API works!
Summary & Links
In this post we’ve walked through a couple of concepts, including:
- Creating your own C# API with Visual Studio and run it as a Docker container locally
- Created an Azure Container Registry and push the docker image here
- Created an Azure Container Instance based on the Docker image we have pushed to ACR
- Used Azure Virtual Networks and Azure Application Gateway to route the traffic over HTTPS for added security and control
It’s been a blast doing this and walk through the various steps, but not without challenges. If you’d like to see more adventures of Jussi & Tobias in container-land, we’d appreciate a comment here or on Twitter where we both hang out quite a lot.
Suggested reading
- MS: Deploy container instances into an Azure virtual network
- MS: Create a virtual network using Azure CLI
- MS: Create an application gateway using Azure CLI
- How to: C# .NET Core apps running as containers in your private Azure Container Registry
- TenantLookupId on GitHub: https://github.com/jussiroine/TenantIDLookup
Thanks for stopping by!
Comments are closed