Developing using Azure Dev Spaces with Azure Kubernetes Services
Explore Azure Dev Spaces for AKS, to easily do development work, and hit F5 to update in Kubernetes in your dev space. Quicker, easier and more reliable iterations will win the day.
Last year Microsoft introduced a preview of something known as Azure Dev Spaces for Azure Kubernetes Services (AKS). To follow suite with my previous posts around container workloads for developers, I'll make examples with C# .NET Core and we'll run the containers in AKS - this time using Dev Spaces for easier local development efforts. Tag along to learn what it's all about and how to test, implement and iterate quicker.
2019-03-26: Azure Dev Spaces is currently in preview and there might be things that change along the way as it matures into GA.
Pre-requisites and tooling
In order to successfully tag along with the examples below, I suggest that you prepare your tool baskets with the proper tools.
- Azure CLI
- Visual Studio Tools for Kubernetes
- Have an AKS (Dev/Experimentation) cluster at hand to try this on
Enable Azure Dev Spaces for AKS using Azure CLI
As an avid user of the Azure CLI, this is where I do most of my configurations and tasks around resources in Azure.
Enabling Dev Spaces can easily be done in the Portal UI too, but since you sometimes script and do things on-the-fly, here's how you can enable Azure Dev Spaces for AKS through the Azure CLI as an alternative:
az aks use-dev-spaces -g demos -n aks-devspaces -s dev -y
Notes from the command:
- "demos" is the resource group name
- "aks-devspaces" is actually the name of my AKS cluster
- "dev" is a new dev space I want to create
- -y indicates that I don't want a confirmation prompt
If you do NOT have the Azure Dev Spaces CLI, it will prompt you to install it now:

az aks use-dev-spaces -g demos -n aks-devspaces -s dev -y
Selecting Azure Dev Spaces Controller 'aks-devspaces' in resource group 'demos' that targets resource 'aks-devspaces' in resource group 'demos'...4s

Creating and selecting dev space 'dev'...1s

Managed Kubernetes cluster 'aks-devspaces' in resource group 'demos' is ready for development in dev space 'dev'. Type `azds prep` to prepare a source directory for use with Azure Dev Spaces and `azds up` to run.
Great, it looks like we're ready to go. But, as a side-note to the above command, you can create sub-spaces now too - so if you want "dev" to be the parent, and you have a couple of different projects or branches going on, you can use "dev" as parent, and create new spaces like so:
az aks use-dev-spaces -g demos -n aks-devspaces -s dev/tobitests -y
At this point, we've prepared our cluster with two spaces: dev and dev/tobitests and I feel it's about time we build a simple app that will run as a container, and be F5-deployed straight into a Dev Space in Kubernetes. I know, the future is here.
Build a C# .NET Core Web App and run in Azure Dev Spaces
I'm using Visual Studio 2019 on a daily basis, do the examples here will be based on that. However, it's pretty much the same thing if you're on Visual Studio 2017. If you use an earlier version that that, then my condolences.
New Project based on type "Container Application for Kubernetes"
Create a new project in Visual Studio, and search for/select the "Container Application for Kubernetes" option, which is available with the VS Tools for Kubernetes.

Doing this, sets your new project up for success with Kubernetes straight out of the box.
Have an existing project?
Should you instead want to enable Kubernetes support for an existing .NET Core project, then select "Add > Container Orchestrator Support" and then "Kubernetes/Helm".
If you create a project from scratch, you'll get the option to select the type of project you want to use. Web App, API, Empty, etc; the normal options. I'm staying with a clean option and going with "Empty".
Public endpoint prompt
During creation of my new project, I'm prompted "Do you want to create a publicly accessible endpoint for your application in your Kubernetes cluster?".
You're the only one who can answer this question for your own workloads.

Project structure
Once you've created your new project, you'll get a couple of things on the fly, including:
- Dockerfile
- Helm chart
- AZDS definition for dev spaces

Noticing in the Debug options of the project, you can see something called "Azure Dev Spaces" now:

Debug your project by hitting F5, and select your desired Dev Space
When you launch the project with F5, you'll get prompted about what Dev Space you want to connect to. We can see that if we select the cluster we've already prepared, we can also select the dev space we want now:

I'm selecting my "dev/tobitests" space that I created in the previous steps.
It will do a bunch of builds that you can see in your output window. I've added the full output log here for good fun to wade through later:
Starting warmup for project 'Kubernetes1'.
Enabling debugging...
Using dev space 'tobitests' with target 'aks-devspaces'
Release "azds-46bbfa-tobitests-kubernetes1" does not exist. Installing it now.
NAME:   azds-46bbfa-tobitests-kubernetes1
LAST DEPLOYED: Tue Mar 26 18:49:11 2019
NAMESPACE: tobitests
STATUS: DEPLOYED
RESOURCES:
==> v1/Service
NAME         TYPE       CLUSTER-IP   EXTERNAL-IP  PORT(S)  AGE
kubernetes1  ClusterIP  10.0.188.74  <none>       80/TCP   1s
==> v1beta2/Deployment
NAME         DESIRED  CURRENT  UP-TO-DATE  AVAILABLE  AGE
kubernetes1  1        0        0           0          0s
NOTES:
1. Get the application URL by running these commands:
  export POD_NAME=$(kubectl get pods --namespace tobitests -l "app=kubernetes1,release=azds-46bbfa-tobitests-kubernetes1" -o jsonpath="{.items[0].metadata.name}")
  echo "Visit http://127.0.0.1:8080 to use your application"
  kubectl port-forward $POD_NAME 8080:80
Building container image...
Sending build context to Docker daemon  56.32kB

...
...
...
We can see that azds (Azure Dev Spaces) release has been created with a new name, and the status is deployed - and it now includes two things that are apparent from the initial view of the log:
- v1/Service:
kubernetes1which is the name of my project, is a Service deployed to Kubernetes, which is of typeClusterIPand gives us the internal IP address. - b1beta2/Deployment:
kubernetes1, again the name of my project, has been deployed as a Kubernetes Deployment.
When Visual Studio is done thinking, you can see the browser window launch with your code:

Verify deployed Dev Spaces resources in AKS
To verify that there's something in the actual Kubernetes cluster too, and not just some magic happening inside Visual Studio, let's head on over to our command line and see if we can spot any changes in our AKS cluster.
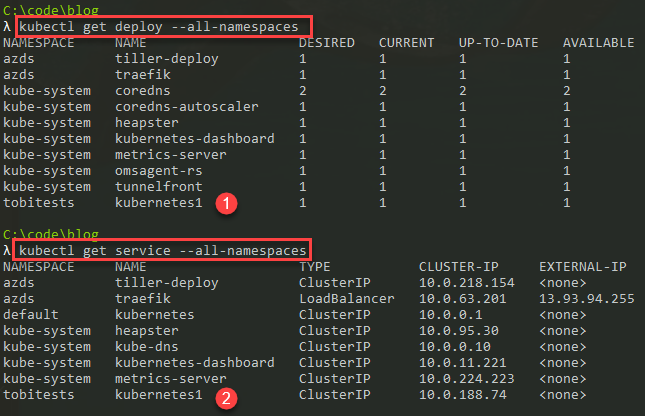
We could in the previous log see that there should be one Service and one Deployment in the cluster. Let's ensure that they're really there:
kubectl get deploy --all-namespaces
and:
kubectl get service --all-namespaces

Test the simple application
If you were attentive during the output log in Visual Studio when hitting F5, you would notice something similar to this message:
NOTES:
1. Get the application URL by running these commands:
  export POD_NAME=$(kubectl get pods --namespace tobitests -l "app=kubernetes1,release=azds-46bbfa-tobitests-kubernetes1" -o jsonpath="{.items[0].metadata.name}")
  echo "Visit http://127.0.0.1:8080 to use your application"
  kubectl port-forward $POD_NAME 8080:80
It explains exactly how we can port-forward through kubectl to test and use our application directly from our localhost, even while it's running in Kubernetes. Let's try.
Since I'm on a new Windows machine, and I don't have Bash installed at the moment, I'll do the commands one by one.
1. List the pod for my deployment
kubectl get pod -n tobitests
You can also use the command they output in the Visual Studio window, should you want to (if you've got multiple pods or a more complex deployment it might be easier):
kubectl get pods --namespace tobitests -l "app=kubernetes1,release=azds-46bbfa-tobitests-kubernetes1" -o jsonpath="{.items[0].metadata.name}"
kubernetes1-6c4fbd746c-9bcg2
The output is the name of my pod: kubernetes1-6c4fbd746c-9bcg2
2. Port-forward with kubectl
To ensure we can route the traffic from our localhost dev box to Kubernetes in AKS, we'll use kubectl:
kubectl port-forward kubernetes1-6c4fbd746c-9bcg2 8080:80 -n tobitests
The output:
Forwarding from 127.0.0.1:8080 -> 80
Forwarding from [::1]:8080 -> 80
This indicates that it's now routed from my localhost machine into the pod deployed inside of AKS.
3. Navigate to the port-forwarded endpoint to test the application
So, let's try it. The url, as apparent, should be http://127.0.0.1:8080. Let's try to navigate there. Bam!

When you make requests to this url, you'll see some output in the command line to acknowledge that it's receiving the requests:

Summary and links
In this post I've explained and explored a bit around Azure Dev Spaces and Azure Kubernetes Services. The simplicity of getting started with AZDS is key to developers adopting this workload on a broader scale.
Now we have walked through these things:
- Enable Azure Dev Spaces for your existing AKS cluster
- Use Visual Studio to create a new Kubernetes-friendly project, or enable Kube/Helm support for an existing project
- Hit F5 to launch the localhost application and deploy to Azure Dev Spaces
- List and verify that our new deployment exist in Kubernetes
- Port-forward with kubectl to the pod in AKS to talk to the application IN the cluster
- Verify we can access the app, live in the cluster, directly from our dev box
Whew - this is incredibly slick, and can minimize iteration-time for a lot of dev- and test workloads you might have. I've already spotted several benefits with introducing AZDS to daily routines, and anything that helps me become more productive is a win.
Some more reading, and great links:
- MS Docs: Azure Dev Spaces overview
- MS Docs: How Dev Spaces work
- GitHub: Azure Dev Spaces repo
- VS: Visual Studio Tools for Kubernetes
Thanks for reading. I'd be happy if you left a comment.


Recent comments