
1. Introduction
In this post we’ll explore how easy it is to actually build a bot for Microsoft Teams using the Microsoft Bot Framework, which can be found here https://dev.botframework.com.
This post is meant as a starting point for building bots and conversational helpers using the Microsoft Bot Framwork. Of course, it doesn’t have to be limited to the Microsoft Teams channel, it can be targeting Slack, Skype or any other available distribution channel.
For the sake of this post, I’ll show how to build it and use it with Teams initially.
1.1 The bot: Nerdibot
As the title of the bot might subtly suggest, it’s a bot that replies with nerdy quotes. Very basic.
I even created a nerdibot logo using Paint 3D on my Windows 10 laptop.

1.2 Pre-requisites
A few things you’ll require are:
- Visual Studio 2017 is my preferred editor today
- Azure Subscription
2. Creating the boilerplate for the Microsoft Bot Framework in Azure and source control
In order to get started with building a successful bot using the Bot Framework, we should register it in the dev portal (https://dev.botframework.com).
2.1 Start registration of our new Bot in the Microsoft Bot Framework dev portal
Sign in to the dev portal, then head on over here:
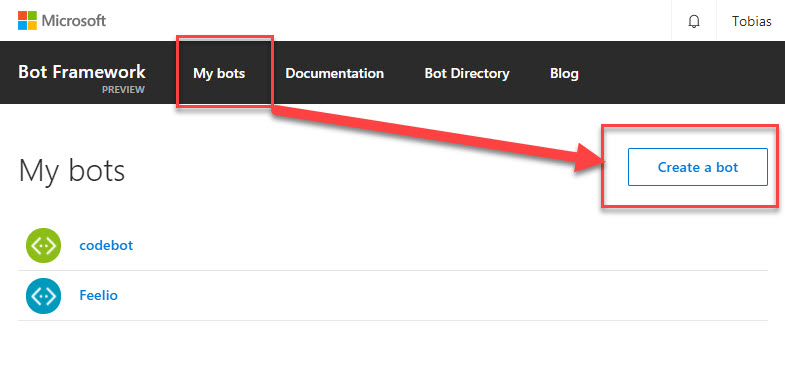
There’s currently only one option to select, so the obvious action is to click Create.
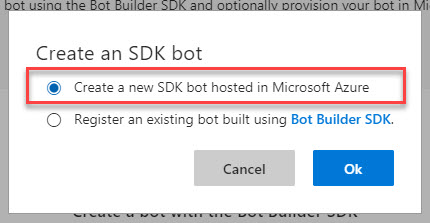
Next, we have to select where this bot will run. Do we build a completely new bot and host it in Azure or do we already have a bot running and we just want to register it?
Well, for the sake of this post we’re going with option number 1; Create a new SDK bot hosted in Microsoft Azure.
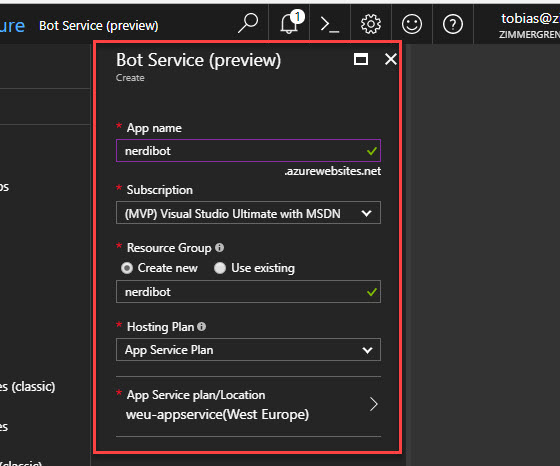
This will take us to the Azure Portal, ready to create a new Bot Service (preview) - pretty convenient:
2.2 Create resources in Azure to host our Bot
Once it’s finished, you’ll see a notification in the portal:
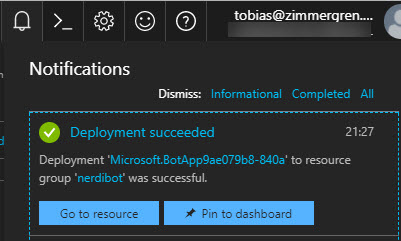
Click the button Go to resource to visit your new Bot resource in Azure, and we can get started with the fun part.
Select the template you’d like for your bot. Again, for the demonstration of this guide I’m using the C# template and using the most basic version of a bot template available, Basic. We can extend the logic of this to infinity later, should we want to make it a bit more amazing.
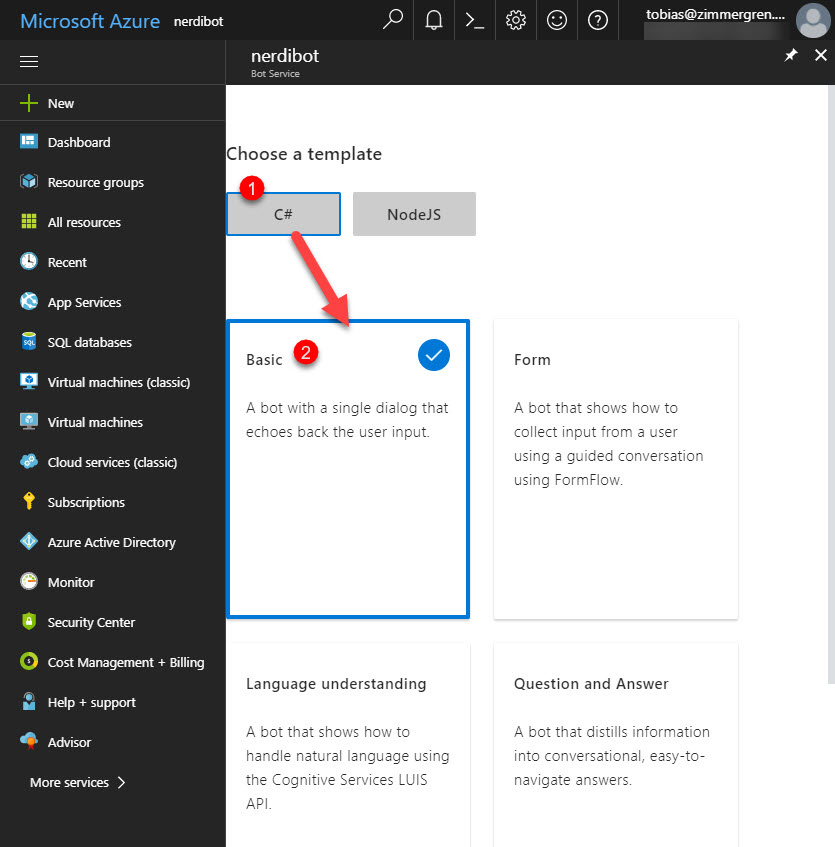
Click Next at the bottom of the page.
2.3 Create a Microsoft App ID for your new bot
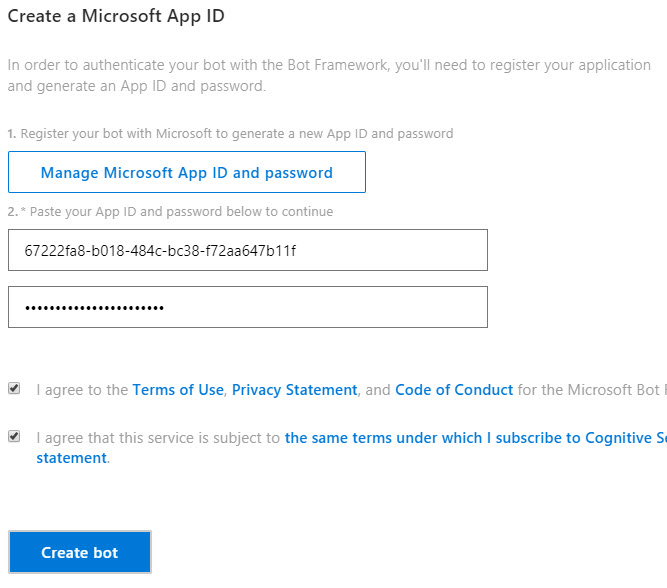
You’ll be seeing the following page, where you will need to click Create Microsoft App ID and password:

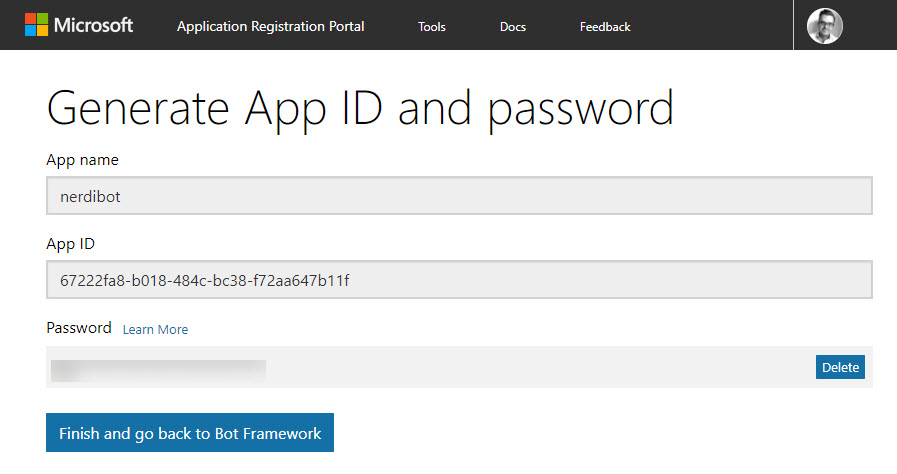
Clicking the button will take you to the Application Registration Portal, from which you’ll be able to generate your Application Id and Password:
Click Finish and go back to Bot Framework.
Ensure that the App Id is correctly entered by default (it will be), and ensure you paste the password you securely copied in the previous step:
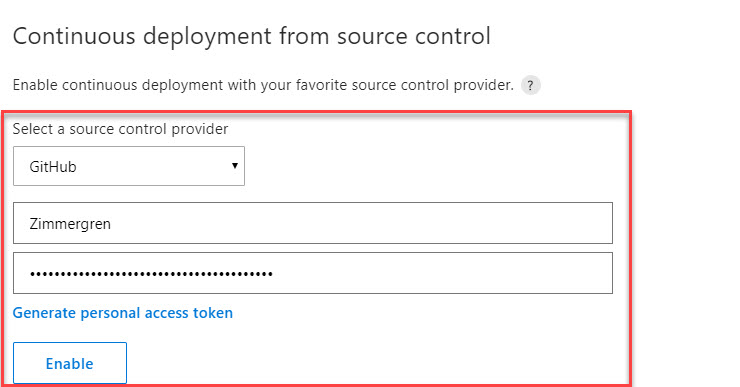
2.4 Connect to GitHub
So, this is obviously an optional step. You can select to hook it up to continuous deployment, or not. I think it’s pretty sweet as it gives us continuous deployments. I’m using https://github.com for this.
Enter your GitHub (or other source control provider) credentials:
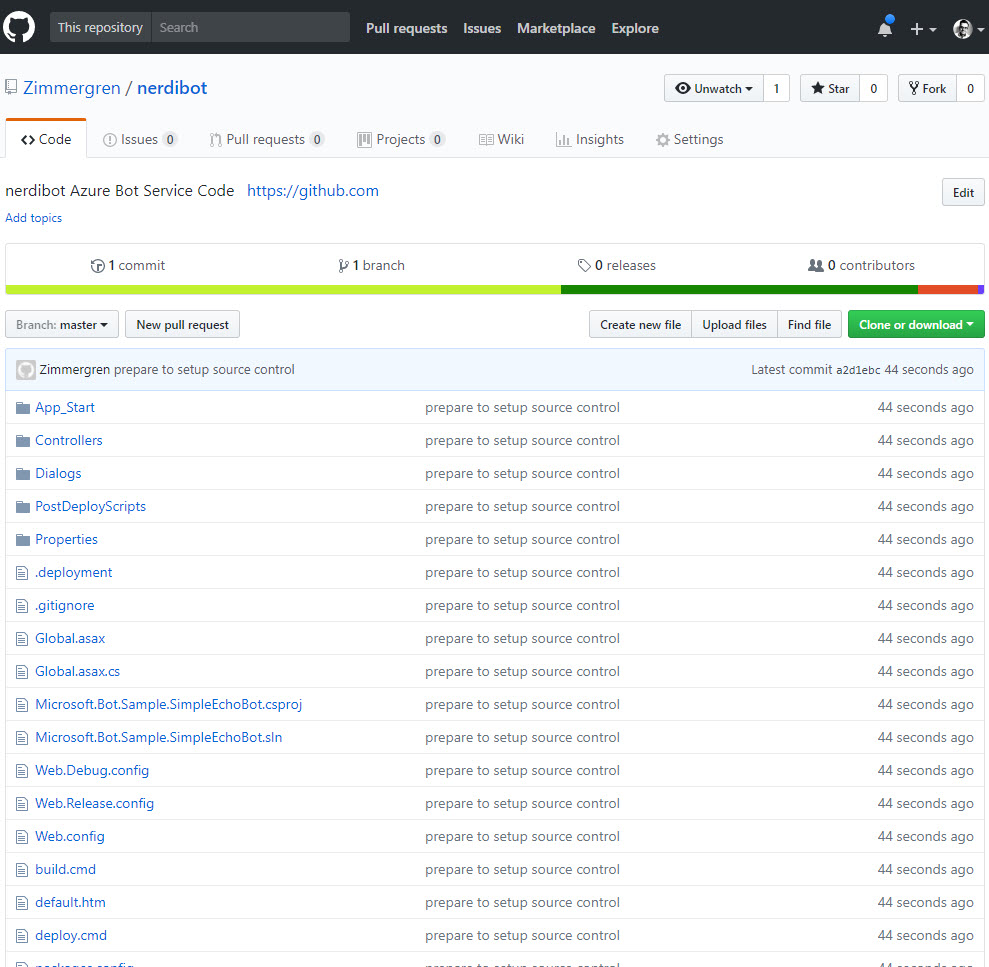
It will automatically connect to GitHub now, and create a new repository with the name of your bot. Mine ended up with https://github.com/Zimmergren/nerdibot
Configure continuous deployment by following the config button in the Azure portal.
I’m happy with the default settings for now.
On GitHub, I can see the repo successfully being created:
3. Tips for testing the bot
Great, we’ve set things up and we’re ready to go. Code is deployed using CD and GitHub, and the template code has been deployed.
How do I test this thing, to ensure it actually does something I want?
3.1 Test the bot from the Azure Portal
From inside the Azure Portal, we can easily test the bot functionality using the big blue Test button. The functionality of the current bot is simple: Echo whatever you type. That’s the basic demo we selected initially.

Okay, we can see that things work. But it’s not really convenient to try and troubleshoot anything at all from here.
3.2 Use the Microsoft Bot Framework Emulator (recommended)
3.2.1 Connect to the Cloud-hosted version of the bot when it’s deployed
Sometimes it’s beneficial to inspect the requests and responses from a service that’s deployed and already running. Since our bot is published publically and available already (from the previous steps), we should be able to reach the Bot on the Url we specified when configuring it in Azure.
My bot exists at https://nerdibot.azurewebsites.net.
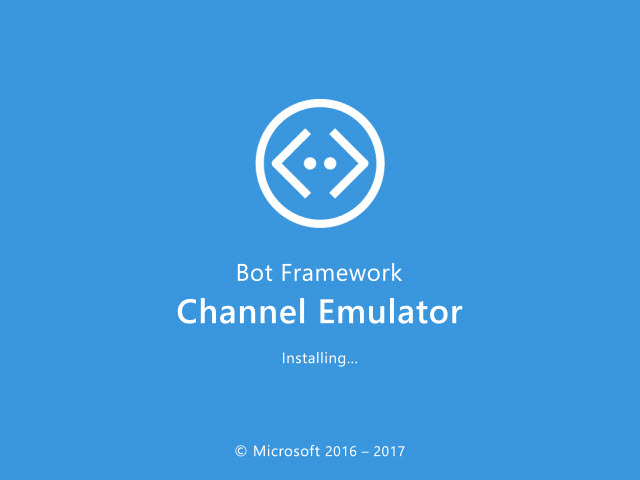
Download the Bot Framework Emulator and install it.
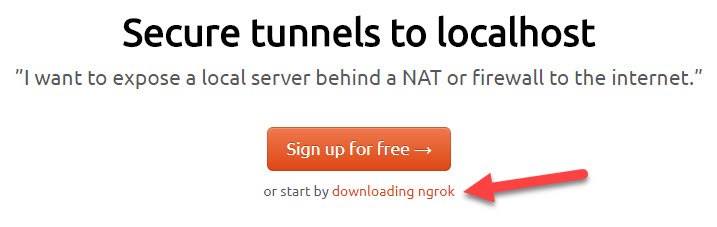
Since we’re also connecting to a service hosted outside of the firewalls and routers (which I assume everyone has, right?), we need to tunnel the request back to our machine. Using ngrok we can easily do this, and it’s fluent with the emulator.
Head on over to https://ngrok.com and download it.
Put the executable where you want it, as long as you remember it in the next step.
Launch Bot Framework Emulator and click the three vertical dots (ellipsis menu) and select App Settings:
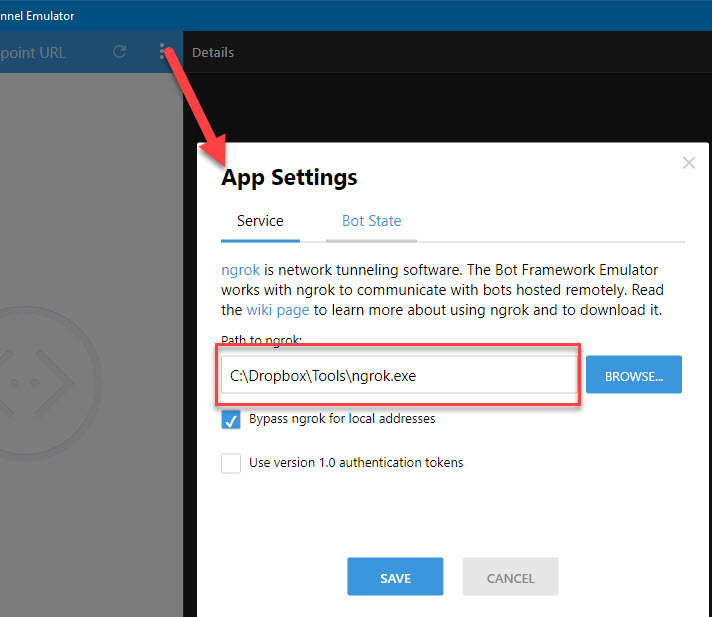
Ensure the path to the ngrok.exe executable is entered correctly, select to bypass for local addresses (normally it doesn’t make sense to use it when debugging localhost later..), click Save.
Now it’s time to try and connect to our hosted bot. Enter the URL to your bot, followed by /api/messages (see the routes in the source code if you’re wondering where this comes from).:
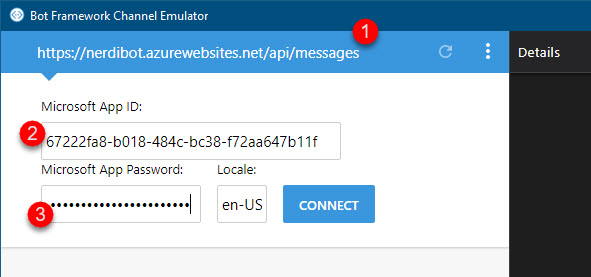
Hit Connect!
BOOM! We can now connect to our remote bot from the emulator, using our App Id and Secret as we entered in the previous dialogue.
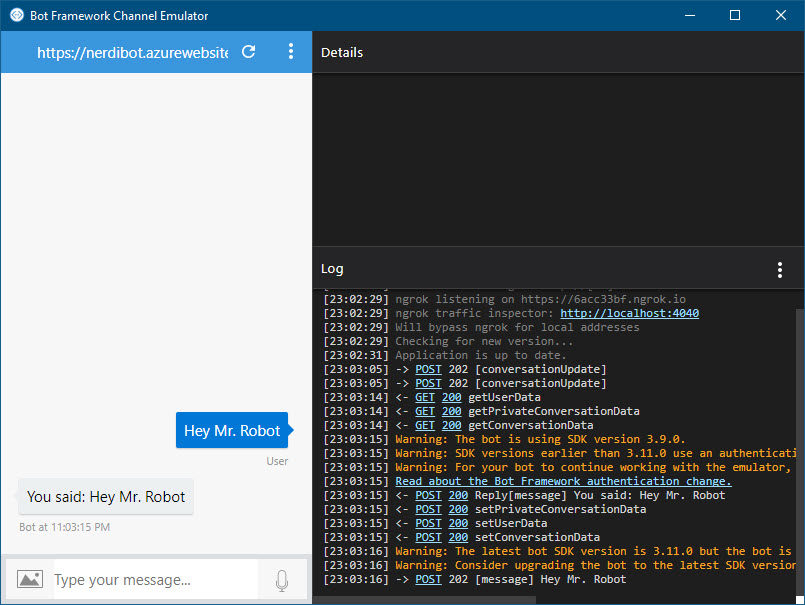
We’ll see the logs of what goes on through the emulator, helping us troubleshoot any issues we might have.
3.2.2 Connect and debug on localhost during development
Great - we’ve created a bot, we’ve put it in the cloud and we’ve verified that it works both in the Azure Portal and using the Desktop application Bot Emulator.
Now we want to debug it while running on localhost.
- Clone your GitHub repository (if you’re using that source control option)
- Launch the Solution which by default is called
Microsoft.Bot.Sample.SimpleEchoBot.sln - Hit F5 without modifying any of the code
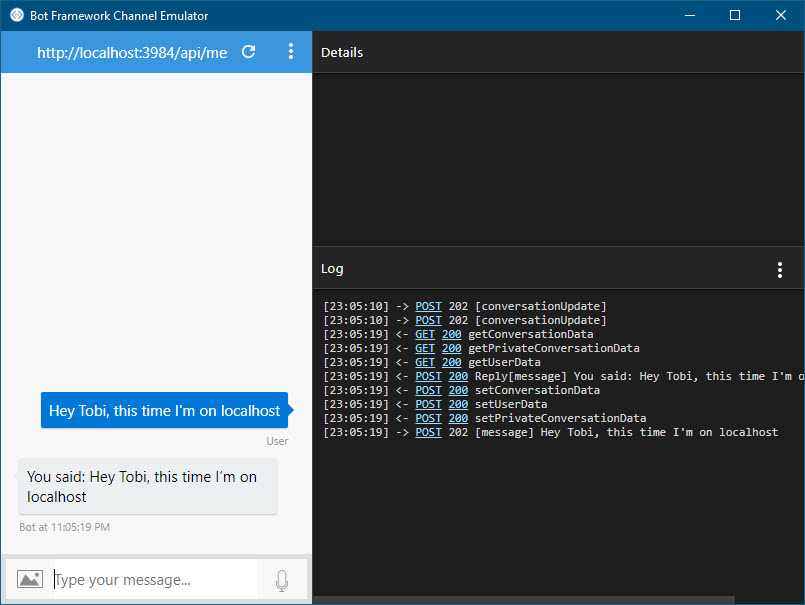
We can see that a browser is launching and hitting the localhost Url, in my case it lands on https://localhost3984.
- Copy this Url and append the same
/api/messagesas when doing it remotely - Enter the full Url into the Bot Emulator now and test it
4. Developing your bot
We’ll be changing a bit of the code of the bot to ensure that it works, our continuous deployment works, and that the hosted version of our bot gets the updates.
While a different post will cover the more in-depth aspects of the actual bot development (there’s some gotchas and a lot of fun tips), we’ll focus on the steps required for getting things to work here.
4.1 Introducing a Chuck Norris API call and utilizing the IActivity to return a “Bot is typing” type of message
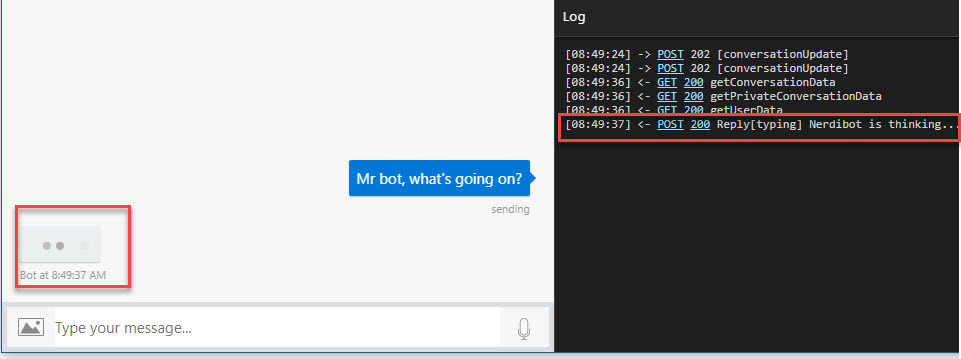
I’ve changed the code in the main EchoDialog which is given to us by default. I’ve introduced a Chuck Norris API which gives you a reply with a quote as if it were Chuck, and added an IActivity implementation sending back a message to the client that the bot is “Nerdibot is thinking..”. The reason for this activity is that you can then see in the UI that the bot has received your request, and it’s working on a reply - for example if the API call takes a bit longer or if it needs to do more complex queries or computing, it might be a good idea to indicate to the user that it’s working on it.
Here’s the full code of the EchoDialog now, with the small changes to introduce the two above things:
using System;
using System.Threading.Tasks;
using Microsoft.Bot.Connector;
using Microsoft.Bot.Builder.Dialogs;
using System.Net.Http;
using Newtonsoft.Json;
using System.Collections.Generic;
using System.Diagnostics;
using System.Threading;

namespace Microsoft.Bot.Sample.SimpleEchoBot
{
    [Serializable]
    public class EchoDialog : IDialog<object>
    {
        public async Task StartAsync(IDialogContext context)
        {
            context.Wait(MessageReceivedAsync);
        }

        public async Task MessageReceivedAsync(IDialogContext context, IAwaitable<IMessageActivity> argument)
        {
            #region Is Typing Activity

            var activity = context.Activity as Activity;
            Trace.TraceInformation($"Type={activity.Type} Text={activity.Text}");
            if (activity.Type == ActivityTypes.Message)
            {
                var connector = new ConnectorClient(new System.Uri(activity.ServiceUrl));
                var isTyping = activity.CreateReply("Nerdibot is thinking...");
                isTyping.Type = ActivityTypes.Typing;
                await connector.Conversations.ReplyToActivityAsync(isTyping);

                // DEMO: I've added this for demonstration purposes, so we have time to see the "Is Typing" integration in the UI. Else the bot is too quick for us :)
                Thread.Sleep(2500);
            }

            #endregion

            #region Handle incoming message

            var message = await argument;

            HttpClient client = new HttpClient();
            var chuckJoke = client.GetStringAsync("https://api.chucknorris.io/jokes/random").Result;

            var deserializedChuck = JsonConvert.DeserializeObject<dynamic>(chuckJoke);
            string chuckSays = ((dynamic) deserializedChuck).value.ToString();

            await context.PostAsync(GetRandomGreet(activity.From.Name) + Environment.NewLine + chuckSays);

            #endregion

            context.Wait(MessageReceivedAsync);
        }

        private string GetRandomGreet(string name)
        {
            List<string> greetings = new List<string>
            {
                $"Hey there {name}!",
                $"Okay {name}.",
                $"{name}, your request has been considered, and I approve. This time.",
                $"Okidoki {name}.",
                $"What's up my awesome pal, {name}."

            };
            Random r = new Random();
            int index = r.Next(greetings.Count);
            string randomString = greetings[index];

            return randomString;

        }
    }
}
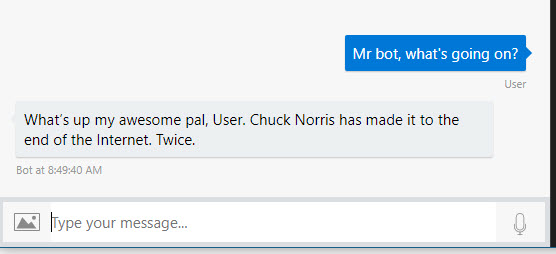
When running the bot, it will now look something like this:
- When you type something to the bot:
Once the message is handled and the bot finished thinking (e.g. my dummy Thread.Sleep() elapsed), you should see the reply:
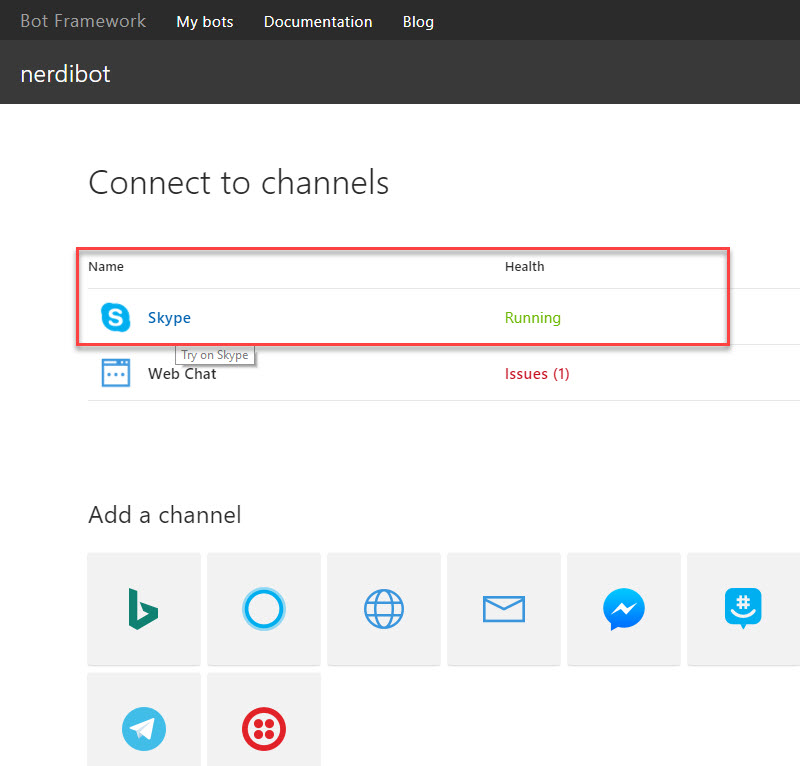
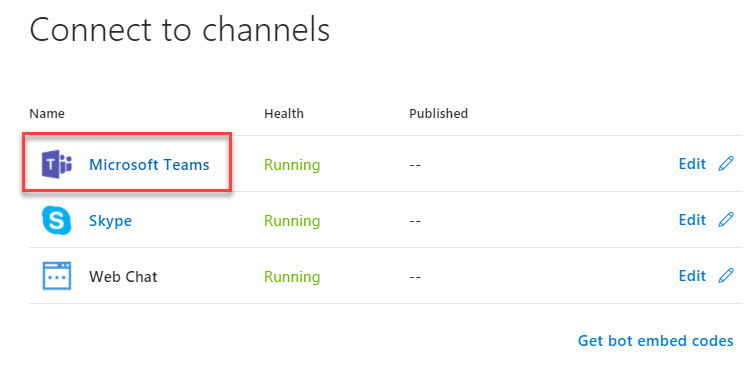
5. Connect the bot to various channels
Right, now imagine you’ve got all your awesome code up and running, and your bot is doing what ever it is that you need it to do. We need to distribute it across various channels and try it out with various platforms.
In order to try it out with a real platform, instead of just the Bot Framework Emulator and Azure test UI, we’ll try to add it to a few different channels. Tag along.
5.1 Add your bot to Skype (consumer)
We’ll be connecting to Skype first. It’s already running by default and we’ll be tring that out.
- Head over to the Bot dev portal again at https://dev.botframework.com
- Click on the
Skypechannel which should be connected already:
- Add the bot as a contact so you can communicate with it

- In your Skype client, you can now see your new bot as a contact
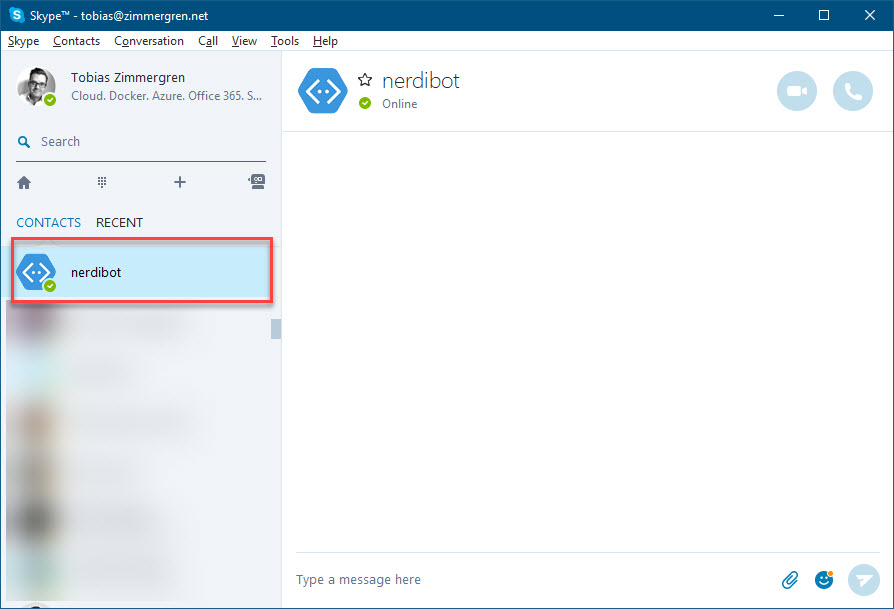
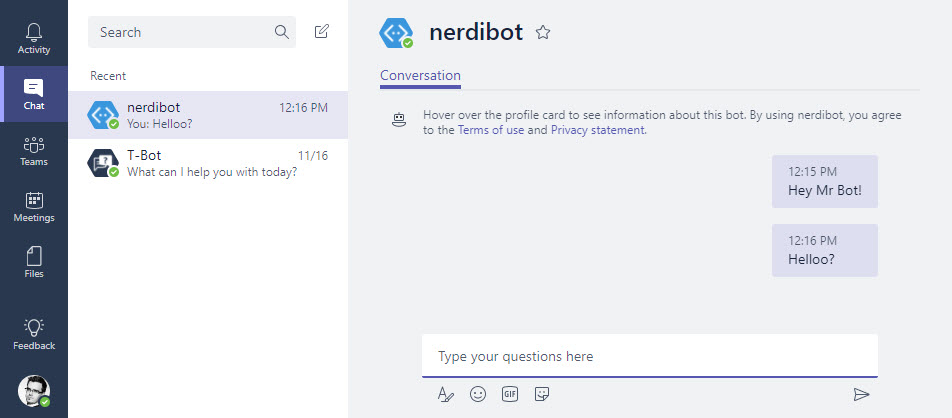
- Chat with the bot!

- We’ll see that it’s got the delay in place (is typing…) and it gets my name correct
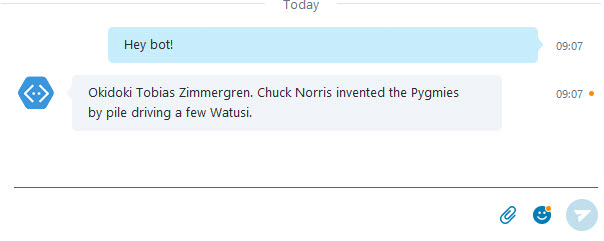
My bot is live on Skype, and can be found here:

5.2 Integrate your bot with any web form
Another standard feature of the Microsoft Bot Framework is to host your bot on any web site or form of your choosing. This is an interesting option if you’re integrating a support bot or helper bot on your publish website (or even on your intranet).
- Head over to the Bot dev portal again at https://dev.botframework.com
- Click on the
Editlink next to theWeb Chatchannel:
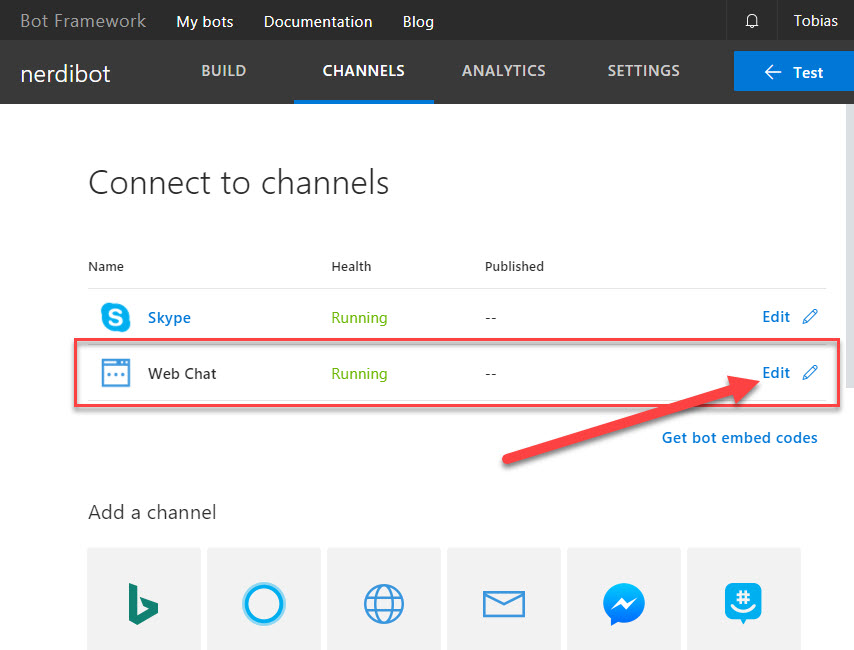
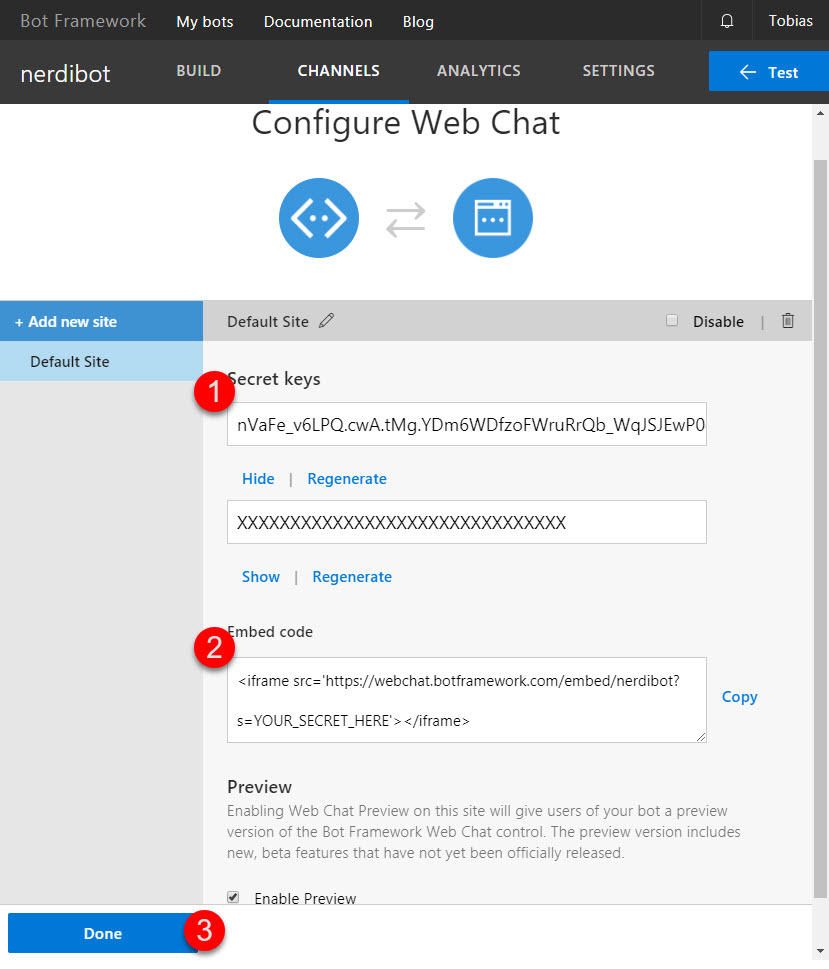
- Make a note of ( 1 ) the Secret Key
- Make a note of ( 2 ) the Embed Code
- Click Done
- Copy the Secret into the Embed Code and replace the
YOUR_SECRET_HEREwith your own secret - Copy this embed code into any web site of your choice
Here’s what my embed code looks like (I’ve faked the Secret to avoid abuse):
<iframe src='https://webchat.botframework.com/embed/nerdibot?s=nVaFe_v6dfdfwA.tMg.dfdfzoFWruRrQb_WqJSJEwP0qIY7c8dfdfcvRZ8k' width="500px" height="800px"></iframe>
- I copied this embed code into
hello.htmlwhich contains nothing else
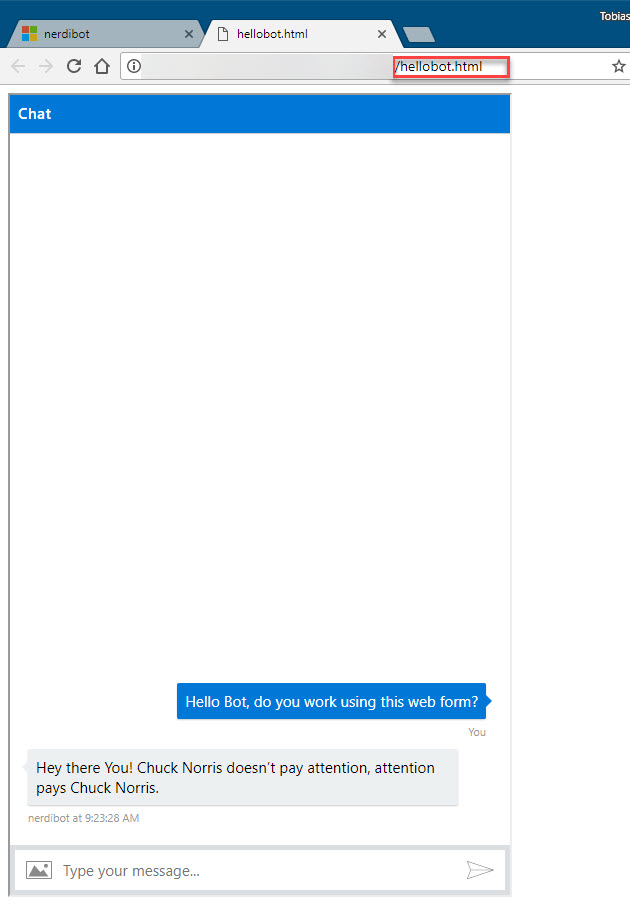
Awesome, we’ve connected it to a website as well. Obviously, you may want to connect it to an actual web site for a more realistic use case, but now you know how to do that.
5.3 Connect your bot to Microsoft Teams
- Head over to the Bot dev portal again at https://dev.botframework.com
- Click on your bot
- Click on the
Microsoft Teamslogo to add a new channel
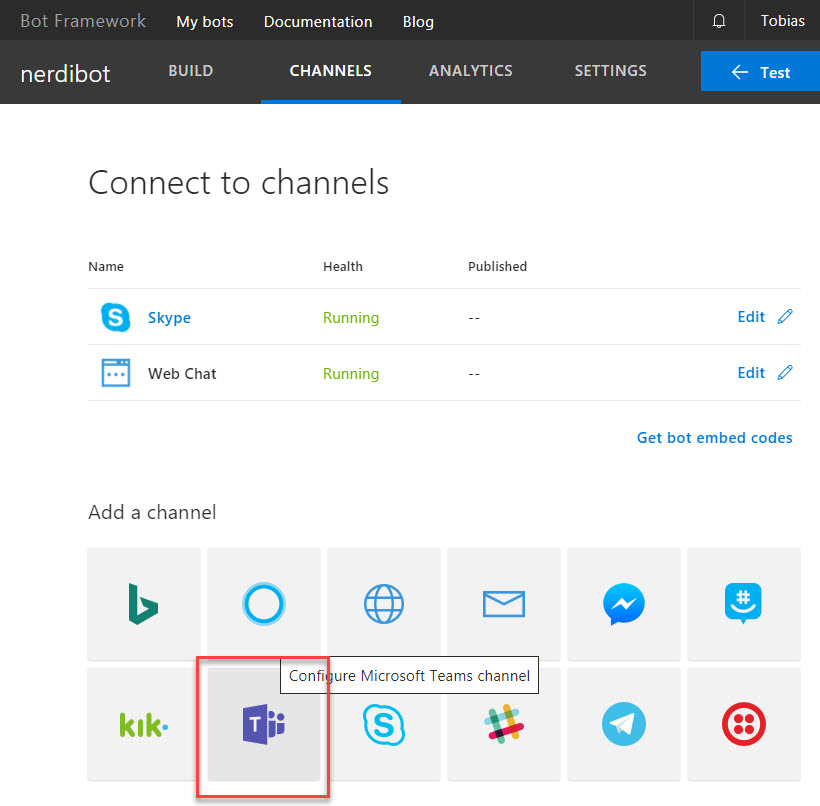
- It will tell you that it’s connecting to Teams, hit
Done
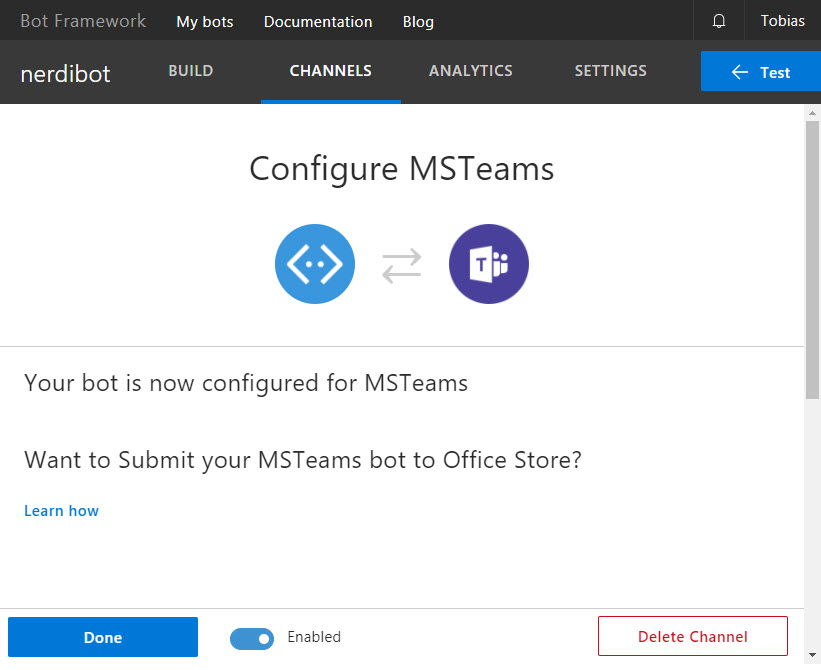
- Click the newly connected Teams channel and it will, just like with for Skype, launch the browser to connect to Teams with your new bot
- You’re connected to the chatbot in your Teams tenant, but he doesn’t reply. Why?
This is due to Microsoft Teams not being configured for Side-loading any apps.
Please read here: https://docs.microsoft.com/en-gb/microsoftteams/platform/get-started/get-started for how to configure sideloading.
Please note: If you don’t sideload your app, it will not be able to communicate. Unless you publish the bot, in which case anyone can add it (if they allow external bots).
- Once sideloading is configured as per the article mentioned above, you should see it work.

I hope this gives enough insights into how easy it actually is to build a bot that can be run anywhere. The MS Bot Framework does indeed have lots of benefits and the SDK’s are evolving.
6. Bot Analytics and Insights
Imagine you’ve developed a really nice bot now, and that you want may be using it internally in your organization, or you have even published it as an official bot somewhere. You want to see the insights and numbers on how it performs, right?
Let’s check a few options out.
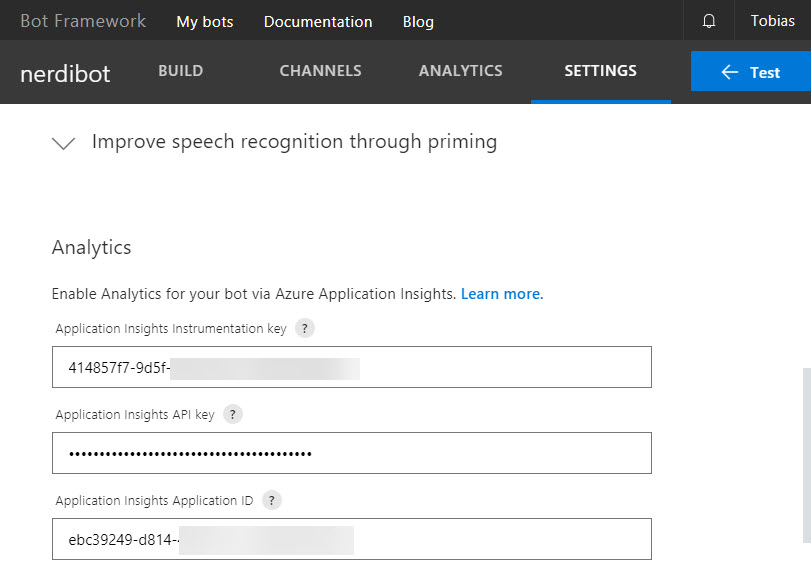
6.1. Application Insights
When setting up the project the way we did, we also get Application Insights hooked up to the resource in Azure so we can easiy track what’s happening, how it’s being used and if there’s any unexpected errors happening.
- Head over to the dev portal for Bot Framework again: https://dev.botframework.com
- Click
Settingsfor your bot - Scroll down to the Analytics section and ensure the data is populated.
If there’s no data configured here, follow the link Learn more to get started on that journey.
Now, to check out the real Application Insights data, follow these few steps:
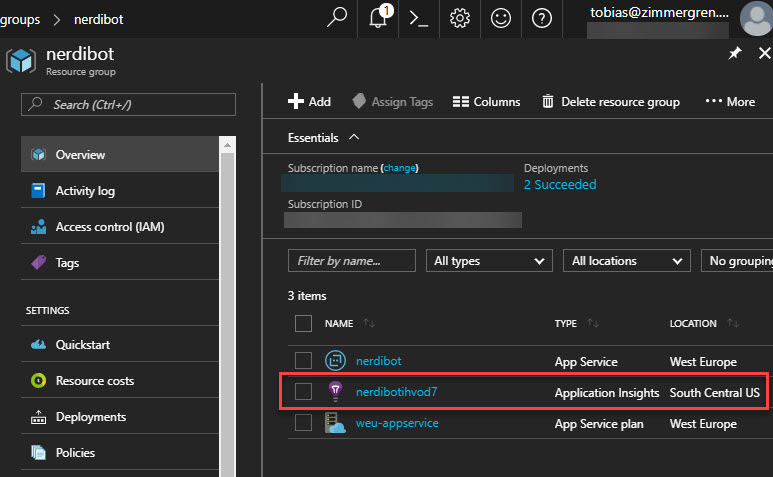
- Head to your azure portal https://portal.azure.com
- Find the resource group for your new bot
- You’ll see that there’s an Application Insights resource connected to the bot. Click it:
From here, you can access ALL insights from your bot. Well, the default ones at least.
If you want to add more App Insights into your code, you can do that as you would with any other Application Inisghts development task.
Since my bot is completely new off the shelf and there haven’t been anyone else using it, I can’t really see much insights yet - but there’s some exceptions logged already:
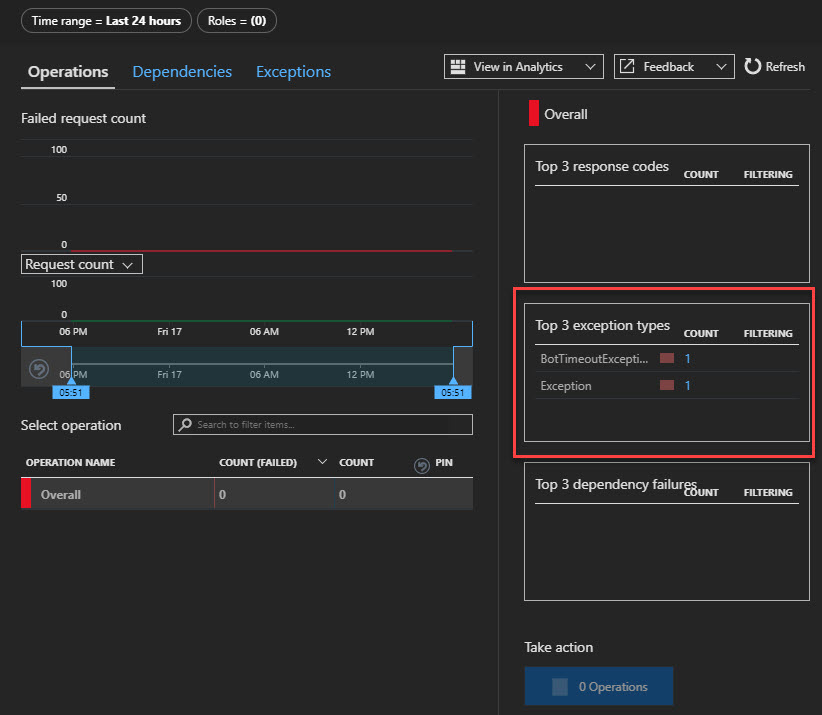
- BotTimeoutException
- Exception
These exceptions might be hard to find if you don’t have any analytics. Imagine you’re publishing an app used by hundreds of organizations, and something goes wrong - you’ll need to quickly fix it and ensure that it doesn’t happen again. App insights is a good first step to do this, with Bots as well as other resources. (Yes, I use App Insights with a lot of my real projects too).
We can drill down into these exceptions and see what really happened:
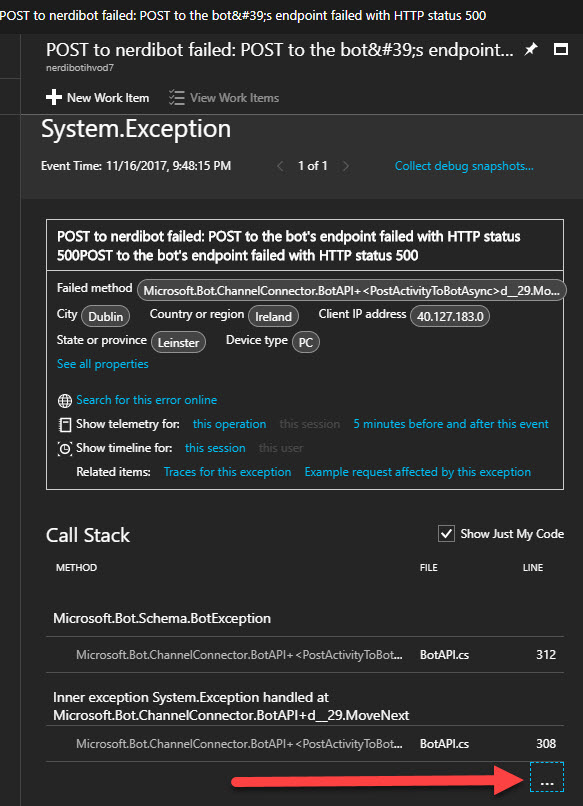
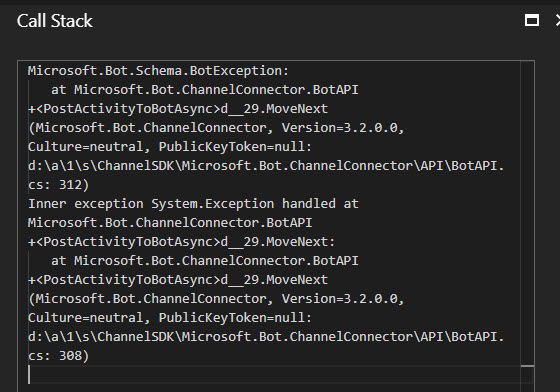
Clicking where the arrow points will give you the full stack trace of what happened:
Hopefully as the bot matures, you’ll find that the inisghts can tell you usage patterns, unexpected errors and quickly find a remedy for anything which is breaking.
6.2. Simple analytics from the Bot Framework portal
From within the portal itself (well, you can access it through the dev portal for Bot Framework or through your Azure resource, but its the same place in the end), you can see some quick but valuable insights about your application and where and how it’s being used.
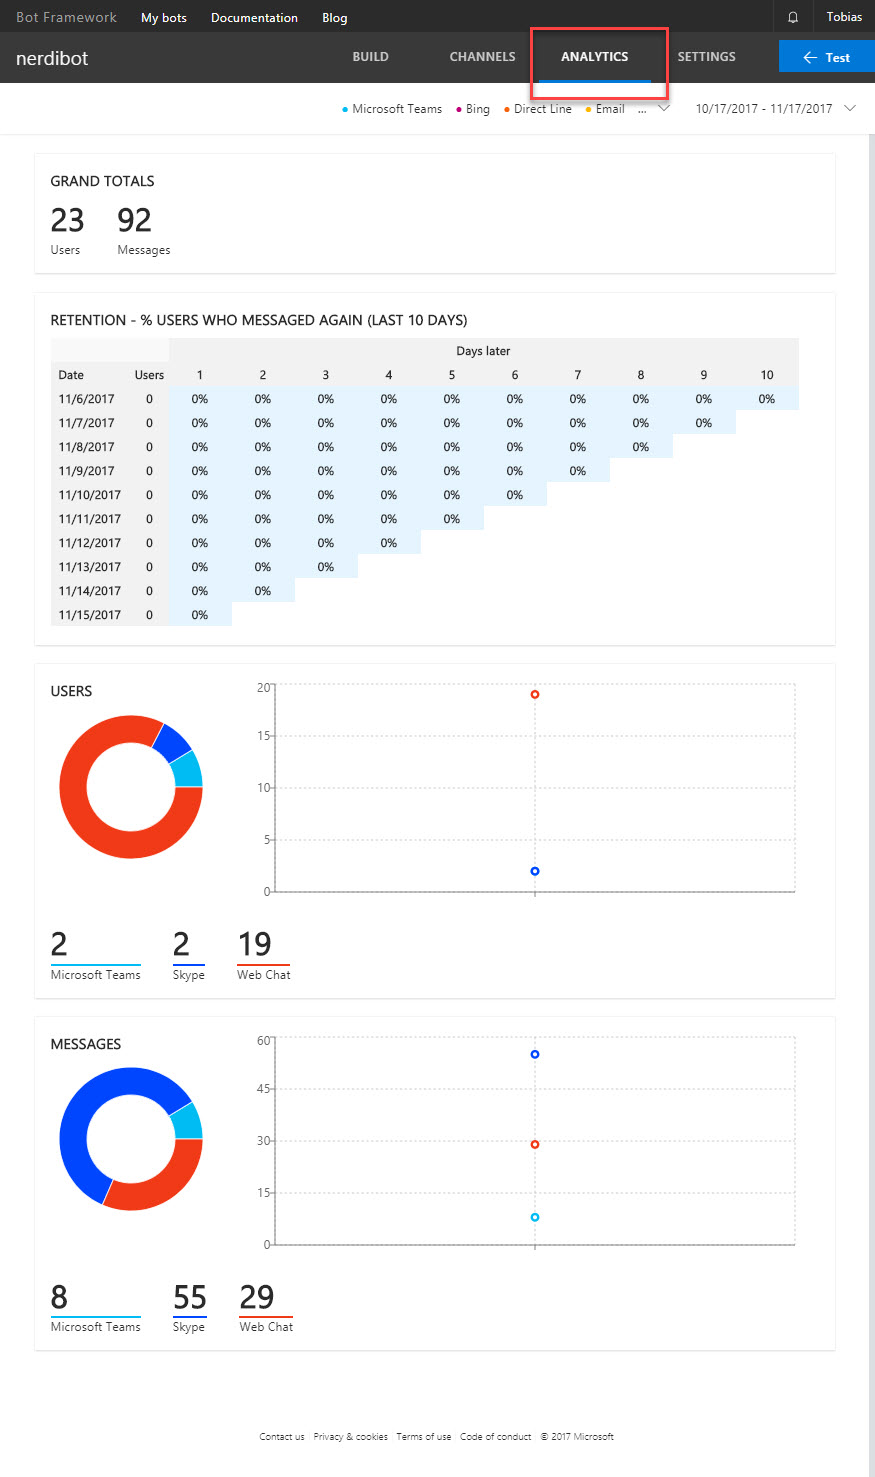
While not as comprehensive as the details you’ll view directly in App Insights, it’s enough to just see if your bot is being used and which channels are more popular.
Summary
With this post I hope that it’s become a bit more clear just how easy it is to get started with building bots using the Microsoft Bot Framework!
I might go into further details with node.js bot development, in-depth C# bot development and building more complex bots using the SDK’s available. But that’s for another post - now we at least know how easy it is to get started.
Cheers,
Tobias.

Comments are closed
Archived comments
What a detailed tutorial ! cant wait testing it :) Thx Tobias
Thanks @Jeff974:disqus, I'm glad you liked it - let me know how it goes. It'd love to hear what you'll be building.
Cheers,
Tobias.
Thinking about building an FAQ Bots in teams / skype about common questions within my company (how to apply leave, what is the wifi password), is it good for such use case ?
It sounds like a great idea. I've seen similar asks recently, and I've also stumbled upon the Obie bot for Slack which could be used to draw some inspiration: https://obie.ai
some other inspiration too :) https://github.com/FranckyC...
Looks like fun :-)
HI Tobias, i am looking for a calling bot, so could you please share me the details about how to do it, thank in advance
thanks for this tutorialguide for making it easy to accomplish on my own. i have build a bot and is running on my skype now, is very fun and thank you. can you know where i can find more to learn on build the bot smarter?
Hi Samael,
You're welcome. I'm glad you liked it, and happy to hear you've got your bot running.
As for making the bot smarter, there's plenty of ways. There's the dumb smartness (clever conversations) and real smartness (AI). Long discussion topics both of them, but here's some info to get you started:
Some things I've found useful are:
- https://docs.microsoft.com/...
- https://docs.microsoft.com/...
The above links focuses on recognizing and understanding what the user types, and then you can handle the intent in your code with LUIS based on that. It's pretty useful if you build conversational chatbots. I would recommend those links as a starter to investigate if this is something you'd be keen on building - the topics of real AI is something entirely different :-)
Fantastic tutorial - I'd done some initial bots w/ MS-Teams, but couldn't get it working. Thanks for a great step-by-step guide... :-)
Thanks @disqus_7vymRvfgYV:disqus for your kind works. I'm glad you got it working.
Would you mind sharing what the final piece of the puzzle was to get it working?
Cheers,
Tobias.
Superb Explanation ! Thanks ! @Zimmergren:disqus Can you suggest how can we integrate Bot created through Microsoft BOT Framework to any existing portal where users are already logged in? I tried with Web Chat and its working like charm ! However, how about making it user based ? Also, currently it exposes tokens ? How can we use existing authentication (SSO integration or something?)
To cut things short, what architecture would you suggest to integrate this within any existing portal where there is user based authentication?
Many thanks in advance.
Best,
Hardik
Great Explanation but please if the bot was to be added to a website and it shows immediately the website is loaded how can one do that
Hi @jamiumuritala:disqus,
Did you look at the "Web chat" option that I described in the post?
Thanks,
Tobias.
Without using the Iframe
How to integrate a handoff in v4?
The chatbot is working fine now I want to introduce a feature like handoff to a agent type by shich both can communicate could you please help me implementating the same in v4