
This post will be an introduction to how you get up and running quickly with building a node.js API which runs through Express on node.js and communicates with a deployed MongoDB database, using TypeScript. Simply put: a MEAN stack application with typings. Oh, except Angular. Since I’m not building a UI yet, this post only has MEN out of the MEAN.
MEAN is an opinionated fullstack javascript framework - which simplifies and accelerates web application development - mean.io
There’s plenty of ways to get up and running quickly with the MEAN stack. There’s plentyful of yeoman generators available online. In this post however, we’ll build a very simple API from scratch in order to see how easy it is.
I live in the Microsoft space a lot. Actually, every day for the last 15 years. That means I’ve got to play with Azure quite a lot. It’s extremely powerful, versatile and secure. There’s a tonne of features we use daily in a lot of our projects, services and deployments. But sometimes you want to check out the competition and alternatives. One of those in the app hosting space is Heroku. After using it with a few sparetime projects on various depths, I must say I’m intrigued to see what more it has to offer.
Looking for the source code? Find it in the Summary-section in the bottom of this post.
Enjoy.
A brief story about Heroku!
Heroku is a cloud platform based on a managed container system, with integrated data services and a powerful ecosystem, for deploying and running modern apps. The Heroku developer experience is an app-centric approach for software delivery, integrated with today’s most popular developer tools and workflows. - heroku.com
It comes with a pretty slick dashboard, making the management of your services a treat. In this post howerver, I’ll mostly use the CLI (Command Line Interface).

Check out the Heroku services and docs on Heroku.com
Step 1: Setup the initial project structure
In order to demonstrate the simplicity of this type of project and hosting it with Heroku, I’ll just init a simple new npm project file and build our simple API as we go.
Before we begin though, please make sure that you initiate git repository for this project, as you can the fully and flexibly deploy all your magic to Heroku with a simple git push. (You can also configure Heroku to pull latest changes from any branch you want, as they come in..).
So either do a git init or setup a new repo any way you feel preferable.
Init a new project
Firstly run the following:
npm init
Modify your generated package.json to look something like below, with these notes:
- I added
node index.jsto the start property in scripts. - I added a few dependencies under the
dependenciesproperty, which we’ll need in our code later.
{
  "name": "herokuquotesdemo",
  "version": "1.0.0",
  "description": "Awesome Heroku Project Sample",
  "main": "index.js",
  "scripts": {
    "test": "echo \"Error: no test specified\" && exit 1",
    "start": "node index.js"
  },
  "repository": {
    "type": "git",
    "url": "git+https://github.com/Zimmergren/heroku-quotes-demo.git"
  },
  "author": "Tobias Zimmergren",
  "license": "ISC",
    "dependencies": {
    "body-parser": "^1.15.2",
    "express": "^4.14.0",
    "mongodb": "^2.2.9",
    "mongoose": "^4.6.0",
    "node-restful": "^0.2.5"
  },
  "bugs": {
    "url": "https://github.com/Zimmergren/heroku-quotes-demo/issues"
  },
  "homepage": "https://github.com/Zimmergren/heroku-quotes-demo#readme"
}
Congrats, you have an awesome looking file right there! Moving on.
Install!
We’ve got our package.json file fully prepped with the dependencies we need. Now we’ll just run the following command to see the project dependencies be pulled down into the node_modules folder.
Run:
npm install
At this point we should be ready to start setting things in Heroku up too.
Step 2: Create your Heroku application
A pre-requisite for this to work, is of course that you have an account with Heroku. They’re free to start out with. Get one here signup.heroku.com if you don’t already have one. Once you’ve signed up for a free account you’re good to continue.
Install Heroku CLI
Whether you’re on a Mac, Windows or Linux, there’s a CLI available.
Head on over here: heroku CLI download and select the installer you’re looking for, and install it. Once done, keep reading and we’ll get this rocket flying!
Sign in to the Heroku CLI
Once installed, you can run the following command to make sure you’re correctly set up.
heroku login
Once logged in you should see a confirmation similar to the one below:
heroku login
Enter your Heroku credentials.
Email: tobias@domain.com
Password (typing will be hidden):
Logged in as tobias@domain.com
Create a new Heroku app using the CLI
Run the following command to create a new Heroku app:
heroku create
The output will be something like this:
Creating app... done, young-headland-17202
https://young-headland-17202.herokuapp.com/ | https://git.heroku.com/young-headland-17202.git
As you can see from the output, Heroku generates a unique subdomain for you based on a three-word combination (word1-word2-numbers). This will be the home of your heroku app. Simple as that.
Select the buildpack using the Heroku CLI
We’re developing a simple node.js api, hence we’ll need to tell Heroku that we want to use nodejs. Run the following command:
heroku buildpacks:set heroku/nodejs
The output should say something like this:
heroku buildpacks:set heroku/nodejs
Buildpack set. Next release on young-headland-17202 will use heroku/nodejs.
Run git push heroku master to create a new release using this buildpack.
For more information, see Heroku Dev Center : buildpacks.
Create a MongoDB database using the Heroky CLI
Since we’re going to host our data somewhere, preferably in the Heroku app, we can do this by creating a MongoDB instance to it like below:
heroku addons:create mongolab
The output should confirm your created database:
heroku addons:create mongolab
Creating mongolab on young-headland-17202... free
Created mongolab-rectangular-86557 as MONGODB_URI
Welcome to mLab.  Your new subscription is being created and will be available shortly.  Please consult the mLab Add-on Admin UI to check on its progress.
Use heroku addons:docs mongolab to view documentation
At this point we have everything in Heroku configured as we need it to start building our app/API.
Step 3: Build application…
Since I want to build this application using TypeScript, I will create a new index.ts file. This will then generate a new index.js file once transpiling, which is the starting point of our app (remember we set this early in this post, in the package.json configuration).
Install typings
In order for TypeScript to work, we need to install some typings. This can be done in several ways. I’m keeping it simple.
Create typings.json
Create a new file called typings.json and populate it with this:
{
  "dependencies": {
    "mime": "registry:npm/mime#1.3.0+20160723033700",
    "mongoose": "registry:npm/mongoose#4.3.5+20160628072220"
  },
  "globalDependencies": {
    "body-parser": "registry:dt/body-parser#0.0.0+20160619023215",
    "express": "registry:dt/express#4.0.0+20160708185218",
    "express-serve-static-core": "registry:dt/express-serve-static-core#4.0.0+20160829034835",
    "node": "registry:dt/node#6.0.0+20160907103612",
    "serve-static": "registry:dt/serve-static#0.0.0+20160606155157"
  }
}
Install the specified typings
In order for the typings to be installed in your project, simply run:
typings install
Build the TypeScript node.js app
At this point we’re all set to start developing our TypeScript application, and later deploy it to Heroku and store the data we produce in the MongoDB database.
This project will be a demo of how to build a simple API, and since we’re using TypeScript we want to define some typings for the model.
In my case I’m sticking to a traditional Quotes demo, which will allow us to get, post, put, update and delete quotes in our database.
Create tsconfig.json
Create a new tsconfig.json file which will define the TypeScript project settings.
My default tsconfig.json file normally looks like this before any other custom changes are added:
{
    "compilerOptions": {
        "target": "es5",
        "module": "commonjs",
        "sourceMap": true
    }
}
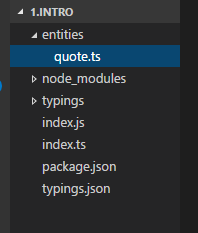
Create a file called quote.ts
Create the quote.ts file. Mine is located in a folder called entities, as such:
The contents of this file is this:
/// <reference path="../typings/index.d.ts" />

import * as mongoose from "mongoose";

interface IQuote{
    text:string;
    author:string;
}

interface IQuoteModel extends IQuote, mongoose.Document{};

var quoteSchema = new mongoose.Schema({
    text: String,
    author: String
});

var Quote = mongoose.model<IQuoteModel>("Quote", quoteSchema);
export = Quote;
We’re firstly telling the file to use the mongoose module, which is how we communicate with the MondoDB in a slick way.
I’m defining an interface called IQuote, and an IQuoteModel interface that implements the IQuote interface and extends the mongoose.Document{[}} which is required to get the benefits of the mongoose model.
If you’re new to Mongoose, don’t worry - read more about it here.
Create index.ts
Create a new file called index.ts.
This will be the entry-point for your app, as we defined in the package.json file in the beginning of this post.
Import required dependencies
In order for us to complete this code, we first need to import the references we need in our code. Add this to the index.ts file:
/// <reference path="typings/index.d.ts" />
import * as express from "express";
import * as bodyParser from "body-parser";
import * as Quote from "./entities/quote";
import * as mongoose from "mongoose";

// node-restul doesn't have typings, so we'll have to use plain js require to get it :-(
var restful = require('node-restful');
Define common variables
You can do this a number of ways. Keeping it aligned with the other simple examples, add these variables after your import statements:
// ===============
// COMMON VARIABLES
// ===============
let appPort: number =  (process.env.PORT || 8080);
let connectionString: string = process.env.MONGODB_URI;
The appPort variable defines the port we’ll launch our server on, and the connectionString variable defines the mongodb connectionstring as per the newly created Heroku app. If you find that the process.env.MONGODB_URI doesn’t work, simply define the full connectionstring hardcoded. (Though, I wouldn’t recommend that for any production use).
Create the expressjs app
Below the previous code block, add this:
// ===============
// Express App
// ===============
var app = express();
app.use(bodyParser.json());
app.use(bodyParser.urlencoded({
    extended: true
}));

app.set("port", appPort);
We’re using Express to run our api.
If you’re not familiar with Express, check it out here
Define the REST API for the Quotes model
In order to support a full CRUD operation in the REST API, I’ve decided to use something called restful. Using this, we can define the allowed and supported REST operations without any hassle at all. It reduces the overhead of writing your own endpoints.
Add this code below the previous code block:
// ===============
// REST API LOGIC
// ===============
var quoteApi = restful.model("quote", Quote.schema)
  .methods(["get", "post", "put", "delete"])
  .register(app, "/api/quote");
I’m creating a new restful model called quote which is based on the Quote.schema. I’m adding the get, post, put and delete methods to the restful model. I’m hooking it up to the express app on the following endpoint: /api/quote.
Simple. Done.
Connect to mongodb
As mentioned previously I wanted to use mongoose instead of working directly with mongodb. Add this one-liner to connect to the database. The connection string used is the one we defined earlier.
// ===============
// DB
// ===============
mongoose.connect(connectionString);
Define the server
The final piece here is to get the server up and running so it will host our app. Add this code block after the previous one:
// ===============
// SERVER
// ===============
let port:number = app.get("port");
var server = app.listen(port, function(){

    // note: Only for debugging purposes to see that your variables are set correctly...
    console.log("connectionString is: " + connectionString);
    console.log("port is: " + port);
    console.log("Server started listening...");
});
Done.
Make sure it transpiles into javascript!
First, if you haven’t done so, run npm install to make sure everything in the definitions is installed. Then just run this:
tsc
This should transpile your code into .js files and that’ll be that.
Done.
Of course there’s more convenient ways to do this. One being a gulp task, but let’s save that for another time.
Step 4: Verify that your app works!
You can either run it using npm start, or as I want to do it run this:
heroku local web
It launches heroku in localhost serve mode.
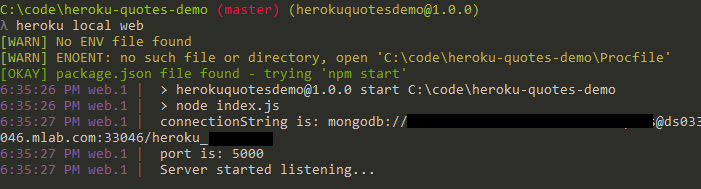
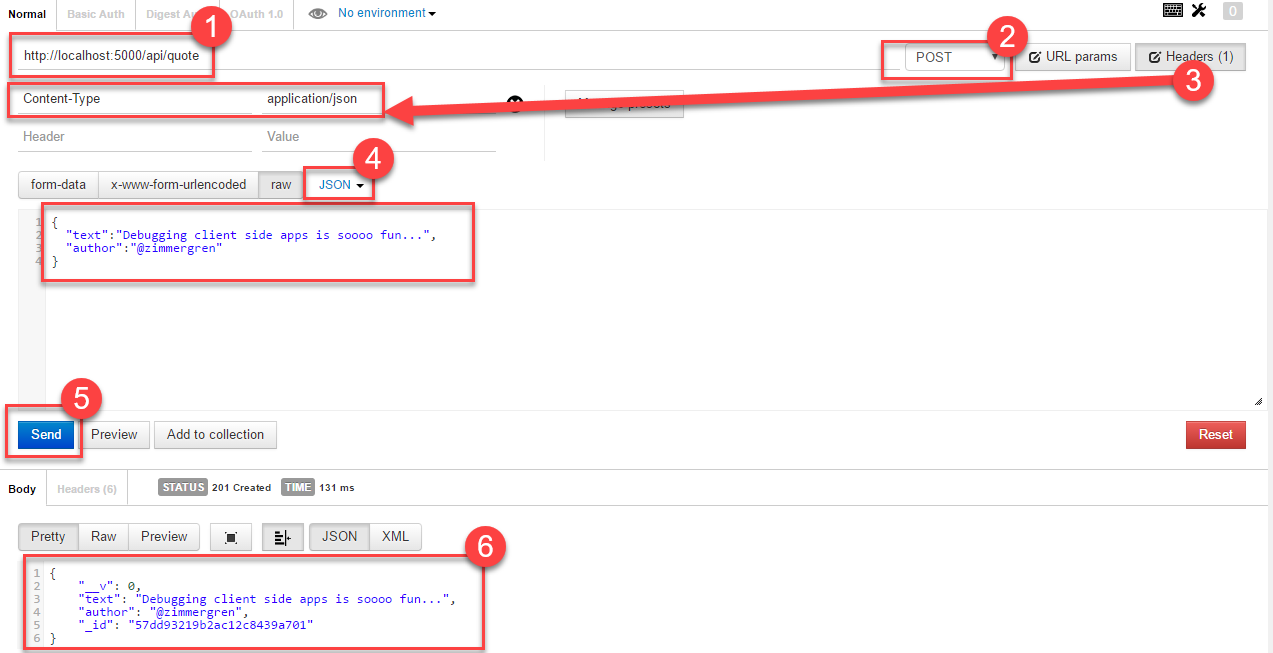
Verify the /api/quote API endpoint
My app is hosted on port 5000 so my url for the full endpoint is http://localhost:5000/api/quote. I will use Postman to test my api easily.
Adding a quote
Launch Postman (I’m using the aforementioned Postman extension for Chome which I love).
- Enter the api endpoint url
- Select
POSTso it will post data - Click
Headersand enter aContent-Typeheader with the valueapplication/json - Select
JSONfrom the dropdown and enter the json-formatted request - Click
Send - See the response to your request
Getting all quotes
At this point I would assume it’s pretty self explanatory how you could retrieve the items from your api as well. Using postman you’ll simply change to a GET request instead.
Try this:
- Enter the api enpoint url
- Select
GETso it will retrieve data - Click
Send - See the response to your get-request
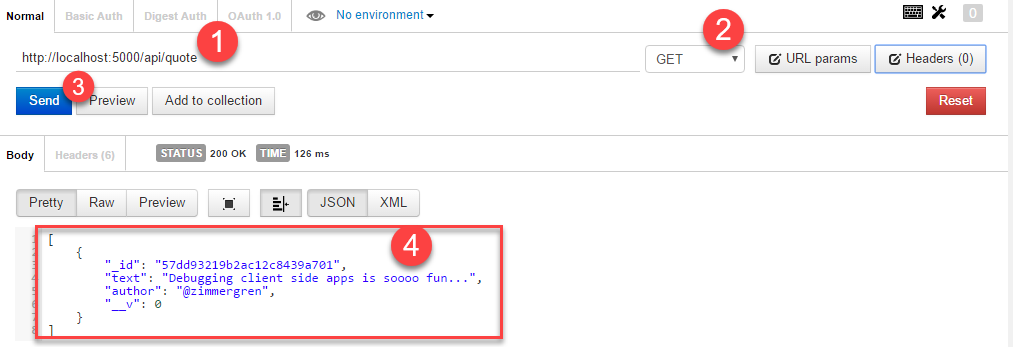
Voila. Le code is working.
For the sake of brevity I’ll skip showing each method through postman, since the same principles apply to all operations.
Step 5: Publish your node.js app to Heroku
Well, it’s been a blast so far. Let’s see if we can continue some of the fun by throwing this guy up into the cloud in the Heroku hosted services.
In the previous steps we’ve already seen how we create our Heroku app, hook up a mongodb database and written our TypeScript-powered nodejs/express api app.
Time to get it published to Heroku.
Add the changes to your git repo
In order to enable us to publish in the (I believe) easiest way possible, you’ll run the following git commands and then you’re done.
First, add any files and changes in the repo.
git add *
Next, I’m committing with a message…
git commit -m "Get this magic going"
Push your branch to Heroku
At this point, you can choose whether or not you want to push the committes changes to your own repository. But whether you do that or not (obviously I’d recommend you to do that so you’re safe…), you can now publish the committed changes to Heroku. From Git cmdline.
The pre-requirements for this is of course that you’re logged in to the Heroku CLI etc, as described earlier in this article.
Run this:
git push heroku master
This snippet assumes that your branch is the master branch. If not, replace it with whatever name your branch is.
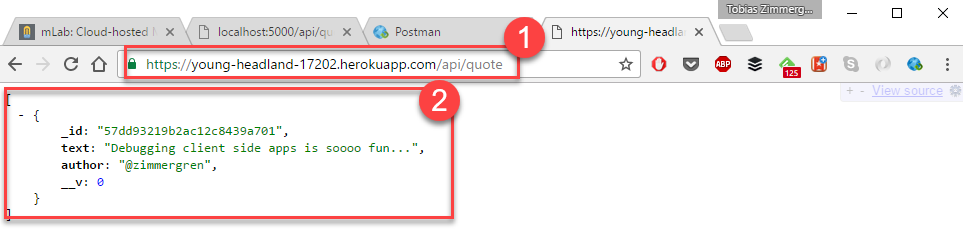
Verify that it’s in the cloud
You can simply run this command to automatically launch your browser, targeting your published heroku app:
heroku open
- Append
/api/quoteto your published url, to verify that the quote service endpoint works - Verify the results by ensuring you get data back. In my case the data is the test data I submitted using the
POSTmethod with Postman previously.
Summary
Thanks for bearing with me all the way to the end. Lovely.
In this post we’ve:
- Created a Heroku app
- Built a TypeScript app with mongodb, node.js and express
- Verified that the aforementioned app works locally
- Published and verified our app in the Heroku cloud
Also consider that in this post I haven’t even touched Authentication and other highly prioritized topics. This post is meant as a guide and reminder to get up and running quickly, especially if you’re into TypeScript and want to throw your mongodb/node.js/express app up in the cloud quickly and effortlessly.
Get the code
I’ve uploaded the code to GitHub: (Link removed. Deprecated example)
Feel free to drop me a few comments below :-)
Tobias.
Comments are closed
Archived comments
hi tobias. thanks for posting this. it is very helpful for us because we have just looked at how to use heroku or something else. this is easy to follow. but there is a problem in the page i don't understand. it says "First, add any files and changes in the repo. " and then it is a json file but not a command. can you clarify this bit and how can we make it work? thanks!!
Hi Harandu,
Thanks for your comment, appreciate it.
Sorry, that's a bug in the Ghost Pro (blog hosting platform I'm using) and they're investigating this with their engineering at this time. Hopefully it'll be resolved soon.
What it's supposed to say is:
----
First, add any files and changes in the repo. (Tip: a git ignore filter for node_modules might come in handy, if you're not keen on keeping those in your repo...)
```
git add *
```
Next, I'm committing with a message...
```
git commit -m "Get this magic going"
```
----
Sorry for the inconvenience, and I hope they'll fix it soon.
Tobias.
Great Post !!!. Really enjoyed it
Thanks @moshoodaminu:disqus