Many people are using the offerings in Microsoft Azure and hold their data in some type of storage containers. In Azure, this can come in the form of an Azure Storage Account, which this article is focusing on.
I’ll discuss and walk through how to BYOK (Bring Your Own Keys) to your Azure Storage Accounts, and use a Key Vault to point to the encryption keys that you own yourself.
Link tip: Bring Your Own Encryption (Wikipedia)
Link tip: Pricing and Restrictions for BYOK in Azure (Microsoft Docs)
Link tip: Hardware Encryption vs. Software Encryption: The Simple Guide - Sam Wiltshire, ontrack.com
Just here for troubleshooting? See these sections:
- Operation returned an invalid status code ‘Unauthorized’
- Hardware key operation not allowed on standard vault
- The operation failed because of permission issue on the keyvault. Please set get,wrapkey and unwrapkey permission on the keyvault for account identity
1. Why do you want BYOK in Azure Storage Accounts?
There are many ideas and reasons why any organization would be interested in bringing their own keys. In general, these are some of my main reasons:
- Audit encryption key usage
- Azure Key Vault can help generate and manage your keys
- You can optionally create your own keys entirely offline instead, and bring them into the cloud if you don’t want to use Azure Key Vault or for some reason trust your own key generation more than the built-in offerings
- Rotate keys whenever you want
- Define more granular access to resources
- Disable keys whenever you want
A note about service encryption capabilities.
According to the Azure Data Encryption-at-Rest, there’s no support for BYOK for
TableorQueueservices. Azure Storage Account have support for customer-managed encryption-at-rest for the File, Block/Page Blobs types only.
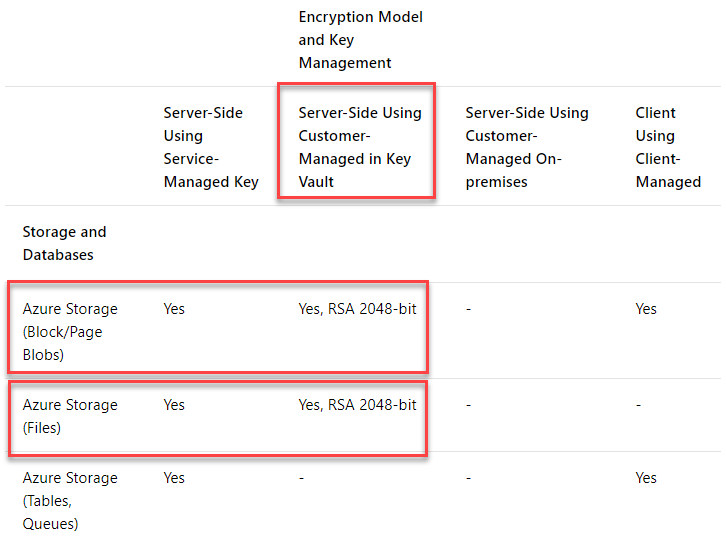
Azure Storage Tables and Azure Storage Queues does not have capability to use the customer-managed keys on server-side in Azure.
2. Create and configure Azure Key Vault for hosting our Keys
To host our own keys, or generate them with using top-notch security standards in the cloud, we can use Azure Key Vault. If we decide to use Key Vault to manage and protect our keys, we have to configure it accordingly. The following section will guide you through how to configure these pre-requisites, and then we’ll be ready to configure out Storage Account after that.
2.1. Create a new Key Vault, with Soft-Delete and Purge Protection enabled
One feature of the Azure Key Vault is the soft-delete feature, which allows you to recover deleted vaults and contents. For example, if you accidentally, or not, delete a key or secret, you can then recover them again.
Another feature we should enable is purge protection, which enables a retention period of 90 days until items that are deleted are actually purged.
Link tip: Azure Key Vault soft-delete overview (Microsoft Docs)
Using the Azure CLI we want to create a new Azure Key Vault, and also enable both soft-delete and purge-protection, which we can easily do by passing in two arguments to the CLI:
For soft delete, you pass in --enable-soft-delete true and, for Purge Protection, you pass in --enable-purge-protection true.
Create your Azure Key Vault like this:
az keyvault create -n byokvaultdemo -g byokdemo --location westeurope --enable-soft-delete true --enable-purge-protection true --sku premiumVerify that the vault has been created, and also query to check the properties for Soft-Delete and Purge Protection are correctly set:
az keyvault list -g byokdemo -o table --query [].{Name:name,ResourceGroup:resourceGroup,PurgeProtection:properties.enablePurgeProtection,SoftDelete:properties.enableSoftDelete}

Results:
Name           ResourceGroup    PurgeProtection    SoftDelete
-------------  ---------------  -----------------  ------------
byokvaultdemo  byokdemo         True               True
It looks like we’re on track. We have our vault; it’s in the correct Resource Group and the Soft Delete and Purge Protection properties are both set to true.
2.2 Generate Your Own Keys in the Azure Key Vault
In Azure Key Vault, there’s a section called keys, which contains a list of any keys you have either Generated or Imported.
There’s an option to use service-managed keys (which Azure Storage Accounts have support for), and there’s another option for customer-managed keys where the keys are stores on-premises with the customer. The latter is not possible in the Azure Storage Accounts, but available in other offerings like SQL Server and Disk Encryption. Hence, this article focuses on the service-managed keys (through Key Vault).
We will generate a strong and secure key using the Key Vault key generation feature, which is a top-notch security forte.
A key consists of a few different properties that are important to specify when we generate it. Below are some of the parameters we’ll set when we create it. For a full list, please see the CLI documentation for az keyvault keys create.
--name: name of the key--vault-name: name of the key vault where the keys should be created--kty: type of keys to create.--ops: Permitted operations for this key--protection: Type of protection (HSM or software)
This is an example of how I generate my RSA key with permissions to encrypt, decrypt, wrapKey, unwrapKey, sign and verify, using hsm protection and a key size in bits of 2048:
az keyvault key create -n byokstoragekey1 --vault-name byokvault --kty RSA --ops encrypt decrypt wrapKey unwrapKey sign verify --protection hsm --size 2048The results should be that you now can list your new key, using the az keyvault key list command as such:
az keyvault key list --vault-name byokvaultdemo -o table

Results:
Kid
-----------------------------------------------------
https://byokvaultdemo.vault.azure.net/keys/byokstoragekey1
Note: The required key size for using this key with the Encryption and BYOK in an Azure Storage account is 2048. You cannot use a bigger or smaller key.
3. Configure Azure Storage Account to use your Keys
Now we’ve completed the first few tasks, namely to create our Key Vault and generated our new key(s). Next steps are to create a Storage Account and configure it accordingly, to properly be able to access the keys in the vault.
3.1. Create a new Storage Account with the required parameters
(You can also update an existing one, but I’m doing this ground up).
To properly enable our Storage Account to work with BYOK, we need to assign an identity to it. We can do this using the --assign-identity flag.
Reading the official Microsoft documentation for the Azure storage account create command, it gives us a bit of insight what this flag does:
Generate and assign a new Storage Account Identity for this storage account for use with key management services like Azure KeyVault.
- Microsoft Docs: az storage account create
Here’s how to create the Storage Account, including the new identity associated with it:
az storage account create -n byokdemo123 -g byokdemo --https-only true --encryption-services table queue blob file --assign-identity3.2 Give your Storage Account access to the Key Vault
For the Storage Account to be able to work with the Keys we have in our Key Vault; we need to grant permissions for the Storage Account into the vault.
See the identity of the Azure Storage Account:
az storage account show -g byokdemo -n byokdemo123 --query identity.principalId

Results:
"feb54393-9043-4acb-8d26-8328d8c92ca5"
Next, we have to assign this identity access to the vault. Grab the output from the previous command, which is the ObjectId of the Storage Account, and pass to this command:
az keyvault set-policy -n byokvaultdemo --object-id feb54393-9043-4acb-8d26-8328d8c92ca5 --key-permissions get wrapkey unwrapkeyCreate or Update your Azure Storage Account to use your new keys from your Key Vault:
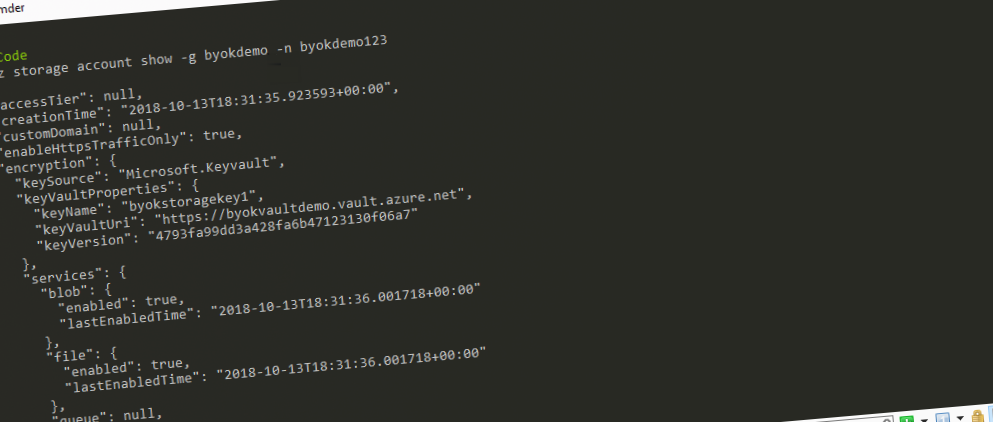
az storage account update -g byokdemo -n byokdemo123 --encryption-key-name byokstoragekey1 --encryption-key-source Microsoft.KeyVault --encryption-key-vault https://byokvaultdemo.vault.azure.net --encryption-key-version 4793fa99dd3a428fa6b47123130f06a7 --encryption-services blob file queue tableWith that, you should get the json output of the command, which should contain this section:
 "encryption": {
    "keySource": "Microsoft.Keyvault",
    "keyVaultProperties": {
      "keyName": "byokstoragekey1",
      "keyVaultUri": "https://byokvaultdemo.vault.azure.net",
      "keyVersion": "4793fa99dd3a428fa6b47123130f06a7"
    },
    "services": {
      "blob": {
        "enabled": true,
        "lastEnabledTime": "2018-10-13T18:31:36.001718+00:00"
      },
      "file": {
        "enabled": true,
        "lastEnabledTime": "2018-10-13T18:31:36.001718+00:00"
      },
      "queue": null,
      "table": null
    }
  }
Success. The Azure Storage Account is now pointing its encryption service to our own key, hosted inside of an Azure Key Vault.
Important consideration:
In the results, you’ll also see that bothqueueandtableis null. This is because it’s currently not supported with BYOK/customer-managed keys for these services as I mentioned at the beginning of this post. Files and Blobs are now protected by our own keys while Queue and Table are protected using the built-in generated keys by the service, as per default.
Troubleshooting
Operation returned an invalid status code ‘Unauthorized’
If you encounter the Operation returned an invalid status code 'Unauthorized' message when trying to do operations toward your new Key Vault, it could be because you need to add a policy for yourself. To do this for your user account, run this command:
az keyvault set-policy -n byokvaultdemo --key-permissions backup create decrypt delete encrypt get import list purge recover restore sign unwrapKey update verify wrapKey --upn your@username.comThe --upn parameter from the command should point to the user that is trying to execute the commands.
Hardware key operation not allowed on standard vault
If you encounter the Hardware key operation not allowed on standard vault message when you try to create keys, it’s because your Key Vault is on the Standard tier instead of the Premium tier.
The solution is to either create a Premium vault from the beginning or upgrade the one you have to the Premium plan.
Unfortunately there’s no direct command in the CLI for it; however, we can update properties using the set command. I figured out how to set the SKU to Premium using this, which was fairly simple:
az keyvault update -n byokvaultdemo -g byokdemo --set properties.sku.name=premiumDone! Now you’ve got an Azure Key Vault on the Premium SKU, and the error message should be gone next time you retry the same operation that gave the error in the first place.
The operation failed because of permission issue on the keyvault. Please set get,wrapkey and unwrapkey permission on the keyvault for account identity
If you encounter the The operation failed because of permission issue on the keyvault. Please set get,wrapkey and unwrapkey permission on the keyvault for account identity message, it’s likely due to Azure Key Vault not having the appropriate permissions to access the Azure Storage Account you have.
The solution here is pretty straight-forward, and we have to give permissions to the Storage Account Identity (remember earlier in this article where we discussed assigning an identity for our Storage Account?).
We need to give the required Key permissions, get, wrapkey, and unwrapkey, to the Azure Storage Account identity.
See section 3.2 Give your Storage Account access to the Key Vault to learn how to get the identity for the Storage Account, and how to assign the permissions.
Voila!
Summary
In this article, we’ve explored how to use customer-managed keys for encryption-at-rest with Azure Storage Accounts.
Further reading on securing Azure Storage Accounts can be found here in my previous articles:
- Secure your Azure Storage Accounts with restrictions based on public IP addresses
- Secure your data in Azure Storage Accounts using RBAC (Role-Based Access Control)
While there’s a lot more to security than what we just walked through, it hopefully gives insights into how to practically get started with it and some of the benefits it can bring.
Don’t forget. There’s always a need for more security around your code, deployments, infrastructure, and data. No resource in the cloud or on-premises should have security as a second thought.
Security first, then comes the rest. Unless you disagree?
Please leave a comment!


Comments are closed