
In this article we’ll explore how to use a distributed configuration model using Azure App Configuration, enabling us to easily and with low effort have a centralized configuration experience for multiple apps and sites.
Below, we’ll dive into these topics:
- Managing Azure App Configuration from the Azure Portal.
- Managing Azure App Configuration from the Azure CLI.
- Programmatically working with Azure App Configuration to retrieve configuration values from our C# (.NET Core) apps.
Let’s dive into what all of this actually means, and explore how easy it is to get started.
What is Azure App Configuration?
Azure App Configuration is a new service that enables parameters/configurations for your app to be stored away from code, and in a central service instead. This enables scalable storage for your configurations and across multiple applications instead of being tied to a specific one - and any resource that relies on configuration could now look at this central place instead of trying to ensure consistency in a distributed workload.
In the past we’ve for example been used to store our configurations in files in our projects, and/or directly on the app in Azure (App Settings).
Note: You’ll need the latest Azure CLI to be able to work with these commands, as it’s in preview and has just been rolled out.
Authentication, Connection Strings and Managed Identity
When working with App Configuration, there’s various ways to connect from your code to it. Further down in this post we’ll look at:
- How to enable Managed Identity for App Configuration (Recommended)
- How to use Connection Strings with App Configuration
For most services that have support for Managed Identity in Azure, it’s a good idea to use them if you can. Completely avoiding BOTH configuration AND credentials in code and config files is a dream that finally is easily achievable. I’m sure I’m not alone in feeling this way.
We will also take a look at how you can programmatically access the App Configuration store using just a Connection String, albeit I would urge you to try and stay away from it.
If you use Connection Strings to connect, you have two sets of keys. Read Only keys, and all-access keys. They both come in two, primary and secondary.
- Primary/Secondary Keys
- Primary/Secondary Read Only Keys
If your applications does not need to make changes, be sure to fetch one of the read-only keys so you don’t have any accidental configuration accidents from code…
Authenticating to the App Configuration store happens easily with either of these two approaches, and Microsoft has been kind enough to provide us with an SDK for all of this. Let’s check that out in a section further down in this article.
Remember: Security shouldn’t be an after-thought. Be pro-active and ensure you’ve got your security posture in shape before you launch your new shiny cloudiness.
Remember #2: NEVER use App Config as a replacement for Azure Key Vault. Credentials are NOT supposed to be stored in here. Use Managed Identity + Key Vault for sensitive data. Secure your ships!
My top 5 features of Azure App Configuration
With App Configuration we get more than just a basic key/value store. Here’s some of my favorite features - but in reality I could write half a book about the benefits this brings…
- Labels: Tag your key-values with labels to enhance the experience, and to use the same keys for multiple applications with different values.
- Configuration comparison: Enables you to easily compare various values of the same key, or other things you’ll need to verify easily.
- Built-in support for Azure Managed Identity, so our web apps/functions/applications can easily access the key-values without specifying credentials in code or config.
- Centralized management of all configurations across all our environments we’re operating
- Content Types
Without getting too detailed about this right now, one of my absolute favorite features of the App Config service is Labels.
There’s a plethora of use cases I can come up with for Labels, including geographically distributed apps that might need different endpoints or configurations. Different types of apps might need different values depending on what version it is running. The same type of app can be deployed in multiple sites and services, and they all read configuration values the same way - but now with different values, all controlled from this one central place instead of N copies spread out across the subscription(s).
There’s some juicy links at the end of this post with more information about Labels, Content Types and everything else I’ve already mentioned.
So with that brief intro to the topic, the following sections will elaborate on how to create a new App Configuration service, how to configure auth/identity and then finally how we can retrieve these configuration values from our code. Awesome, let’s dive in.
Managing App Configuration from the Azure Portal
Search for “App Configuration”, and select it - enter the requested details like what Resource Group to put it in, etc.
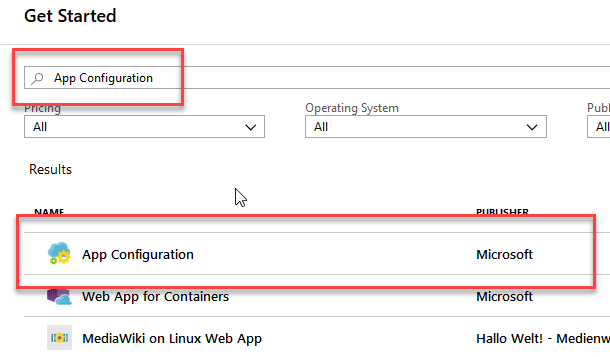
Azure App Configuration from the Azure Portal
When it’s created, it will show up with this shiny new icon as a resource in your selected Resource Group:
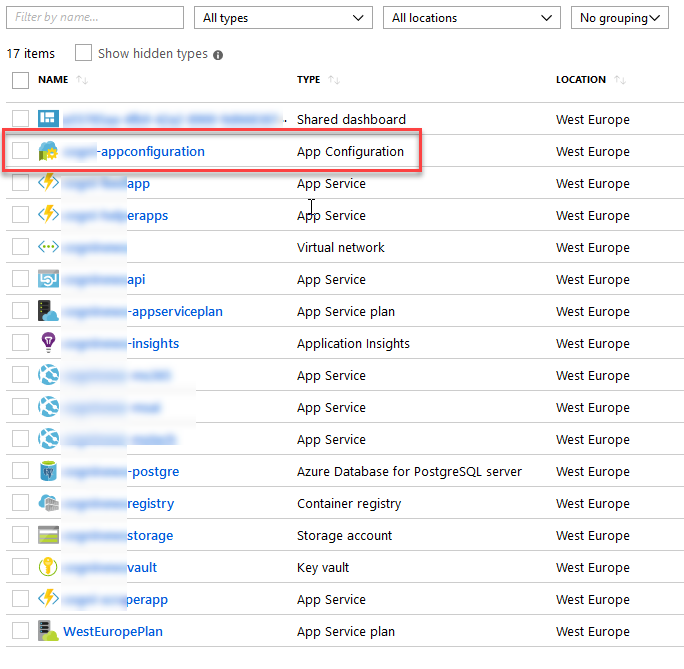
Azure App Configuration listed in a Resource Group
Et voila - it’s created, and ready to go. Check out option 2 below for how to do the same using the Azure CLI; If you just want to continue to the fun part of configuring and using this service, skip to the next headline.
Create values in App Configuration store
Navigate in the Azure Portal to your new Azure App Configuration store, and select “Key-Value Explorer” in the left navigation.
From here, you can simply click “Create” to add a new entry:
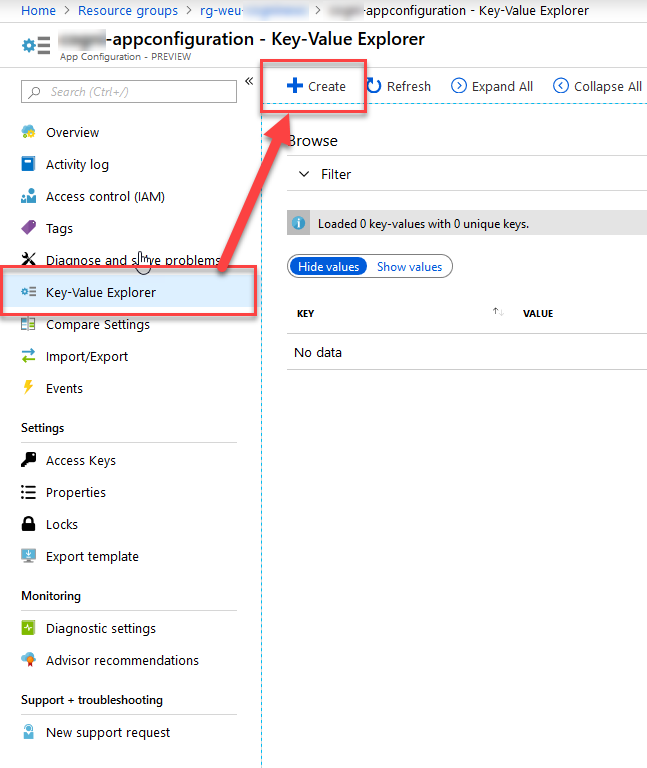
Creating a new Key-Value entry in the Azure App Configuration store.
I’m going to add a couple of example entries, all with the same key “Site:Description”, but with different values and Labels.
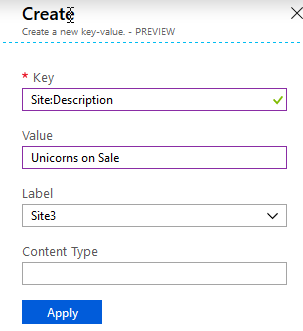
Adding a new Key with name Site:Description in the Azure App Configuration store, using the Azure Portal.
I’m adding a couple of more entries to have this simple setup for demo purposes:
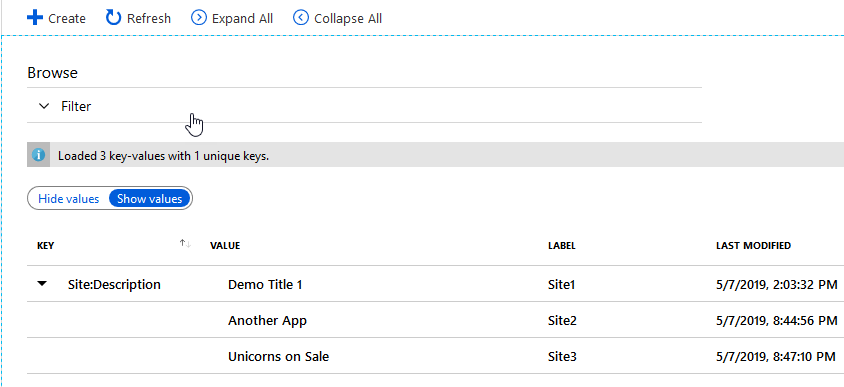
Azure App Config store entries with different values and labels, but using the same Key for easy retrieval from code
As you can see, working with the Azure Portal is, as always, pretty straight forward. Later, we’ll be retrieving the values from our “Site:Description” configuration key.
Authentication using Managed Identity (Recommended)
First, go to your Web Site, or Function, or whatever resource with support for Managed Identity that you want to use - and enable it. I’ve got a web site I’m enabling MSI for:
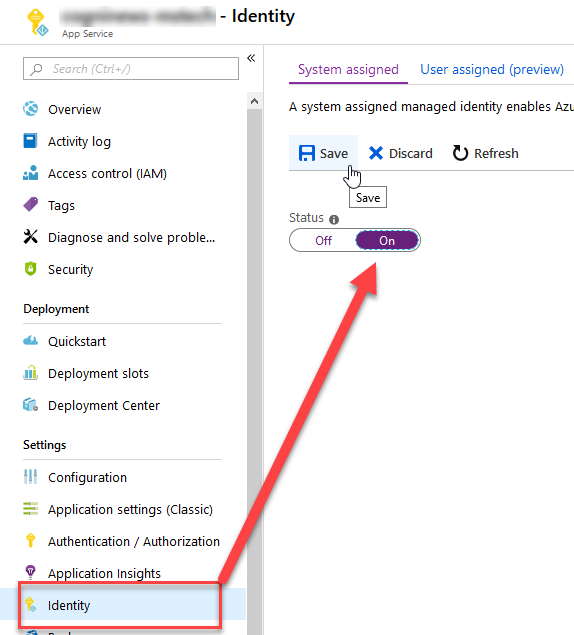
Enabling Azure Managed Identity for an App Service from the Azure Portal.
Once you’ve got your identity enabled, make a note of the name (the same name as your app service), which you’ll need in the next step.
From your App Configuration service, select Identity and then Add a Role Assignement:
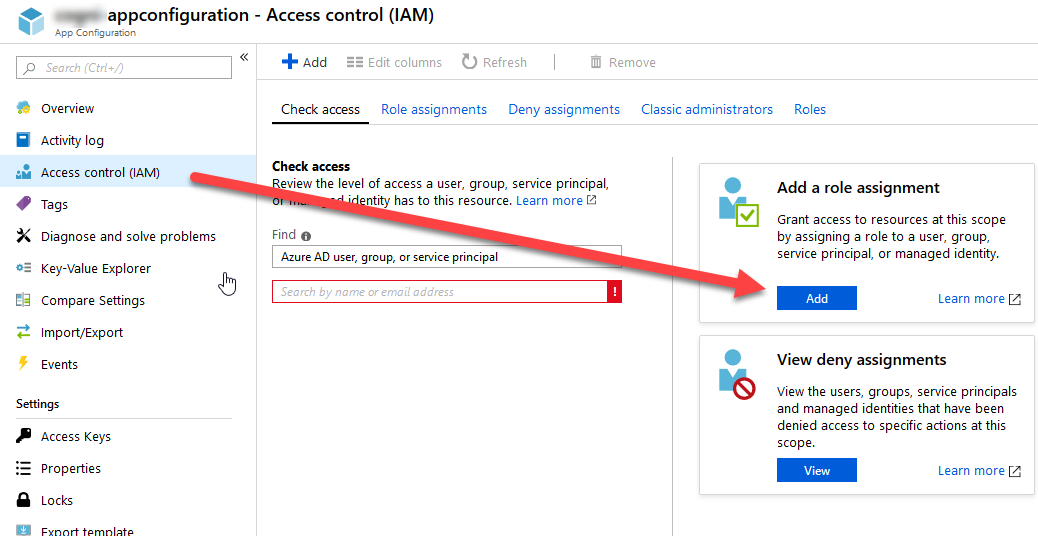
Adding a Role Assignment to Azure App Configuration for our Managed Identity, from the Azure Portal.
From the drawer that flies in on the right-hand side, select what fits your scenario. I’m going for “Reader” access only, and since it’s an App Service I select that in the drop down and then it will list all Managed Identities that exist on my App Services:
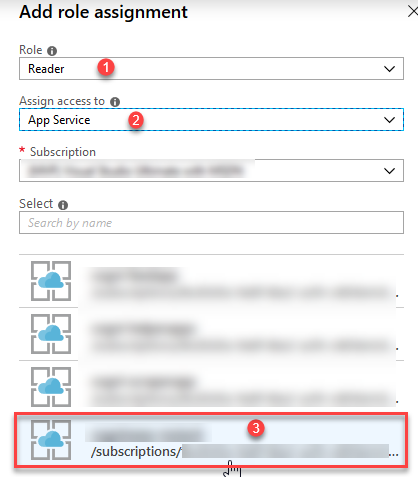
Adding the Role Assignment as Read-only access for my Managed Identity on App Configuration store.
In the list I select:
- Reader role. I only want to allow my App Service to actually READ data.
- In the drop-down, I select App Service under the Managed Identities header, which then filters the list by App Services where Managed Identity is enabled.
- I will see the name of my App Service here, and can select it.
Done! We have now successfully configured Managed Identity for our App Configuration service, and the App Service that I just configured can, without credentials since it’s now running under its own identity, access configuration data from this App Configuration store.
Authentication using Connection Strings
To connect to the App Configuration using a Connection String instead of Managed Identity, you can find it here:
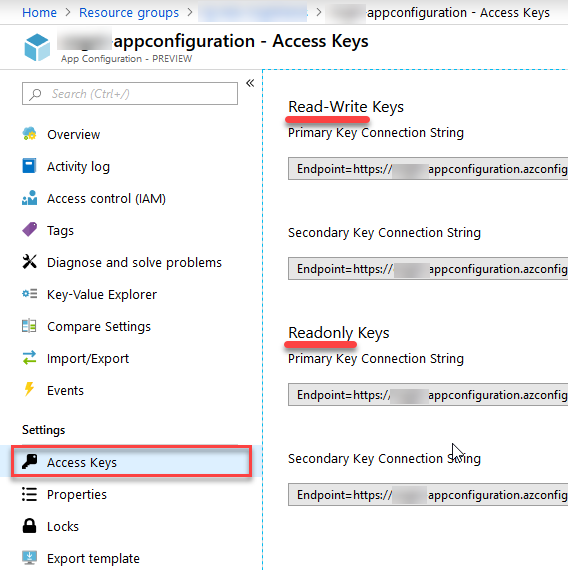
Getting the Connection String / Access Keys from the Azure Portal, for our App Configuration service.
That’s it. One step, and we have these keys. But that also means you’ll have to have them flying somewhere in your code when you later try to get data from this service.
We have now done pretty much everything we need to get started from the Azure Portal point of view:
- Set up App Configuration service
- Added a couple of Key/Value pairs for demo purposes
- Configured Managed Identity, or fetched Connection Strings
We are ready to jump into the code. The next section describes how to do the same thing we just did, but from the Azure CLI instead. If you just want the code, then scroll further down for that.
Tag along!
Managing App Configuration from the Azure CLI
If you’re anything like me, you want reproducible results. I’m an avid user of PowerShell + Azure CLI. This way I can easily script it, and ensure that I can reproduce my setup in different tenants (for example dev, test, prod, etc.).
Let’s just dive into the commands necessary. Below I’m listing the required commands to:
- Configure the CLI to use the appconfig extension
- Create an App Config service
- Create some example key/value pairs
- Configure Managed Identity (Role Assignments of App Service to App Configuration)
- Get Connection Strings
Awesome sauce! Let’s go.
Enable the App Config extension
az extension add -n appconfig
The output indicates that it’s installed, and at the time of this writing it’s also in Preview.
az extension add -n appconfig
The installed extension 'appconfig' is in preview.
Create the Azure App Configuration store
Once the extension is installed, it’s simply a single-line CLI execution to get a new config store:
az appconfig create -n "your-appconfiguration" -g "rg-weu-yourresourcegroupname" -l westeurope
This will result in a json output that (hopefully) indicates success:
{
  "creationDate": "2019-05-04T10:21:56+00:00",
  "endpoint": "https://your-appconfiguration.azconfig.io",
  "id": "/subscriptions/guid/resourceGroups/rg-weu-yourresourcegroupname/providers/Microsoft.AppConfiguration/configurationStores/your-appconfiguration",
  "location": "westeurope",
  "name": "your-appconfiguration",
  "provisioningState": "Succeeded",
  "resourceGroup": "rg-weu-yourresourcegroupname",
  "tags": {},
  "type": "Microsoft.AppConfiguration/configurationStores"
}
We’re ready to go - we have our service, either by creation from the portal or creation from the Azure CLI. Tag along to learn how to wield it.
Create Key-Value pairs
The other option that I like for creating the Key-Value pairs is using the Azure CLI. It’s pretty straight forward and works like this:
Create a Key-Value entry:
az appconfig kv set -n your-appconfiguration --key "Site:Description" --label Site2 --value "Reviews of the best sunglasses online"
The output is a question along with the json data, and after you select (y), you will see the created data in json:
{
  "contentType": null,
  "etag": "SoIla4WZrkelqPknjX3G7CWqmEW",
  "key": "Site:Description",
  "label": "Site2",
  "lastModified": "2019-05-04T18:39:22+00:00",
  "locked": false,
  "tags": {},
  "value": "Reviews of the best sunglasses online"
}
Okay, that was really it. Simple, straight forward and powerful.
Authentication using Managed Identity (Recommended)
We can of course also assign Managed Identity access with the Azure CLI. It means we’ll create a Role Assignment for our identity, and grant this identity access to our App Configuration instance.
I’m using PowerShell to help hold the variables in my queries. You can of course use Bash or just native CLI as you’d like.
Get the Managed Identity’s Principal Id (I’m assuming you have a managed identity for your Web App already - if not, to assign one, see here):
$webAppIdentityId = az webapp identity show -g RESOURCE_GROUP -n WEB_APP_NAME --query principalId
Next, get the Id of the app config, which is the actual Scope of the role assignment:
$appConfigScope = az appconfig show -g RESOURCE_GROUP -n YOUR_APPCONFIGURATION --query id
Finally, simply assign the Role Assignment of the web app identity to the App Configuration scope:
$roleAssignment = az role assignment create --role reader --assignee-object-id $webAppIdentityId --scope "$appConfigScope"
We have now:
- Fetched the Principal Id of the Managed Identity assigned to our web app
- Fetched the Scope (id) of the App Configuration service
- Assigned the Managed Identity with Reader access to the App Configuration
Voila. We’re done here.
Authentication using Connection Strings
If your scenario demands the use of the connection strings/keys instead of Managed Identity - here’s how to grab the connection strings from the Azure CLI.
az appconfig credential list -n your-appconfiguration -g your-resource-group -o json
I’ve used -o json for the full output below. You can, as always, limit the results with a --query by whatever parameters you’d like. Here’s the output, clearly listing all your keys/connection strings:
[
  {
    "connectionString": "Endpoint=https://your-appconfiguration.azconfig.io;Id=redacted;Secret=SECRETVALUE",
    "id": "redacted",
    "lastModified": "2019-05-04T10:21:54+00:00",
    "name": "Primary",
    "readOnly": false,
    "value": "redacted"
  },
  {
    "connectionString": "Endpoint=https://your-appconfiguration.azconfig.io;Id=redacted;Secret=SECRETVALUE",
    "id": "redacted",
    "lastModified": "2019-05-04T10:21:54+00:00",
    "name": "Secondary",
    "readOnly": false,
    "value": "redacted"
  },
  {
    "connectionString": "Endpoint=https://your-appconfiguration.azconfig.io;Id=redacted;Secret=SECRETVALUE",
    "id": "redacted",
    "lastModified": "2019-05-04T10:21:54+00:00",
    "name": "Primary Read Only",
    "readOnly": true,
    "value": "redacted"
  },
  {
    "connectionString": "Endpoint=https://your-appconfiguration.azconfig.io;Id=redacted;Secret=SECRETVALUE",
    "id": "redacted",
    "lastModified": "2019-05-04T10:21:54+00:00",
    "name": "Secondary Read Only",
    "readOnly": true,
    "value": "redacted"
  }
]
Great, with the connection strings you desire, you’re ready to use them in code further down in this post.
Programmatically working with Azure App Configuration to retrieve configuration values from our C# (.NET Core) apps
Okay, we have a store - now what?
We’ll take a look at how we now can use this store to fetch configuration values from our .NET Core projects using C#.
Hello, Microsoft.Extensions.Configuration.AzureAppConfiguration
There’s a NuGet from Microsoft called Microsoft.Extensions.Configuration.AzureAppConfiguration. This enables us to work with the SDK for App Configuration, which will come in handy now.
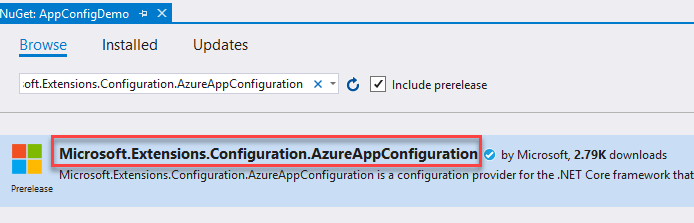
Adding the AzureAppConfiguration NuGet
Authenticate to App Configuration
There’s different ways we can access our store programmatically. We’ve already explored two ways to configure authentication and identity:
- Managed Identity
- Connection String
Below are code samples for both options, so you can go with whatever suits your use case best.
Authenticate with Managed Identity + Specific Label
static void Main(string[] args)
{
    var config = new ConfigurationBuilder()
        .AddAzureAppConfiguration(options =>
        {
            options.ConnectWithManagedIdentity("https://YOUR_ENDPOINT.azconfig.io")
                .Use(KeyFilter.Any, "Site3");
        })
        .Build();

    Console.WriteLine("Config Value: " + config["Site:Description"]);
}
Authenticate with Managed Identity, and no label
static void Main(string[] args)
{
    var config = new ConfigurationBuilder()
        .AddAzureAppConfiguration(options =>
        {
            options.ConnectWithManagedIdentity("https://YOUR_ENDPOINT.azconfig.io");
        })
        .Build();

    Console.WriteLine("Config Value: " + config["Site:Description"]);
}
Connection String + specific Label
static void Main(string[] args)
{
    var config = new ConfigurationBuilder()
        .AddAzureAppConfiguration(options =>
        {
            options.Connect("CONNECTION_STRING_HERE")
                .Use(KeyFilter.Any, "Site3");
        })
        .Build();

    Console.WriteLine("Config Value: " + config["Site:Description"]);
}
Connection String, and no label
If you do NOT specify a label when you connect to the App Configuration, you will only get values of keys where the label is null. This is how you’d do it:
static void Main(string[] args)
{
    var config = new ConfigurationBuilder()
        .AddAzureAppConfiguration("YOUR_CONNECTION_STRING")
        .Build();

    Console.WriteLine("Config Value: " + config["Site:Description"]);
}
Reading configuration values
As you’ve likely already spotted in the code samples, you can now just use the config object and grab the values from your keys. They’re now centrally managed, and as soon as you update something in Azure, it hits your app in the most beautiful way.
So, there we have it. An exploration of App Configuration, how to get started and how to retrieve the values securely from your code. 🚀
Summary & Links
Using the Azure App Configuration store is a pretty straight forward experience in both the Azure Portal and the Azure CLI. It provides a great deal of value if I need to specify the same type of configuration structure across multiple applications (Web Sites, Functions, Console Applications, Containers, …).
Links:
- MS Docs: What is Azure App Configuration?
- MS Docs: Key Value store and explanations on Keys and Label filters
- MS Docs: More details on Managed Identity with App Configuration
- MS Docs: If you’re running ASP.NET Core, you need to look into dynamic reloading of data
- Azure Friday: Getting Started with Azure App Configuration
- GitHub question: When will GA be available?


Comments are closed