Sending e-mails from custom applications and integrations in the cloud is relatively easy, whether you’re building a fully customized app, low-code apps, or integrations using existing plug-and-play solutions.
Microsoft even recommends a third-party, SendGrid, for sending e-mails in Azure. Sometimes that’s the way forward, and sometimes it’s not. Let’s talk about that a bit further down.
In this post, we’ll check out an easy way to set up the basic configuration and code for allowing our applications to send e-mails using Microsoft Graph.
However, before we dive into the config and code, I want to spend some time talking about the requirements and potential use cases. Sometimes it’s easy for devs to find a technical solution, but perhaps these solutions do not always match the business requirements.
We’ll take a look at:
- What does Microsoft recommend?
- Use Cases (the why).
- Get full e-mail and inbox capabilities.
- Customize endlessly.
- Corporate regulations.
- Setup (the how)
- Create an Azure AD app with Microsoft Graph permissions.
- Ensuring the account is licensed to send e-mails.
- Build the code.
- Results.
- Known limitations.
What does Microsoft recommend?
To send e-mails in Azure, Microsoft recommends a service like SendGrid. Plain and simple, and this works in a wide array of use cases.
Quote from the docs about sending e-mails in Azure:
We recommend you use authenticated SMTP relay services to send email from Azure VMs or from Azure App Service. (These relay services typically connect through TCP port 587, but they support other ports.) These services are used to maintain IP and domain reputation to minimize the possibility that external domains reject your messages or put them to the SPAM folder. SendGrid is one such SMTP relay service, but there are others. You might also have an authenticated SMTP relay service on your on-premises servers.
Using these email delivery services isn’t restricted in Azure, regardless of the subscription type.
- Recommended method of sending e-mail in Azure (Microsoft Docs)
If you want to send e-mails, I recommend that you look at whether SendGrid fits your requirements. Sending e-mails using the SendGrid NuGet packages is easy.
But this post isn’t about sending e-mails with SendGrid. It’s about sending e-mails using Microsoft Graph, an excellent fit for several business requirements.
Use Cases
Let’s take a quick look at a few business cases where sending e-mails using the Microsoft Graph APIs could be an interesting fit.
These use cases do not replace SendGrid or any other third-party service, but it adds to the story of when you may want to consider one or the other. Always make informed decisions regarding your situation.
While there are a lot more use cases and requirements, we could spend time talking about, here’s a few of the recurring themes I’m seeing.
Get full e-mail and inbox capabilities.
Sending e-mails one-off or by automation is a great way to fulfill many of our requirements, both for the business and our technical solutions.
Sometimes you want to send an e-mail, and you don’t need to think twice about it. Sometimes, however, you may like to send an e-mail and keep the history of the entire conversation at your fingertips - in your Microsoft 365 mailbox.
Using the Microsoft Graph APIs to send e-mails as a user, you can decide whether to keep the sent e-mails in your “Sent” folder.
This setup helps a lot with conversations that have sparked from your automated e-mails. For me, this creates a seamless experience.
Customize endlessly.
Simply put, it’s your code, so you set the rules. I will demonstrate a super-basic way to craft your custom e-mail templates in HTML and use that for sending somewhat good-looking e-mails to the recipients.
With SMTP relay services (such as the SendGrid above), you get much room for customizations, including templates. If you, however, want the 100% custom experience for whatever reason, you can use the Microsoft Graph APIs to build your e-mail solution.
Logically integrate the e-mail solution you build into your existing applications and workflows, allowing a fully customized experience.
Assume, for example, that you’ll need to ad-hoc modify several of the components of a template depending on the recipient, some data that’s already in your system that you can get to only at runtime, and a mix of other variables. Doing this with the existing relay services can work, but it often becomes a side-project in its own right to configure the third-party service to sit nicely in our custom solution.
Corporate regulations.
Organizations work in different ways depending on their policies, their location, data sovereignty regulations, regulatory compliance requirements, and more.
Sometimes, working with these requirements can be challenging. Using the Microsoft Graph APIs allows you to use the service and mailbox accounts already part of and approved by your organization.
You often, therefore, do not need to require approval to bypass policies or run through technical due diligence for any third-party e-mail service when using what’s already in the box.
In my experience, this has been a common theme. The corporate regulations are one of the critical use cases I’ve looked at using the Microsoft Graph API to send e-mails. Customers have a wide range of different requirements, and this one keeps coming back regularly.
Setup
To allow our applications to send e-mails as a given user or service account, we need to configure an Azure AD application with the appropriate permission. Additionally, we need to ensure that the user or service account has a license assigned for sending e-mails.
The process of configuring our Azure AD apps and users is very straightforward.
Let’s dive in.
Create an Azure AD App with Graph permissions
To allow our app to send e-mails using our user or service account, we need to configure an Azure AD application with the appropriate permissions.
You can do these steps using Azure PowerShell, the Azure CLI, or the Azure Portal that I’m doing for demonstration purposes.
Create a new App Registration
Head over to Azure AD and create a new App Registration.
- Azure Portal > Active Directory > App registrations > New registration
- Name: Whatever you want.
- Type: Accounts in this organizational directory only (Single tenant)
- Redirect URI: Not required.
Decide if you want to use Managed Identity
When you design your application and architecture, working with Managed Identity is a great aspect of staying “passwordless” in the cloud.
Microsoft Graph can support both the traditional ClientID + ClientSecret approach, as well as using the Managed Identity approach.
Since all our services are running in production under an identity, either User Assigned Managed Identity or System Assigned Managed Identity, we can make use of that easily.
If you’re using a Managed Identity, you don’t need to perform the next step with the Client ID / Secret.
Read more about managed identity for Azure resources:
- Managed identities for Azure resources (Microsoft Learn)
Using a Client ID and Client Secret
If you design your applications to rely on the traditional Client ID / Client Secret approach for authenticating to the application, here’s how you can set that up.
We then need to create a new secret and securely store the value of the said secret, along with the Tenant ID and the app’s Client ID.
From the App page:
- Certificates & Secrets > New client secret
- Copy the secret and store it in a safe location (password manager is a good idea).
Next, make sure you copy the Application ID (Client ID) and the Tenant ID for your application. You can find these on the Overview page of your app.
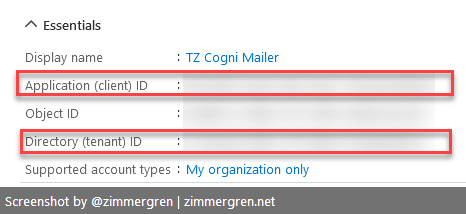
Copy the Application ID and the Directory/Tenant ID for your Azure AD Application.
To recap, you should at this point have stored these values for use later in our code:
- Application (client) ID.
- Directory (tenant) ID.
- The value of the secret you created for this app.
Set up the application permissions
Looking at the official docs for SendMail, we can see a few ways we can configure our apps to allow sending e-mails. Depending on your scenario, you may want to adjust the permissions between delegated or application permissions.
Permission type
Permissions (from least to most privileged)
Delegated (work or school account)
Mail.Send
Delegated (personal Microsoft account)
Mail.Send
Application
Mail.Send
Decide what fits your scenario.
Use delegated permissions if you want a user to consent to the app explicitly, and allow that one user to send e-mails from the application.
Use application permissions if you want to allow sending e-mails as any user in the organization. Note: This permission is highly privileged and would enable your application to impersonate any user in the organization. Use this with caution and responsibility.
For the demonstration, I’m setting up Application Permissions in my dev tenant, allowing me to test my code with multiple service accounts/users.
From the app page in the Azure Portal:
- API permissions > Add a permission
- Microsoft Graph > Application Permissions > Mail.Send > click Add Permission
- Optionally, remove the default permission for the app.
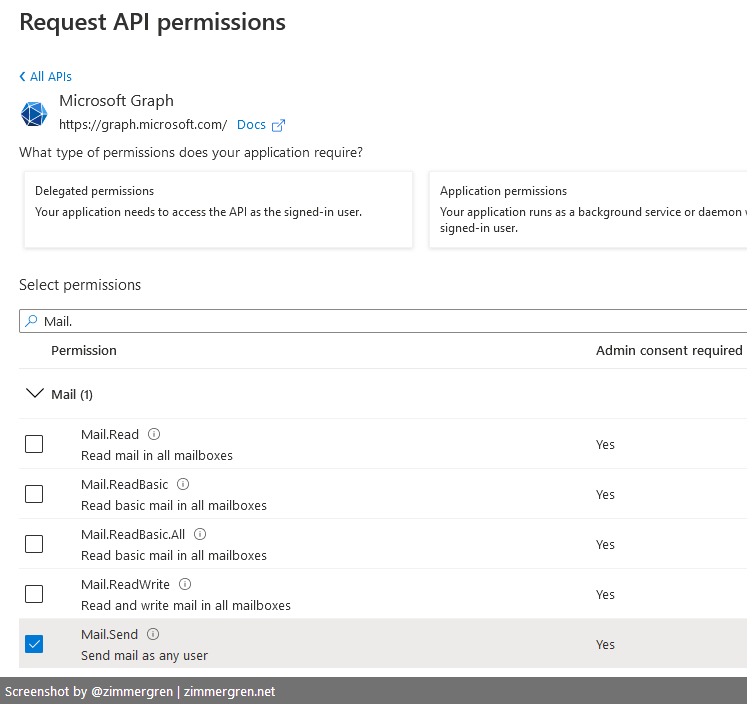
Assigning the appropriate permissions to the Azure AD Application, allowing it to send e-mail using the Microsoft Graph API.
Your configured permissions should look something like this (with differences in the Delegated versus Application, depending on your choice):
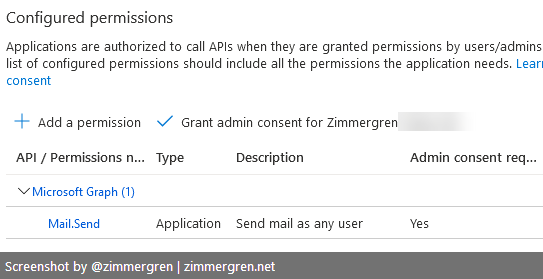
Azure AD Application API permissions configured for Microsoft Graph to send e-mails as any user in the organization.
Consent to the application.
Like me in my demo, if you are allowing sending e-mails as any user in the organization, you can click “Grant admin consent on behalf of
This post isn’t about the permission model, so check these resources for more insights into how the consent flow works.
Read more:
- Requesting individual user consent (Microsoft Docs)
- Requesting admin consent (Microsoft Docs)
Ensure your user or service account has a license to send e-mails
If you are using a user account that already has the required licenses to operate e-mails and use the mail capabilities of Microsoft 365, then you’re already done with this step. Generally, users with a mailbox associated with them should work.
If you are setting up a new user, perhaps a service account or shared mailbox, you need to ensure that the user account has the appropriate licenses configured. Let’s review that now.
Go to the Azure Portal:
- Active Directory > Licenses > All Products
- (Any license that has a mailbox) - For me, it’s Office 365 E5.
- Assign it to the user (For me, again, this is already done).
Optionally, and perhaps how I usually go about this for one-off scenarios, I configure the required license directly on the user object:
- Active Directory > Users > “Your User” > Licenses > Assignments > Assign a license with a mailbox here.
When you’ve done either of the two approaches to assigning a license, you should head to the User Account and copy the Object ID. Again, you can do all of this from the Azure CLI or PowerShell, but we’re doing the visual way for clarity.
- Active Directory > Users > “Your User” > copy the Object ID
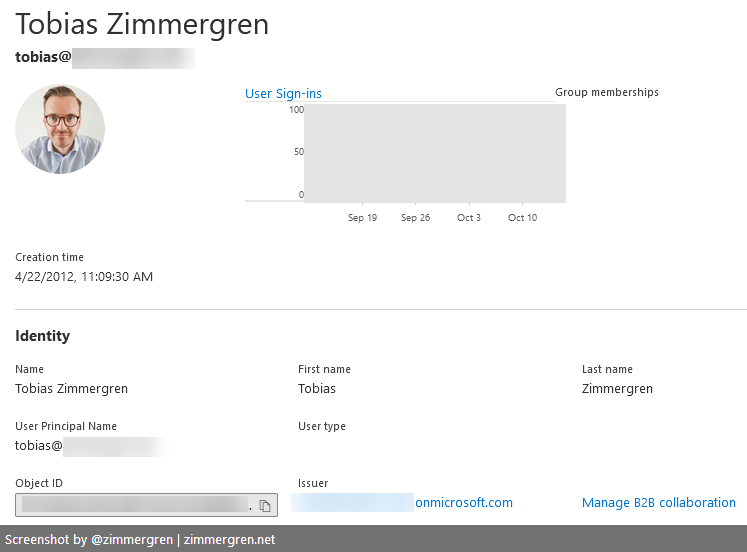
Copy the ObjectId from the User in Azure Active Directory.
Great, we’re done with the preparations. At this point, we should have:
- New Azure AD application.
- Configured the appropriate permissions for sending e-mails.
- Ensured there was a license assigned to the user account.
With that, we’re ready to head over to the next part. Building the code.
The project
For demonstration purposes, I’ve built a new Console Application in .NET 6, showcasing the critical lines of code. For production workloads, you need to adjust your code accordingly.
You can get the simple code sample on GitHub:
Install the required dependencies (NuGet)
To allow successful communication with Microsoft Graph, we need to make use of a few NuGet libraries.
- Azure.Identity (NuGet)
- Microsoft.Graph (NuGet)
We use the Azure.Identity to retrieve our ClientSecretCredential object, and we use the Microsoft.Graph to instantiate a new GraphServiceClient and eventually, send e-mails with the Users.SendMail endpoint.
First, let’s establish some housekeeping.
For development: Secrets.json
In the code sample, I’m using the secrets.json file to store my local dev secrets.
Tenant ID, Client ID, and Client Secret here might make the most sense if you are using ClientID/Secret for authentication. If you are using Managed Identities, you might want to skip this file entirely.
The file has the following format and should consider for basic development practices and only with dev tenants. And as always, don’t put any sensitive information into your code repositories.
Here’s the format of the secrets.json file for this project.
{
  "GraphMail": {
    "TenantId": "GUID",
    "ClientId": "GUID",
    "ClientSecret": "YOUR_SECRET",
    "UserObjectId": "GUID"
  }
}
For production purposes, please make sure you use Azure Key Vault. There are no two ways around that - use Azure Key Vault for sensitive configuration values.
The HTML template.
In my code sample, I have made use of a simple HTML template from Colorlib. You can download the same template or any of their other templates:
The original template I’m working with looks like this:
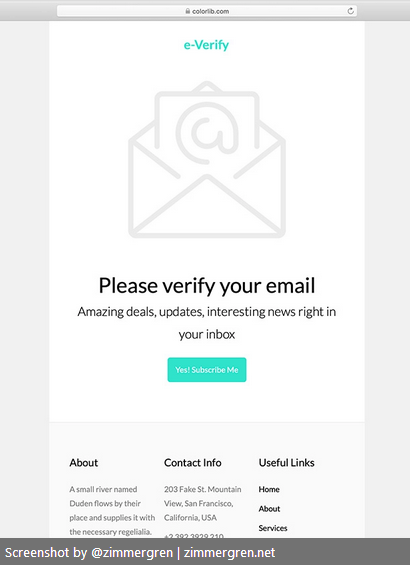
Colorlib template for e-mails.
I have made some slight adjustments for the demo to showcase how easy it is to make this work.
I am showcasing a simple way to use an e-mail template for sending custom e-mails with the Microsoft Graph APIs.
For any sustainable solution, I would use a templating engine or a more robust markup experience, allowing a dynamic and fully adjustable approach to theming and templating. For this demo, it should be sufficient to replace a few placeholders.
Here’s the C# code
I’ve simplified this code a lot, so this is not fit for production scenarios, as mentioned already. The nature of this application code is to demonstrate how to achieve the task, not to build a production-grade system.
I’m using .NET 6, but the code snippets are the same for previous versions of .NET, too.
Define your dependencies
// DEPENDENCIES
using Azure.Identity;
using Microsoft.Extensions.Configuration;
using Microsoft.Graph;
Make sure you’ve installed the aforementioned NuGet packages:
- Azure.Identity (NuGet)
- Microsoft.Graph (NuGet)
Load the secrets from the secrets.json file (if applicable)
I’m using the secrets.json file to store the secrets in my demo, ensuring they never reach the repository when I make commits. To load the secrets from your machine, you can use this code.
// DEV EXPERIENCE: Loading the secrets from the secrets.json file.
// To run this project, ensure you have this file. Please see the reference blog post for instructions: https://zimmergren.net/sending-e-mails-using-microsoft-graph-using-dotnet
var config = new ConfigurationBuilder()
    .SetBasePath(AppDomain.CurrentDomain.BaseDirectory)
    .AddUserSecrets<Program>()
    .Build();
Authenticate to the Azure AD App
To authenticate to the app we’ve built, we have to create the ClientSecretCredential object as part of the Azure.Identity package.
When using a Client ID and Secret:
//
// NUGET: Azure.Identity
//

// Define your credentials based on the created app and user details.
// Specify the options. In most cases we're running the Azure Public Cloud.
var credentials = new ClientSecretCredential(
    config["GraphMail:TenantId"],
    config["GraphMail:ClientId"],
    config["GraphMail:ClientSecret"],
    new TokenCredentialOptions { AuthorityHost = AzureAuthorityHosts.AzurePublicCloud });
When you want to use managed identity:
var credentials = new DefaultAzureCredential();
Define and send the e-mail
To send the e-mail, we can now make use of the GraphServiceClient and add any message and parameters as required.
We’ll define our GraphServiceClient, set up an e-mail template and a new Message to send, define the recipient(s), and eventually call graphServiceClient.Users.SendMail() to deliver the message.
//
// NUGET: Microsoft.Graph
//
// Define our new Microsoft Graph client.
// Use the credentials we specified above.
GraphServiceClient graphServiceClient = new GraphServiceClient(credentials);
// Define something for the message.
// I'm getting the HTML e-mail template and replacing a few entries, for demonstration purposes.
// Real-world implementations of this would use a more robust templating experience, with more options.
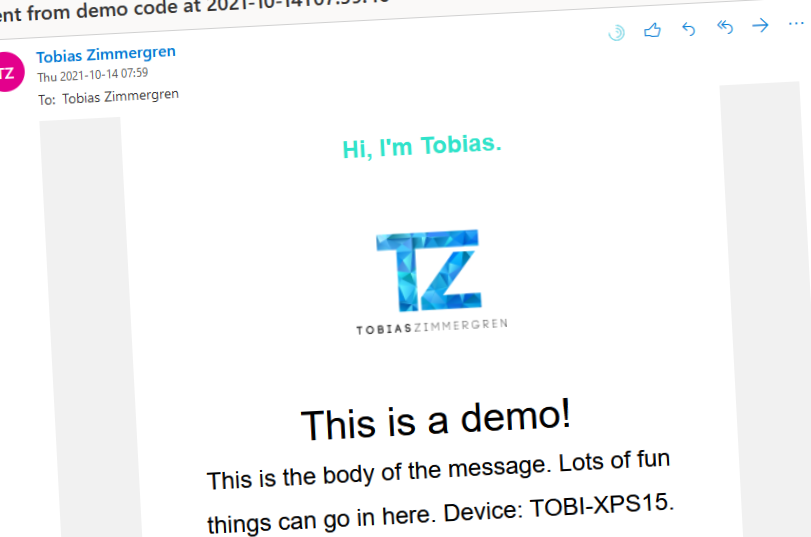
var subject = $"Sent from demo code at {DateTime.Now.ToString("s")}";
var body =
System.IO.File.ReadAllText("mailtemplate.html")
.Replace("{{HEADER_LINK}}", "https://zimmergren.net")
.Replace("{{HEADER_LINK_TEXT}}", "Hi, I'm Tobias.")
.Replace("{{HEADLINE}}", "This is a demo!")
.Replace("{{BODY}}", $"This is the body of the message. Lots of fun things can go in here. Device: {Environment.MachineName}. User: {Environment.UserName}.");
// Define a simple e-mail message.
var message = new Message
{
Subject = subject,
Body = new ItemBody
{
ContentType = BodyType.Html,
Content = body
},
ToRecipients = new List<Recipient>()
{
new Recipient { EmailAddress = new EmailAddress { Address = "blog@zimmergren.net" }}
}
};
// Send mail as the given user.
graphServiceClient
.Users[config["GraphMail:UserObjectId"]]
.SendMail(message, true)
.Request()
.PostAsync().Wait();
That’s all there’s to it.
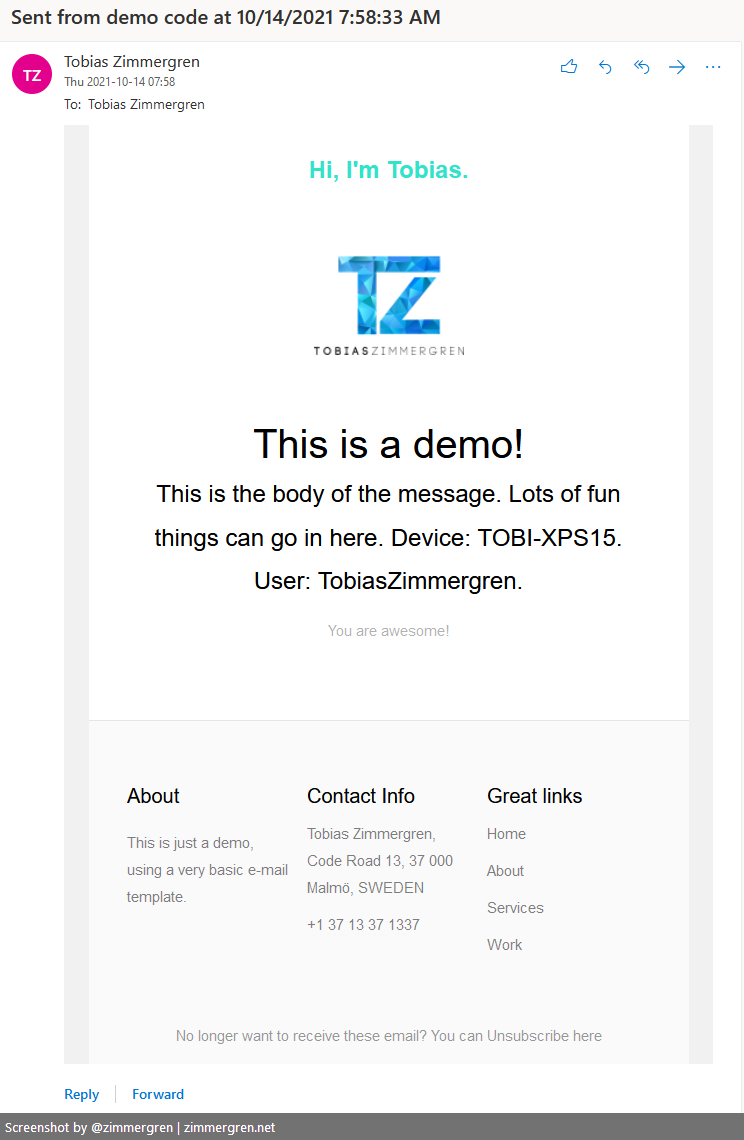
View the results.
Since the code to demonstrate this was pretty simple, the delivered e-mail is also equally plain and straightforward. You can, of course, format very nice HTML-templated e-mails as you would with any third-party e-mail service.
With the code sample I have, I am using an HTML template for my e-mail, provided by Colorlib.
- Get the e-mail template. (GitHub)
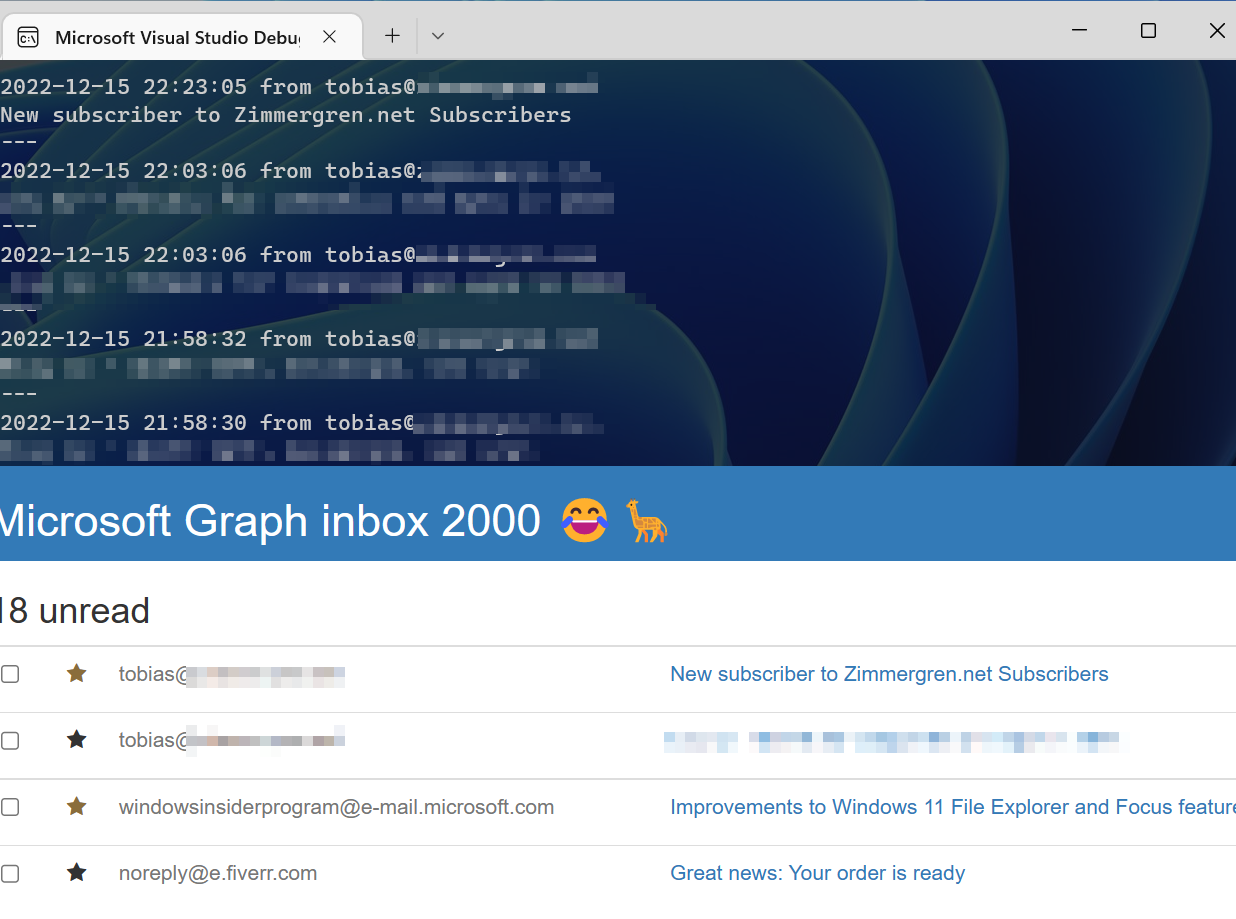
I can verify that running the code actually does deliver an e-mail to my inbox, and it’s formatted according to the template I decided to use.
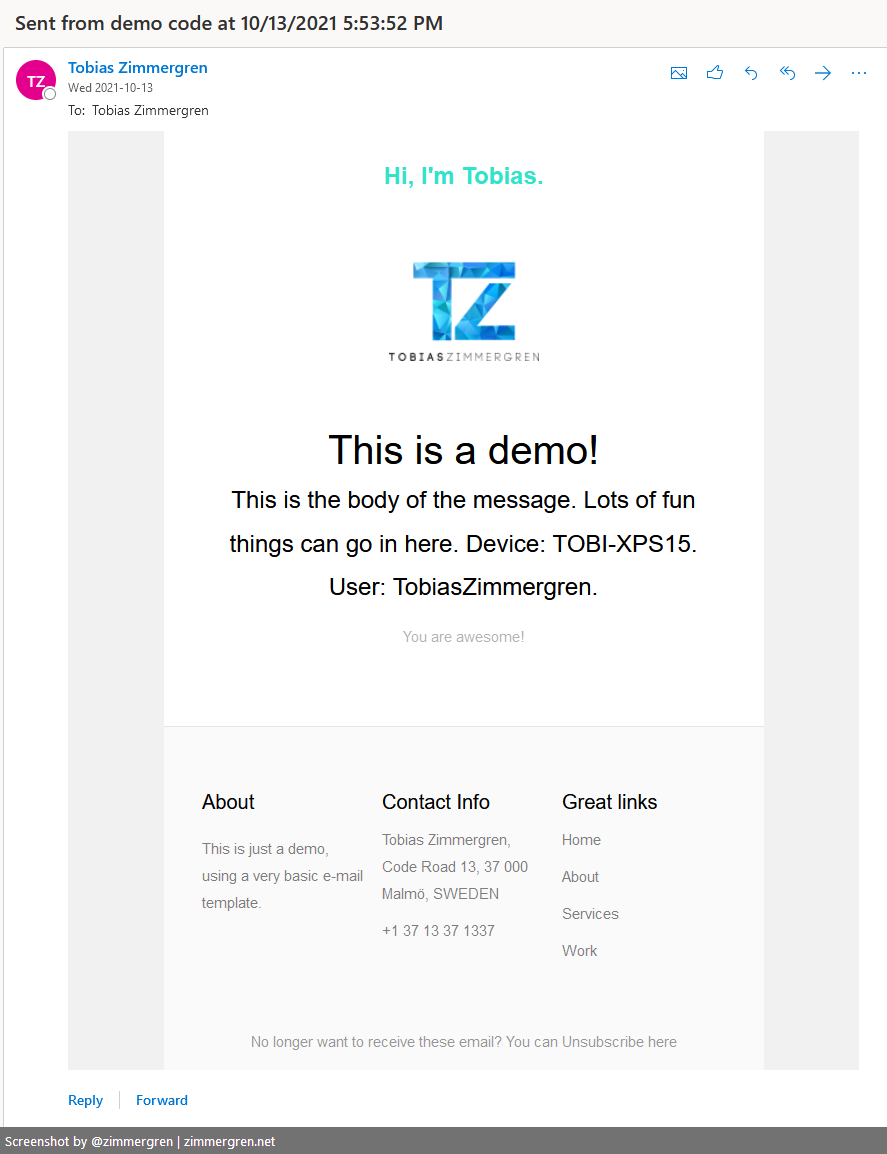
Microsoft Graph e-mails from the APIs, using Application permissions.
Gotchas and limitations
As with everything, a proper design has to take many things into account.
Build cloud-native apps and design for resiliency
I’ve built, deployed, and operated cloud solutions for years. A key consideration that comes back on every project is resilience and a proper design of how the application should behave.
Here’s some great reading on building real-world, long-running and sustainable cloud applications.
- Resiliency and dependencies (Azure Architecture Center)
- Make all things redundant to avoid a single place of failure (Azure Architecture Center)
- Overview of the reliability pillar in the Azure Well-Architected Framework (Azure Architecture Center)
Exchange Online limits
If you decide to roll with a custom Microsoft 365 e-mail integration using the Microsoft Graph APIs, please be aware of the sending limitations in Exchange, depending on your license.
“Sending limits apply to the number of recipients, number of messages, and number of recipients per message that a user can send from their Exchange Online account”
- Exchange Online limits (Microsoft Docs)

Comments are closed