SP 2010: How to create a PowerShell Snapin Cmdlet - Part 2
In my previous article (How to create a PowerShell Snapin – Part 1) I talked about the general approach to create a custom PowerShell Cmdlet. However, in Part 1 I did not talk about how you create SharePoint 2010 specific Cmdlets. That’s what this article is all about.
So without further ado, I will quickly brief you on how you can create a custom PowerShell Cmdlet for SharePoint 2010 using the SPCmdlet base class.
In my example I will create a very simple Cmdlet you can use to automatically create demo-sites for use in demo-purposes or development scenarios so you don’t have to go about creating all the different sites by hand, and without a need to create scripts to do the same.
Creating a custom PowerShell Cmdlet that talks with SharePoint 2010
I will add some functionality to my previous project (found in my previous article) and extend that project with some custom SharePoint 2010 specific Cmdlets to get your started with writing PowerShell cmdlets for SP 2010.
In order to do this, we should derive from a subclass of the type SPCmdletBase. The following base classes deriving from SPCmdletBase are available:
- Create a new Cmdlet (SPNewCmdletBase)
- Create a new Class and name it something of your own preference (I chose this silly name: SPAwesomeness.cs)
- Add a reference to the following two namespaces:
using Microsoft.SharePoint;
using Microsoft.SharePoint.PowerShell;
Add the following base code to your class:
using System;
using System.Management.Automation;
using Microsoft.SharePoint;
using Microsoft.SharePoint.PowerShell;
namespace Zimmergren.SP2010.PowerShell
{
    [Cmdlet(VerbsCommon.New, "SPCreateDemoSites")]
    public class SPAwesomeness : SPNewCmdletBase<SPWeb>
    {
        protected override SPWeb CreateDataObject()
        {
            throw new NotImplementedException();
        }
    }
}
As you can see in the code above I’ve got a class called SPAwesomeness which derives from the SPNewCmdletBase class which in turn derives from the SPCmdletBase. SPNewCmdletBase should be derived from when you create a Cmdlet that should create and save data to SharePoint.
Also note that we’re using the Attribute [Cmdlet] to set a name for our command, in this case SPCreateDemoSites.
When deriving from this class, you need to implement at least one method override, in this case CreateDataObject. This is where our magic will take place!
- Add some logic to your custom SharePoint Cmdlet
Now that we’ve got the basic code up and out of the way, we need to add some logic to actually make something happen.
I’ve added some very simplistic code to create some Demo-sites based on the available templates in your installation. It looks like this:
using System;
using System.Management.Automation;
using Microsoft.SharePoint;
using Microsoft.SharePoint.PowerShell;

namespace Zimmergren.SP2010.PowerShell
{

    [Cmdlet(VerbsCommon.New, "SPCreateDemoSites")]
    public class SPAwesomeness : SPNewCmdletBase<SPWeb>
    {

        // Let's add a mandatory parameter that indicates that you need

        // to specify a value for this property through the PS console
        [Parameter(Mandatory = true,
        ValueFromPipeline = true,
        Position = 0,
        HelpMessage = "Specify an existing site to extend with demo sites")]
        public string SiteUrl { get; set; }

        protected override SPWeb CreateDataObject()
        {
            var site = newSPSite(SiteUrl);
            try
            {
                // SharePoint Server Publishing Infrastructure feature
                site.Features.Add(newGuid("f6924d36-2fa8-4f0b-b16d-06b7250180fa"));
            }
            catch (Exception ex)
            { /* Empty catch block is not recommended :-) */}
            SPWeb demoWeb = CreateBaseDemoSite(site);
            // When we're done, you'll get this object returned to the PS console
            return demoWeb;
        }

        private static SPWeb CreateBaseDemoSite(SPSite site)
        {
            // Creates a Blank Site which will host all the Demo-sites
            SPWeb web = site.AllWebs.Add(
            "DemoSite",
            "Demo Sites",
            "Demo Sites",
            1033,
            "STS#1",
            false,
            false);
            web.QuickLaunchEnabled = true;
            CreateDemoSites(web);
            return web;
        }

        private static void CreateSite(SPWeb parentWeb, string url, string template)
        {
            string desc = " created by Tobias Zimmergren's custom cmdlets";
            parentWeb.Webs.Add(url,
            url + " demo",
            url + desc,
            1033,
            template,
            false,
            false);
        }

        private static void CreateDemoSites(SPWeb web)
        {
            SPWebTemplateCollection webTemplates =
            web.GetAvailableWebTemplates((uint)web.Locale.LCID, true);
            foreach (SPWebTemplate template in webTemplates)
            {
                try
                {
                    CreateSite(web,
                    template.Title.Replace(" ", ""),
                    template.Name);
                }
                catch (Exception ex)
                { /* Empty catch block is not recommended :-) */ }
            }
        }
    }
}
- Test your custom SharePoint 2010 cmdlet
In order to test it, follow along with the steps I mentioned in my previous article (here) to deploy it – then call the new command you’ve created called New-SPCreateDemoSites like this:

It will ask you to supply the mandatory property (SiteUrl), so type in an existing url to an existing site collection and execute like this:

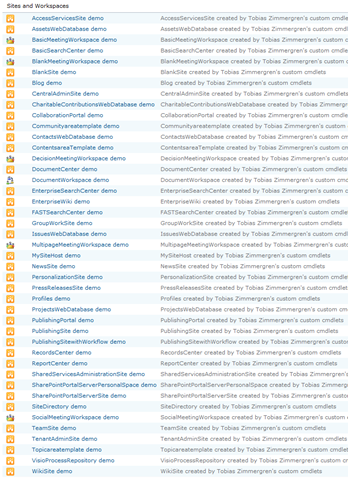
Now you’ll need to wait for a few minutes. What’s happening now is that your Cmdlet is creating a site called "Demo Sites" and will add a whole bunch of sub-sites to that new site.
Navigate to your new site called "Demo Sites" and you should see something like the following sub-sites created:

Summary
Quite easily you’ve created your first SharePoint 2010 Cmdlet extension to operate with the SPCmdletBase classes. In this case we’ve created a new site called Demo Sites and added a bunch of sites to that new site, as per the available templates on your server.


Recent comments