
In this article I will talk about how you can get started with creating custom PowerShell commands for SharePoint 2010 that you can use.
You will see how easy it actually is to build a custom class library that in turn is an extension to the PowerShell console and will add a couple of extra commands according to your preference.
The reasons for wanting to do this is an endless list, but as an example if you’ve got repeated tasks you’ll need to perform that are not available out of the box, you can create them yourself and then use normal PowerShell scripts to execute your code. That way you can easily build your own custom commands (CmdLet) for PowerShell which basically extends the functionality to support whatever scenario you’ve got.
You might remember that in SharePoint 2007 you could extend the STSADM.EXE command with something called STSADM Extensions. The approach I’m talking about in this article is pretty much the same concept – extending the build-in commands of your PowerShell console by adding custom code.
How to create a PowerShell Snapin
Download the Windows SDK in order to get the
System.Management.Automation.dll file for PowerShell easily accessible.
- Create a new Class Library project
Start out by creating a new Visual Studio 2010 Class Library project and give it a proper name.
I’ve named mine Zimmergren.SP2010.PowerShell.
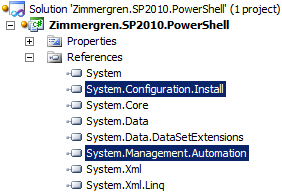
Add assembly references
Add a reference to System.Management.Automation
This DLL is located in:
C:Program FilesReference AssembliesMicrosoftWindowsPowerShellv1.0
(if you installed the Windows SDK as I told you earlier on in this article)
Add a reference to System.Configuration.Installation
You should now have the following reference added:
- Create a PowerShell Installer class
In order for our PowerShell Cmdlet to work, we need to create an installer-class. This class is called when you install the SnapIn/Cmdlet and will provide the system with some information like where it comes from and what it’s supposed to do.
Start out by creating a new class in your project, I named mine PowerShellInstallerClass.cs. Next, add the following code to that class:
using System.ComponentModel;
using System.Management.Automation;

namespace Zimmergren.SP2010.PowerShell
{
    [RunInstaller(true)]
    public class PowerShellInstallerClass : PSSnapIn
    {
        public override string Name
        {
            get
            {
                return "Zimmergren.SP2010.PowerShell";
            }
        }

        public override string Vendor
        {
            get
            {
                return "Tobias Zimmergren";
            }
        }

        public override string Description
        {
            get
            {
                return "Tobias Zimmergren's awesome PowerShell Cmdlets";
            }
        }
    }
}
This essentially provides some information to the system upon installation of your SnapIn.
- Create a PowerShell Cmdlet class
Now you need to continue this venture by creating a new class in your project. I named mine TestCmdlet1.cs.
Use the [Cmdlet()] attribute on your class to tell the system that it’s going to be a Cmdlet for PowerShell like this:
using System.Management.Automation;
namespace Zimmergren.SP2010.PowerShell
{
    [Cmdlet(VerbsCommon.Get, "TestCmdlet1")]
    public class TestCmdlet1 : PSCmdlet
    {

    }
}
Next, you should override the methods you want to execute your code and add some dummy-code. There’s a couple of different methods to use here:
- BeginProcessing()
- EndProcessing()
- ProcessRecord()
- StopProcessing()
You should make sure your class looks like this so we can test the first part out:
using System.Management.Automation;
namespace Zimmergren.SP2010.PowerShell
{
    [Cmdlet(VerbsCommon.Get, "TestCmdlet1")]
    public class TestCmdlet1 : PSCmdlet
    {
        protected override void BeginProcessing()
        {
            WriteObject("BeginProcessing() method - Execution has begun");
        }

        protected override void ProcessRecord()
        {
            WriteObject("ProcessRecord() method - Executing the main code");
        }

        protected override void EndProcessing()
        {
            WriteObject("EndProcessing() method - Finalizing the execution");
        }
    }
}
- Deploy the new PowerShell Snap-ins
Since this is a generic Class Library-project, we need to create some kind of deployment script to make sure that our Cmdlet gets deployed when we build our project.
There are two requirements for deploying and installing our PowerShell Cmdlet:
- Deployed to the server (Using GACUTIL)
- Installed on the server (using INSTALLUTIL)
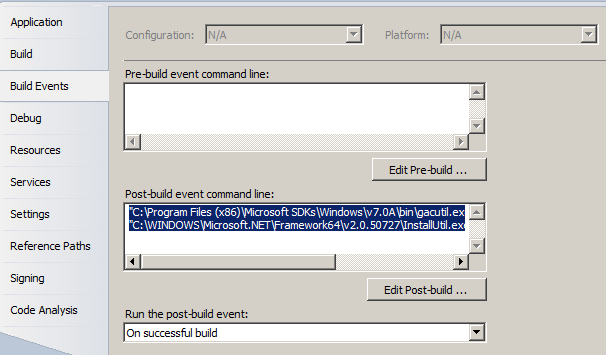
In this sample project I’m simply adding two lined in the Post-Build actions like this:
"C:\Program Files (x86)\Microsoft SDKs\Windows\v7.0A\bin\gacutil.exe" -if "$(TargetPath)""C:\WINDOWS\Microsoft.NET\Framework64\v2.0.50727\InstallUtil.exe" "$(TargetPath)"
You’ll find the post-build events if you click project properties and go to this box:
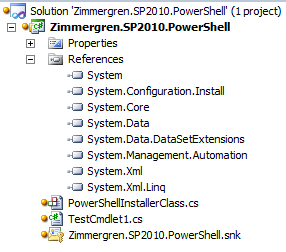
- Project overview
Your project should look something like this:
- Test your PowerShell Snapin
In order to test our project, we now just need to build the Visual Studio project and the post build scripts will automatically hook up our assembly in the GAC and use INSTALLUTIL to install the Cmdlet.
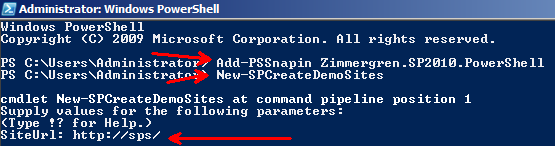
To try the commands out, you need to launch a powershell console and type in the following command:
Add-PSSnapin Zimmergren.SP2010.PowerShell
Now you should be able to just call your command (in my case, it’s called TestCmdlet1) like this:
TestCmdlet1
This should bring your the following output in your PowerShell console window:
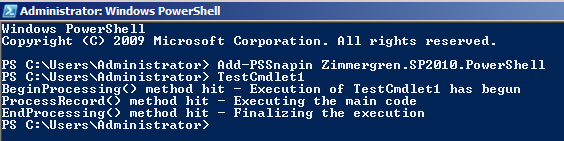
Great, our very first PowerShell cmdlet is created – and we have validated that it works!
Summary
In this article we talked about how you create a general PowerShell Cmdlet in order to extend the capabilities in your PowerShell consoles. There’s no business logic incorporated in this sample, that’s up to you to implement in your projects. You’ve got the starting point to get sailing on the great PowerShell seas right here!
In my next article (Part 2) I will talk about the SharePoint 2010 specific details for creating a custom Cmdlet for your SharePoint installations. It will cover how you create custom Cmdlets to interact with the SharePoint 2010 object model in a nice way.
Comments are closed