SP 2013: Getting started with the new Geolocation field in SharePoint 2013
SharePoint 2013 comes with tons of enhancements and modifications to previous versions of the product. One of the cool features I’ve played around with lately is the Geolocation field. Back in 2010 I wrote a custom-coded solution for displaying location information in our SharePoint lists, integrating some fancy-pants Google Maps – in SharePoint 2013, a similar field exist out of the box.
In this article I’ll mention what this field does, a sample of creating and using the field, getting and setting the Bing Maps keys to make sure our maps are properly working and displaying.
Update 2013-09-14: As pointed out by Leon Zandman in the comments, there’s a some updated pre-requisites required in order to view the geolocation field value or data in a list. Information from Microsoft:
An MSI package named SQLSysClrTypes.msi must be installed on every SharePoint front-end web server to view the geolocation field value or data in a list. This package installs components that implement the new geometry, geography, and hierarchy ID types in SQL Server 2008. By default, this file is installed for SharePoint Online. However, it is not for an on-premises deployment of SharePoint Server 2013. You must be a member of the Farm Administrators group to perform this operation. To download SQLSysClrTypes.msi, see Microsoft SQL Server 2008 R2 SP1 Feature Pack for SQL Server 2008, or Microsoft SQL Server 2012 Feature Packfor SQL Server 2012 in the Microsoft Download Center.
Introduction to the Geolocation Field
I’ll showcase what the Geolocation field can do for us in a SharePoint list. In the sample below I’ve used a list called “Scandinavian Microsoft Offices” which contains a few office names (Sweden, Denmark, Finland and Norway). What I want to do in my list is to display the location visually to my users, not only the name and address of the location. With the new Geolocation field you can display an actual map, as I’ll show you through right now – skip down to the “Adding a Geolocation Field to your list” section if you want to know how to get the same results yourself.
A plain SharePoint list before I’ve added my Geolocation field
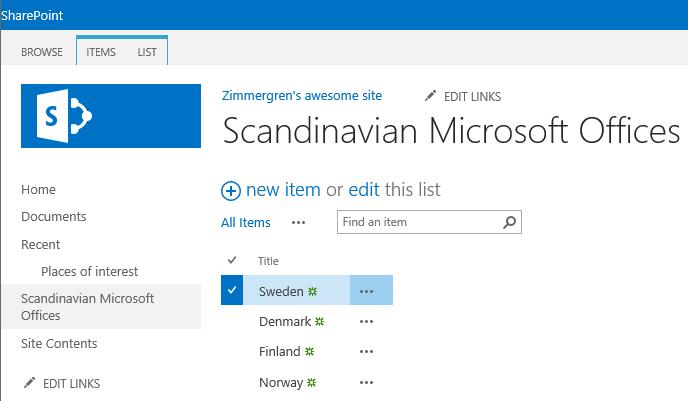
As you can see, no modifications or extra awesomeness exist in this list view – it’s a vanilla SharePoint 2013 list view.
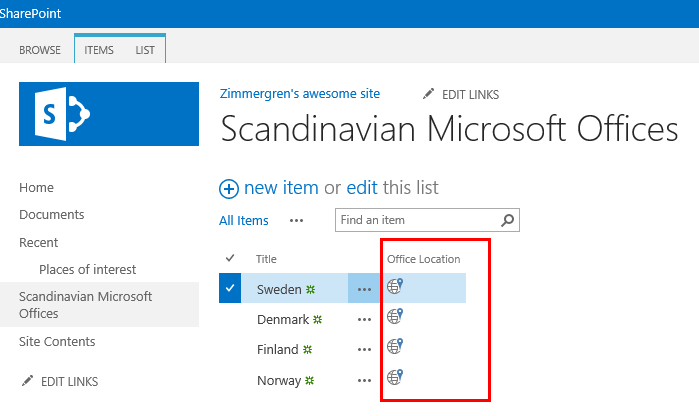
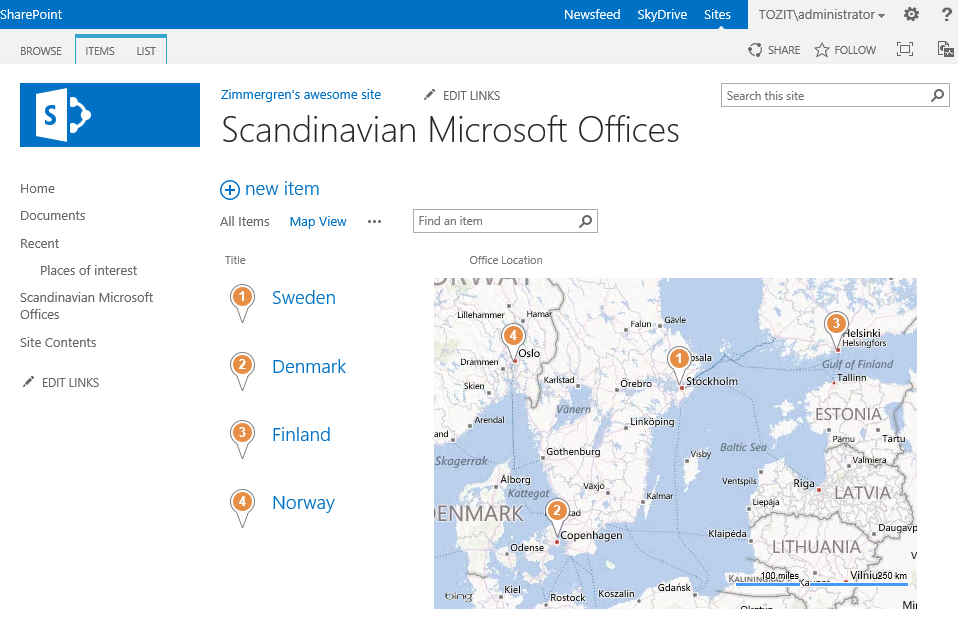
The same list, with the Geolocation field added to it
When we’ve added the Geolocation field to support our Bing Maps, you can see that a new column is displayed in the list view and you can interact with it. In my sample here I’ve filled in the coordinates for the four Microsoft offices I’ve listed in my list.
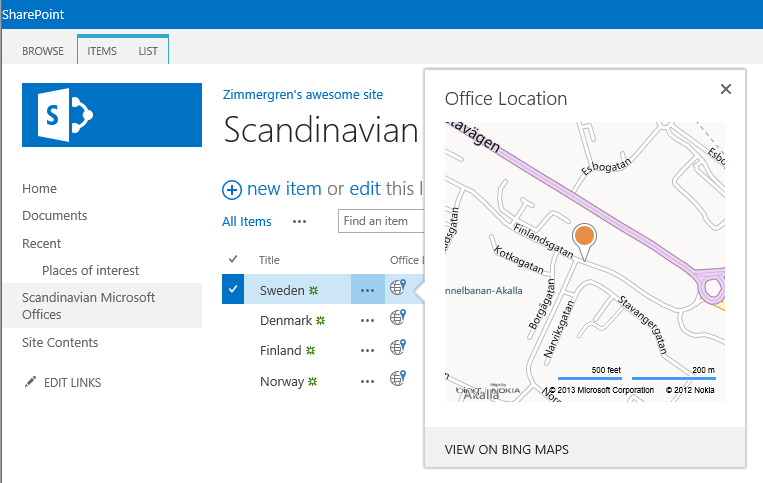
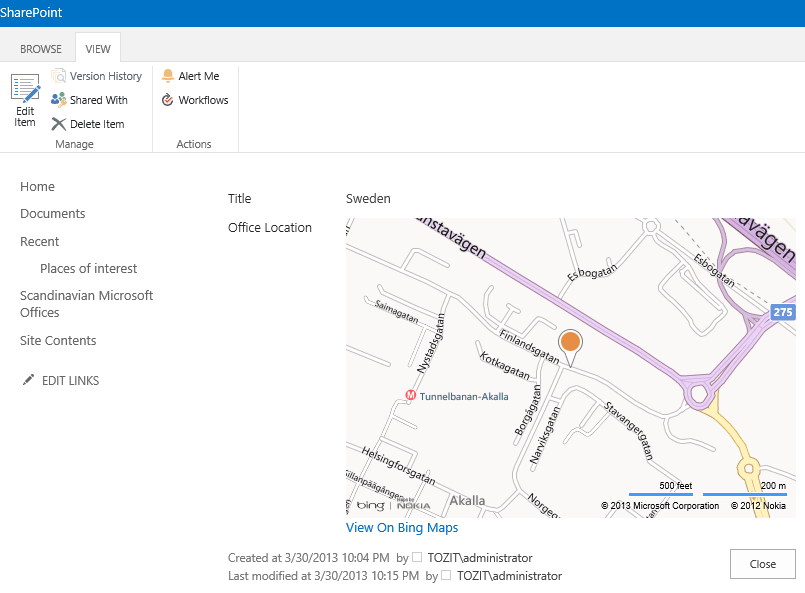
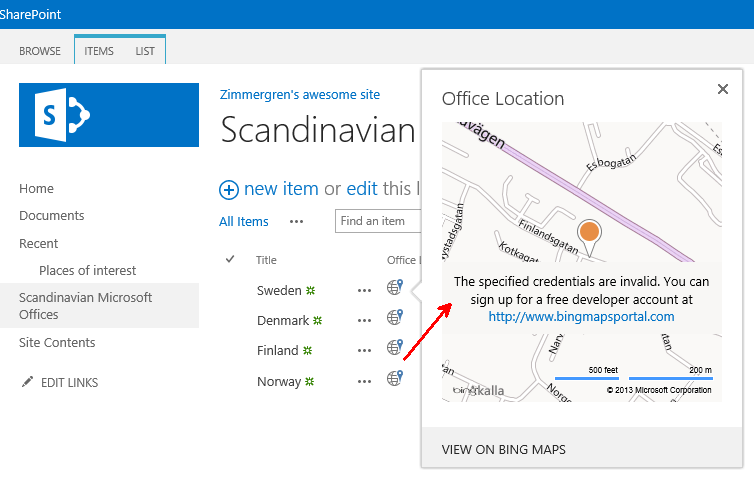
Pressing the small globe icon will bring up a nice hover card kind of dialog with the actual map, with options to view the entire map on Bing Maps as well (which is essentially just a link that’ll take you onwards to the actual bing map):
Viewing an actual list item looks like this, with the map fully integrated by default into the display form:
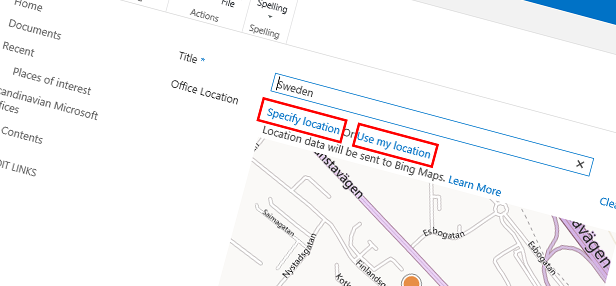
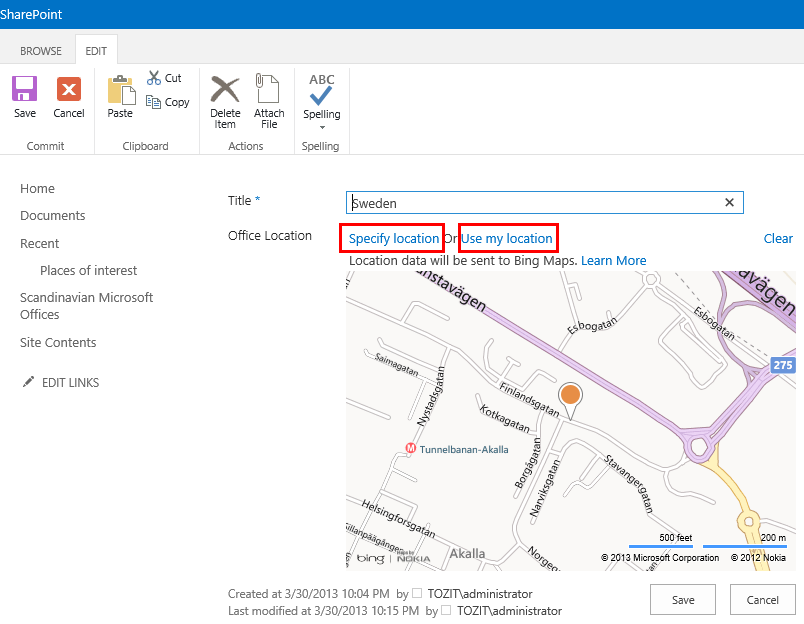
And should you want to Add or Edit a list item with the Geolocation field, you can click either “Specify location” or “Use my location“. If you browser supports the usage and tracking of your location, you can use the latter alternative to have SharePoint automagically fill in your coordinates for you. Compare it with how you check in at Facebook and it recognizes your current location and can put a pin on the map for you.
In my current setup I don’t have support for “Use my location” so I’ll have to go with the “Specify location” option – giving me this pretty dull dialog:
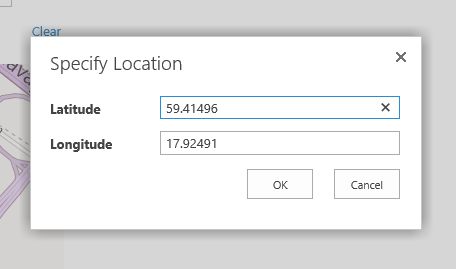
As you can see, you don’t have an option for searching for your office on Bing Maps and then selecting the search result and have it automatically insert the correct Lat/Long coordinates. But, that’s where developers come in handy.
Create a new Map View
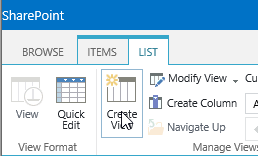
Let’s not forget about this awesome feature – you can create a new View in your list now, called a “Map View”, which will give you a pretty nice map layout of your tagged locations with pins on the map. Check these steps out:
1) Head on up to “List” -> “Create View” in your List Ribbon Menu:
2) Select the new “Map View”

3) Enter a name, choose your fields and hit “Ok”

4) Enjoy your newly created out of the box view in SharePoint. AWESOME
Adding a Geolocation Field to your list
Right, let’s move on to the fun part of actually adding the field to our list. I’m not sure if it’s possible to add the field through the UI in SharePoint but you can definitely add it using code and scripts, which is my preferred way to add stuff anyway.
Adding a Geolocation field using PowerShell
With the following PowerShell snippet you can easily add a new Geolocation field to your list:
Add-PSSnapin Microsoft.SharePoint.PowerShell
$web = Get-SPWeb "http://tozit-sp:2015"
$list = $web.Lists["Scandinavian Microsoft Offices"]
$list.Fields.AddFieldAsXml( "", $true, [Microsoft.SharePoint.SPAddFieldOptions]::AddFieldToDefaultView)
Adding a Geolocation field using the .NET Client Object Model
With the following code snippet for the CSOM you can add a new Geolocation field to your list.
// Hardcoded sample, you may want to use a different approach if you're planning to use this code :-)
var webUrl = "http://tozit-sp:2015";
ClientContext ctx = new ClientContext(webUrl);
List officeLocationList = ctx.Web.Lists.GetByTitle("Scandinavian Microsoft Offices");
officeLocationList.Fields.AddFieldAsXml( "", true, AddFieldOptions.AddToAllContentTypes);
officeLocationList.Update();
ctx.ExecuteQuery();
Adding a Geolocation field using the Javascript Client Object Model
With the following code snippet for the JS Client Object Model you can add a new Geolocation field to your list:
function AddGeolocationFieldSample()
{
    var clientContext = new SP.ClientContext();
    var targetList = clientContext.getweb().getlists().getByTitle('Scandinavian Microsoft Offices');
    fields = targetList.get_fields();
    fields.addFieldAsXml("", true, SP.AddFieldOptions.addToDefaultContentType);
    clientContext.load(fields);
    clientContext.executeQueryAsync(Function.createDelegate(this, this.onContextQuerySuccess), Function.createDelegate(this, this.onContextQueryFailure));
}
Adding a Geolocation field using the Server Side Object Model
With the following code snippet of server-side code you can add a new Geolocation field to your list:
// Assumes you've got an SPSite object called 'site'
SPWeb web = site.RootWeb;
SPList list = web.Lists.TryGetList("Scandinavian Microsoft Offices");
if (list != null)
{
    list.Fields.AddFieldAsXml("", true, SPAddFieldOptions.AddFieldToDefaultView);
}
Be amazed, its that easy!
Bing Maps – getting and setting the credentials in SharePoint
Okay now I’ve added the fields to my lists and everything seems to be working out well, except for one little thing… The Bing Map tells me “The specified credentials are invalid. You can sign up for a free developer account at http://www.bingmapsportal.com“, which could look like this:
Get your Bing Maps keys
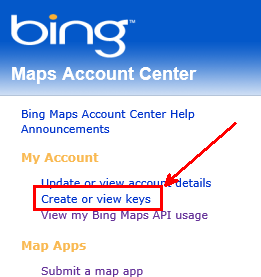
If you don’t have any credentials for Bing Maps, you can easily fetch them by going to the specified Url (http://www.bingmapsportal.com) and follow these few simple steps.
1) First off (after you’ve signed up or signed in), you’ll need to click on the “Create or view keys” link in the left navigation:
2) Secondly, you will have to enter some information to create a new key and then click ‘Submit’:
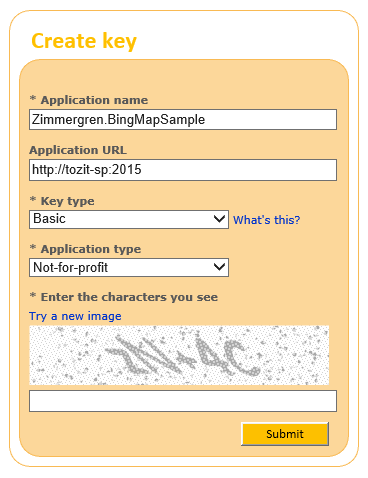
After you’ve clicked ‘Submit’ you’ll be presented with a list of your keys, looking something like this:

Great, you’ve got your Bing Maps keys/credentials. Now we need to let SharePoint know about this as well!
Telling SharePoint 2013 what credentials you want to use for the Bing Maps
Okay – so by this time we’ve created a Geolocation field and set up a credential for our key with Bing Maps. But how does SharePoint know what key to use?
Well that’s pretty straight forward, we have a Property Bag on the SPWeb object called “BINGMAPSKEY” which allows us to configure our key.
Since setting a property bag is so straight forward I’ll only use one code snippet sample to explain it – it should be easily translated over to the other object models, should you have the need for it.
Setting the BING MAPS KEY using PowerShell on the Farm
If you instead want to configure one key for your entire farm, you can use the Set-SPBingMapsKey PowerShell Cmdlet.
Set-SPBingMapsKey -BingKey "FFDDuWzmanbiqeF7Ftke68y4K8vtU1vDYFEWg1J5J4o2x4LEKqJzjDajZ0XQKpFG"
Setting the BING MAPS KEY using PowerShell on a specific Web
Add-PSSnapin Microsoft.SharePoint.PowerShell
$web = Get-SPWeb "http://tozit-sp:2015"
$web.AllProperties["BINGMAPSKEY"] = "FFDDuWzmanbiqeF7Ftke68y4K8vtU1vDYFEWg1J5J4o2x4LEKqJzjDajZ0XQKpFG"
$web.Update()
Update 2013-03-31: More examples of setting the property bag
I got a comment in the blog about having more examples for various approaches (like CSOM/JS and not only PowerShell). Sure enough, here comes some simple samples for that.
Setting the BING MAPS KEY using JavaScript Client Object Model on a specific Web
var ctx = new SP.ClientContext.getcurrent(); var web = ctx.getsite().getrootWeb(); var webProperties = web.getallProperties(); webProperties.setitem("BINGMAPS_KEY", "FFDDuWzmanbiqeF7Ftke68y4K8vtU1vDYFEWg1J5J4o2x4LEKqJzjDajZ0XQKpFG"); web.update(); ctx.load(web); // Shoot'em queries away captain! ctx.executeQueryAsync(function (){ alert("Success"); },function () { alert("Fail.. Doh!"); });
Setting the BING MAPS KEY using .NET Client Object Model on a specific Web
// Set the Url to the site, or get the current context. Choose your own approach here..
var ctx = new ClientContext("http://tozit-sp:2015/");
var siteCollection = ctx.Site;
ctx.Load(siteCollection);
var web = siteCollection.RootWeb;
ctx.Load(web, w => w.AllProperties);
ctx.ExecuteQuery();
var allProperties = web.AllProperties;
ctx.Load(allProperties);
// Set the Bing Maps Key property
web.AllProperties["BINGMAPSKEY"] = "FFDDuWzmanbiqeF7Ftke68y4K8vtU1vDYFEWg1J5J4o2x4LEKqJzjDajZ0XQKpFG";
web.Update();
ctx.Load(web, w => w.AllProperties);
ctx.ExecuteQuery();
So that’s pretty straight forward. Once you’ve set the Bing Maps Key, you can see that the text in your maps has disappeared and you can now start utilizing the full potential of the Geolocation field.
Summary
The Geolocation field is pretty slick to play around with. It leaves a few holes in terms of functionality that we’ll have to fill ourselves – but of course that depends on our business requirements. One example is that I rarely want to enter the coordinates into the Geolocation field myself, but I might just want to do a search and select a location which is the added and the coordinates populated into the field automatically, or use the (built in) functionality of “Use my location” – good thing we’ve got developers to fine-tune this bits and pieces :-)
Enjoy.


Recent comments