
In this article, I am exploring the capabilities of Bring Your Own Key with the Azure Container Registry. A way for you to get better control of the full Key Lifecycle Management process, should you need to.
I am detailing a few of my thoughts that come up around different scenarios. I would be happy to hear about your own experiences and reasons for why BYOK helps you and your organization. Feel free to leave a comment or reach me on Twitter.
Scenarios
Instead of publishing purely technical piece guidelines, I am trying to angle some of my reasons and thoughts to “why,” as well.
While there are plentiful reasons for different organizations to bring their own keys, here are some of the main aspects I am considering.
Managing sensitive information and data, and in this case, encryption keys specifically, can help improve your overall key management lifecycle.
You’d be fully in charge of the creation, rotation of keys, permissions to use the keys (access policies), review auditing of used keys, and more.
Azure Key Vault is HSM backed (Hardware Security Modules) and can generate unique keys that have strong security, automatically. You can opt-in to bring your keys from your own HSM device, should you want to.
Some angles are:
- Transparency on how the keys are being used (auditing).
- Key rotation and cancellation capabilities.
- A central place to manage your key(s), separated from the management of your services.
- Built-in role separation.
- Encrypt multiple services using a single master key.
- Separate the duties of management and data in your org.
- Geo-location of your choice for the master keys.
- You can work with your keys in many ways. Azure CLI, REST, PowerShell, and the Azure Portal. Perhaps I have even missed some.
But let us not forget the potential downsides. More on that further down in this post, but, for now, consider:
- You are responsible for the keys.
- You are responsible for the lifecycle of the keys. Key creation, rotation, expiration, you name it.
- You are responsible for ensuring there is no data loss due to lost keys.
Read more about “Consider a lost key” further down.
Regulatory compliance.
Some organizations have strict regulatory compliance guidance that they need to follow. In some scenarios, they have to own and control the keys and key-rotation themselves to comply with their policies.
I have been in contact with a few organizations where their compliance and regulations are relatively strict. A typical scenario is:
- We (organization) must own and control where the master keys are.
- We (organization) have restrictions on who, what, and where master keys are stored.
- We (organization) have geographical restrictions on where the master key(s) must reside.
There can be strict regulations to follow for our data, services, and, in this case, encryption master keys. Realizing the potential of Azure Key Vault to handle our customer-owned keys helps a lot. Specifically, when we can define and control the entire end-to-end key management lifecycle.
Auditing key usage.
When someone, or some system, is using your keys, you can stay informed about it. Azure Key Vault has built-in capabilities for diagnostics and audit logging if you enable it.
I have previously written an article about viewing the diagnostics logs of your Azure Key Vault. It explains how you can drill into the audit logs for your Azure Key Vault, which resides in an Azure Log Analytics workspace.
- Who accessed my Key Vault? (Zimmergren)
Depending on what types of permissions you have granted, and whether you want to list more information or only the key activities, these are helpful things to start looking for:
- KeyUnwrap
- KeyWrap
- KeyList
- KeyGet
There is an excellent post on Microsoft Docs about how to interpret the logs, which helps us understand this in more detail.
- Interpret your Key Vault logs (Microsoft)
Consider a lost key
A critical aspect of the entire BOYK scenario is that you are in control, and ultimately responsible, for your encryption keys. Therefore, if you lose them (delete the Azure Key Vault, delete the Key, or otherwise make it unavailable), all your data is lost. Period.
Without the key, you can not decrypt or recover your data. I want to make that as clear as I can, to ensure you don’t jump into the BYOK game without knowing what that means for you, your data, operational excellence and business continuity in case you aren’t prepared.
Some ways you can help mitigate losing the keys are:
- Back up your encryption keys after you have created them.
- Back up your encryption keys after you perform a key rotation.
- Enable soft-delete on the Azure Key Vault.
- Do not delete keys. Instead, set the Enabled flag to False, or ensure that it expires a given date.
My strong recommendation for starting with BYOK is to do research ahead of time, and ensure you are prepared.
How to set up ACR with your own Encryption Keys
Today, you can only enable this capability when you create a new Azure Container Registry. Modifying the Encryption mechanism of an existing registry is not currently supported.
Enabling this is fairly straight forward. I am using the Azure Portal to demonstrate this, but as always, you can do most of this, and more, with the Azure CLI.
Before we create the actual Container Registry, let’s ensure that we have the pre-requisites.
1. Create a Managed Identity
In order for the Azure Container Registry to access the Azure Key Vault keys, we need to set up Access Policies, and if we have a managed identity we can tie them together this way.
Go to your Azure Portal and create a new User Assigned Managed Identity.
You will need this in the below steps.
2. Create or import the keys in your Azure Key Vault
Next up, we want to either import our HSM generated keys, or generate them on the fly using the built-in capability in Azure Key Vault.
Since I currently do not operate any keys that I create myself using an HSM backed device, I am using the built-in capabilities, which I will explain below.
Go to your Azure Portal, and create a new Azure Key Vault.
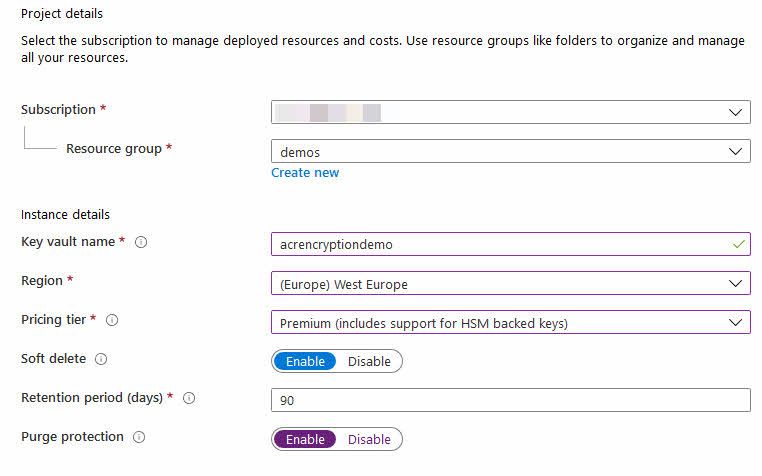
Creating an Azure Key Vault from the Azure Portal.
Note:
- Enable purge protection.
- Enable soft delete.
- Main reasons: You do not want to accidentally lose all your data.
You can opt-in to set up Access Policies directly when you create your vault, or do it at a later point. Here, I have just created my vault, and in order to grant the new Managed Identity access to the keys, I need to configure the Access Policies, and grant the Managed Identity access.
Go to your Azure Key Vault -> Access Policies -> Add Access Policy
From here, add the User Assigned Managed Identity with the Get, unwrapKey, wrapKey permissions, as per the official BYOK documentation.
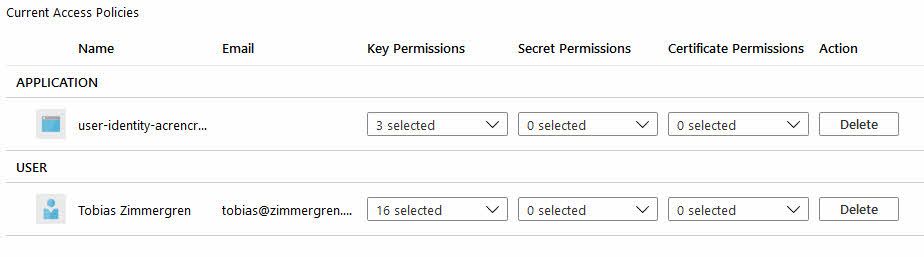
Configure Access Policy to an Azure Key Vault, to allow a User Assigned Managed Identity access.
So far we have created our Vault, we have associated the Managed Identity through an Access Policy, and the only thing remaining now is to ensure we have some keys to use.
Setting up new keys, or importing your custom ones, is easy.
Go to your Azure Key Vault -> Keys.
Generate or import a new key. Here’s an example of how I am doing it for the purpose of this post:
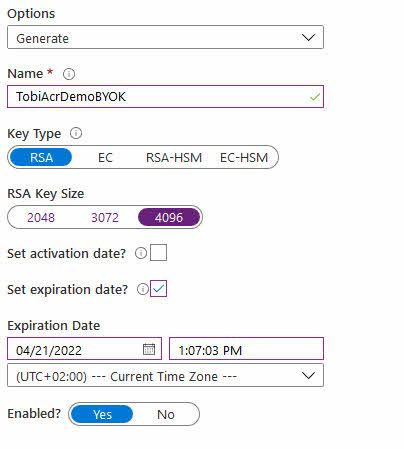
Azure Key Vault adding a new custom Key
We are all set for continuing our journey. Next up we will create an Azure Container Registry that uses customer-owned keys for Encryption.
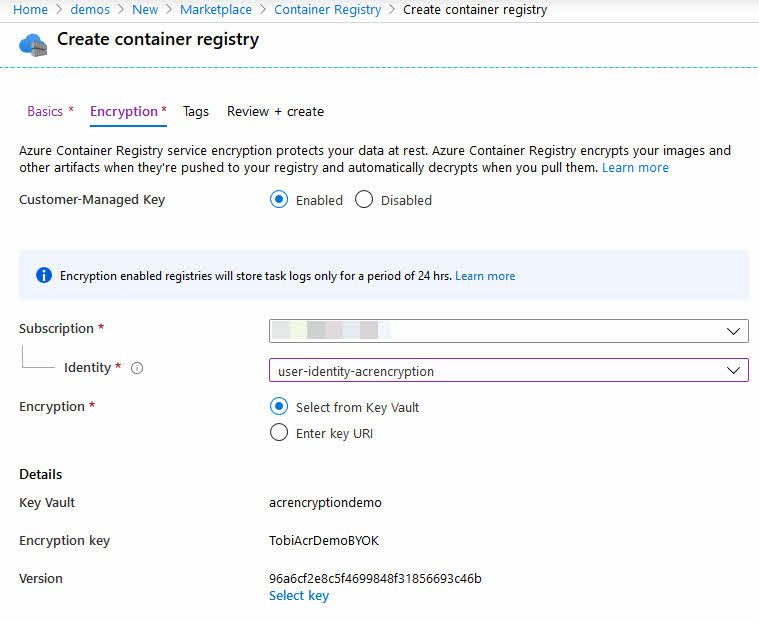
3. Create a new ACR and enable customer-managed Encryption
At this point we have our Azure Key Vault and our User Assigned Managed Identity configured to access Keys. Next step is to set up an Azure Container Registry and ensure that we enable the Encryption capability.
Go to Azure Portal -> Create New -> Azure Container Registry
In the dialog you’ll see a step called Encryption. This is where we want to switch from Disabled to Enabled.
You will be presented with the option to select the Managed Identity, pick your Azure Key Vault and select the Key you want to use. This is what it currently looks like:
When we hit create, the Azure Container Registry is being created and have the custom encryption capabilities turned on with your own unique keys. You are now in charge of key rotation and maintenance of these keys.
When the deployment is done, you can navigate to your Azure Container Registry and select the Encryption option to ensure that the keys are indeed now hooked up:
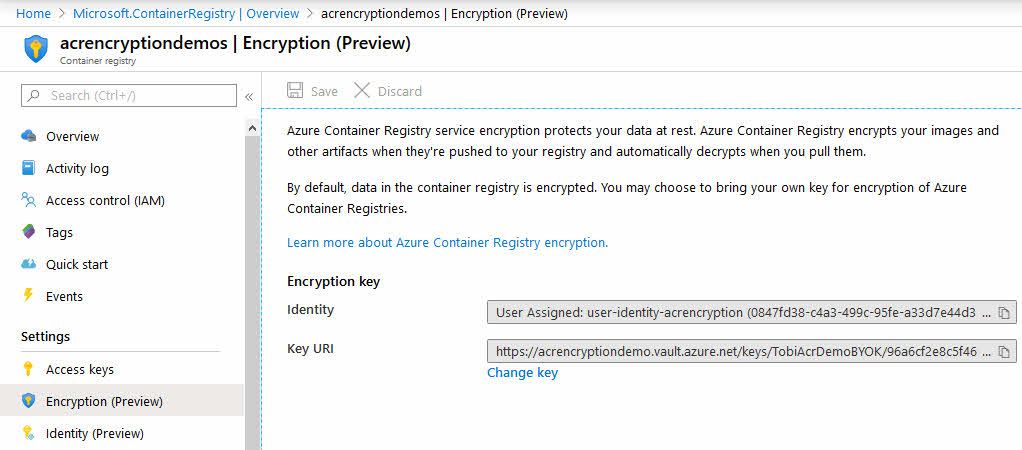
Azure Container Registry is now using customer-owned Encryption keys. BYOK is working.
There it is. We have successfully brought our own keys. In this case I generated them from the Azure Key Vault, but you can, as mentioned previously in this article bring your own HSM keys.
Summary and Links
In 2018, I wrote about “Getting Started with BYOK in Azure Storage - Encrypt data at rest with your own encryption keys”. In this post we’re talking about the same concept of bringing your own customer-managed keys, but for the Container Registry.
Using these capabilities mean that the data is encrypted with your custom keys at rest, in the Azure datacenters.
The data at rest in Azure is always encrypted by default, as well. I don’t necessarily see a need to BYOK unless you have specific requirements to do just that. It always depends on your situation, your organization and other variables. Now we have the option to choose, which is great.
Read more:
- Import HSM-protected keys to Azure Key Vault (Microsoft)
- Who accessed my Azure Key Vault? (Zimmergren)
- Encryption using customer-managed keys (Microsoft)
- Interpret your Key Vault logs (Microsoft)
Header photo by Sylvie Tittel on Unsplash

Comments are closed