This article is part of a series. Here’s a list of all available parts.
- Part 0: Introduction to the article series
- Part 1: Create an AzureRm Active Directory (AAD) Application using PowerShell
- Part 2: Getting started with the AzureRm PowerShell cmdlets
- Part 3: Build an application using C# which is using the Azure Resource Manager API’s
- Part 4: Tip: Azure Resource Explorer Tool
- Part 5: Tip: Get all available api-version alternatives for the ARM endpoints
- Part 6: Move Azure Resources from one Resource Group to another
- Part 7: Download an Azure Publishing Profile (xml) programmatically using REST
- Part 8: Programmatically export Resource Group template using the REST API
Introduction
Welcome to Part 1 in the Developing with Azure series. In this post I will walk you through how to use PowerShell in order to create an Azure Active Directory (AAD) Application and then also create a new Service Principal which we’ll use to authenticate and authorize requests to the Azure Resource Manager.
When we talk about various auth alternatives, there’s a lot of options. We’ll focus on using an account/service principal for our AAD Application but in another post we’ll investigate how we can set up the authentication using a Certificate.
Background: Why use a Service Principal?
On of the considerations I’ve faced during the work I’ve done with the Azure Resource Manager is how I would authenticate my requests. There’s really three options that comes to mind, and those are:
- Use your Username and Password (Your own account)
- Use a Certificate
- Use a Service Principal
I’ve tried all fo the above methods, and find that using a Service Principal is the easiest way to manage and control the permissions in Azure. Since Azure supports RBAC (Role-Based Access Control), you can easily assign specific permissions or limitations on what the service principal or account should be allowed to do.
Benefits of RBAC with a Service Principal:
- Fine-grained permission configuration
- An account limited to a single purpose using role-based access control
- Remove any unecessary permissions and privileges
- Create a unique service principal with limited permissions per service
- etc..
Scenarios when this type of account comes in handy:
- Continuous Integration (CI) from a Build Server using PowerShell
- Release Manager automation with PowerShell for automatic deployments etc
- Custom API’s, Applications or Services you build that need to authenticate and work with the Azure Resource Manager API’s
- Etc..
Authenticate to Azure Resource Management from PowerShell
First of all, make sure you’re running Azure PowerShell 1.0 or later. Previous editions are targeting older versions with deprecated cmdlets for Azure Resource Management.
Next, we also need to have the Azure Resource Manager Cmdlets (please visit the link and install..).
In order to get started, we need to make sure that the powershel session is authenticated. We’ll do this by using the following command:
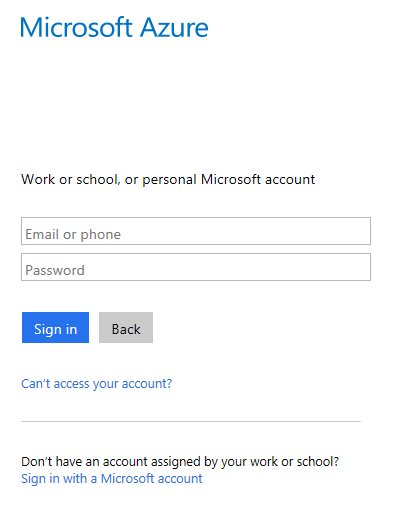
Login-AzureRmAccount
It should bring up an Azure Sign-in dialogue. Use it to sign in with your account (or whichever account has the required permissions to manage your subscription):
The output of the command should be some data about your session, like this:
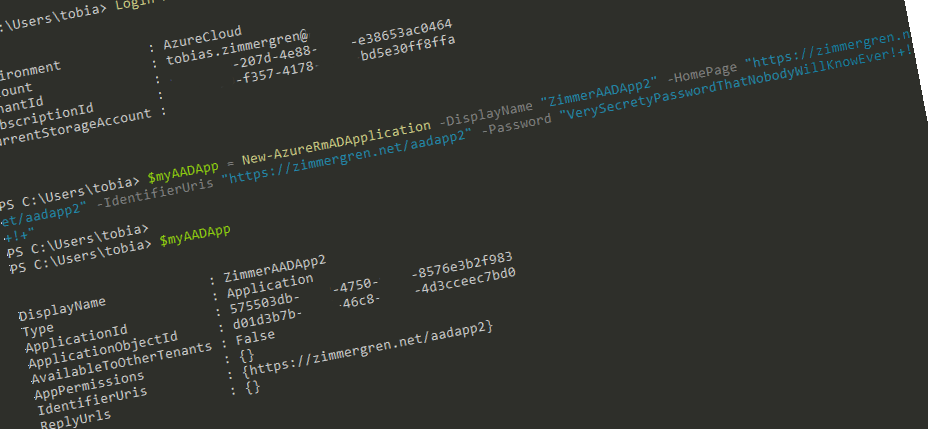
PS C:\Users\tobia> Login-AzureRmAccount


Environment           : AzureCloud
Account               : YourEmail@yourdomain.com
TenantId              : YourGuid
SubscriptionId        : YourGuid
CurrentStorageAccount :
Creating an AzureRM AD Application
Great, we’re using PowerShell to authenticate ourselves to our subscription with the aforementioned command. Now it’s time to create a new AAD Application (Azure Active Directory). This will be an Azure Resource Manager application, and we’ll use the new AzureRm cmdlets. As I mentioned in the pre-reqs, make sure you’ve got at least Azure PowerShell 1.0 installed.
The cmdlet for creating a new AAD Application is:
New-AzureRmADApplication
You should run it like this:
$myAADApp = New-AzureRmADApplication
	-DisplayName "ZimmerAADApp1"
	-HomePage "https://zimmergren.net/aadapp1"
	-IdentifierUris "https://zimmergren.net/aadapp1" -Password "My Pass"
After running this command, you need to check that the application was successfully created. Do this by simply checking the value of the $myAADApp variable (or whatever you named it):
PS C:\Users\tobia> $myAADApp


DisplayName             : ZimmerAADApp1
Type                    : Application
ApplicationId           : YourGuid
ApplicationObjectId     : YourGuid
AvailableToOtherTenants : False
AppPermissions          : {}
IdentifierUris          : {https://zimmergren.net/aadapp1}
ReplyUrls               : {}
NOTE: You should copy your ApplicationId from the output and save for later.
Creating a Service Principal
We have created our AzureRm AD Application and we’re ready to create an account which can get access to this application in order to later work with the APIs. We’re doing this with something called a Service Principal, which essentially is a type of service account.
New-AzureRmADServicePrincipal -ApplicationId <your application id>
*NOTE: The **ApplicationId *you should use is the one you got from the previous query and saved.
Next step is to assign a Role Assignment to the Application. We’ll do this using the New-AzureRmRoleAssignment command. I’m giving Contributor access, but you can choose whatever access level you want:
New-AzureRmRoleAssignment
	-RoleDefinitionName Contributor
	-ServicePrincipalName "<application id>"
The result of this should be something like this:
RoleAssignmentId   : /subscriptions/A GUID/providers/Microsoft.Authorization/roleAssignments/<GUID>
Scope              : /subscriptions/A GUID
DisplayName        : ZimmerAADApp1
SignInName         :
RoleDefinitionName : Contributor
RoleDefinitionId   : A GUID
ObjectId           : A GUID
ObjectType         : ServicePrincipal
In order to move on to the next step, we first need to get the subscription id. The easiest thing to do in achieving this is:
$mySubscription = Get-AzureRmSubscription
This will result in something like this:
C:\Users\tobias> $mySubscription

SubscriptionName : Production
SubscriptionId   : <a guid>
TenantId         : <a guid>
State            : Enabled
From here, make a note of the SubscriptionId and the TenantId. Both are required for the next commands to execute.
Authenticate using your new Service Principal to verify
In order to try our new Service Principal out, we need to try and authenticate the requests through that account.
To do this, create a new credential object like so:
$svcPrincipalCredentials = Get-Credential
It should yield a login image like this:
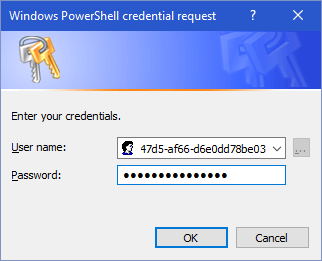
Enter the ApplicationId as username and the Password that you configured in the beginning of this article.
Awesome - you have fetched the Credentials for the new Service Principal. That means we can now start logging in to the Azure Resource Manager with any approach we want. In this post we’ll just verify that we can access it using PowerShell:
Login-AzureRmAccount
	-Credential $svcPrincipalCredentials
	-ServicePrincipal
	-TenantId "<your tenant id guid>"
It should yield an output like this, and verify that you are signed in using the new service principal account (the account guid..):
Environment           : AzureCloud
Account               : <your guid>
TenantId              : <your guid>
SubscriptionId        : <your guid>
CurrentStorageAccount :
Run the Azure Resource Manager PowerShell commands
Once you’ve hooked up everything as described above, you’re ready to run some PowerShell cmdlets (and currently also have a session which is authenticated).
There’s some Azure PowerShell cmdlets for the Resource Manager which are described in more detail available here.
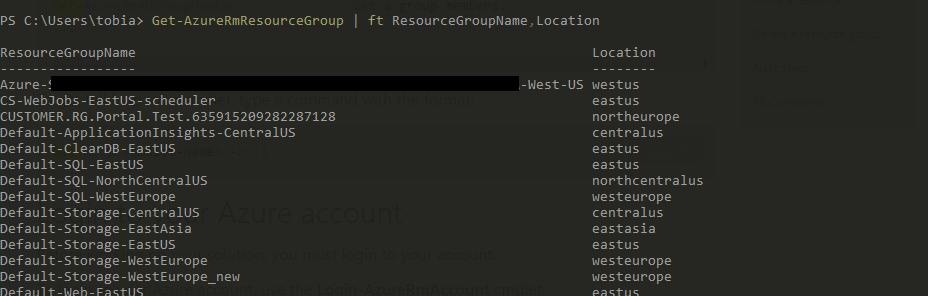
As an example, you can now list all your resource groups by running this command:
Get-AzureRmResourceGroup | ft ResourceGroupName,Location
This should yield a result like this:
Summary
Bingo! We have achieve the following result:
- Sign in and authenticate with Azure using PowerShell
- Create a new Azure Resource Manager AAD Application
- Create a Service Principal (essentially a “service account”)
- Assign the Service Principal with (in my case) Contributor permissions
- Verified that we could login using the new service principal through PowerShell with the
Login-AzureRmAccountcmdlet - Run the Azure Resource Manager cmdlets successfully to fetch amazing magic from our Azure subscription
This means we’re good to go, and can now start building any type of application which can authenticate (using the Service Principal’s ID and Password) and work with the Azure Resource Manager API’s. Which in turn means that if we want to continue and evolve what we’ve just done, we can start building C# applications, web api’s, backend services or whatever you prefer.
Comments are closed
Archived comments
hello! just in time for my work with this arm. thank you very much for guidance in blogpost and i hope there will be many more. question. can you do a blogpost about how to do with the .net to get and create resource in azure? thhx
Hi Nemanja,
Thank you for your comment, I appreciate it.
Sure, that's on the roadmap for this or next week as well - stay tuned for a post about how you can utilize the ARM from C#.
Thanks,
Tobias.
This series is exactly what i've been searching for. Thank you!
Hi Sean,
Thanks. I appreciate the kind words :-)
Tobias.
thanks !! for this article, very clear, i searched for a long time to find this article there is almost nothing in the web about this kind of topics.
but this is perfect really you explain perfectly and every thing works like a charm.
keep going good luck ! ;)
Hi Kholo,
Thank you for the kind words. I'm glad you could benefit from it :-)
Cheers,
Tobias.
Hi Tobias, i hadto give permissions to another accounts service principal to my subscription so that they can deploy to my cloud service, but new-azurermroleassignment giving this error. any thoughts?
new-azurermroleassignment : the provided information does not map to an ad object id
The classic portal lets you create a 1-year or 2-year key for the service principal. Is there a way to do that with powershell? I was guessing it's a self-signed cert of some sort, but wasn't sure how they ended up with that 44 character string.
Hi Tobias, can you guide me through User & Password based authentication rather than ServicePrincipal ?
Great article, but I'm confused about one thing (possibly more than one). In Azure Portal I can create a new App Service and then inside that app I can turn on App Service Authentication. From there I can select "Log in with Azure Active Directory" then set Express mode and give it an application name (this gets added to active directory). This seams semi-straight forward from a workflow perspective. However, when I try doing this with azurerm I'm baffled. This workflow doesn't seem to exist when scripting the same solution. Examples show creating an active directory application and adding a service principal using certificates or login credentials, neither of these were required through the portal interface. If I use azurerm to create the ADApp then I can no longer create it normally because the identifiers are already used. The app does not show up in the resource group, I only have a registered app in active directory. How can I create an app service to publish to and have it connected to a service principal? I hope I'm asking the question correctly.