
In this article, I am talking about how to share a mounted Azure file share across multiple containers in your deployments in Microsoft’s hosted Kubernetes offering, AKS.
This is a mini-series with two parts.
- (this post) How to: Mount an Azure Storage File share to containers in AKS.
- Processing data from SQLite hosted in an Azure File share, running in Azure Kubernetes Services.
Step by step
To get started, we’ll need an Azure Storage account and an Azure Kubernetes Services cluster up and running.
Create an Azure file share
For the sake of ease and to keep a somewhat visual appeal in this blog post, I’m doing it really easy here with the Azure Portal. Colorful pictures to follow instead of command line screenshots ;)
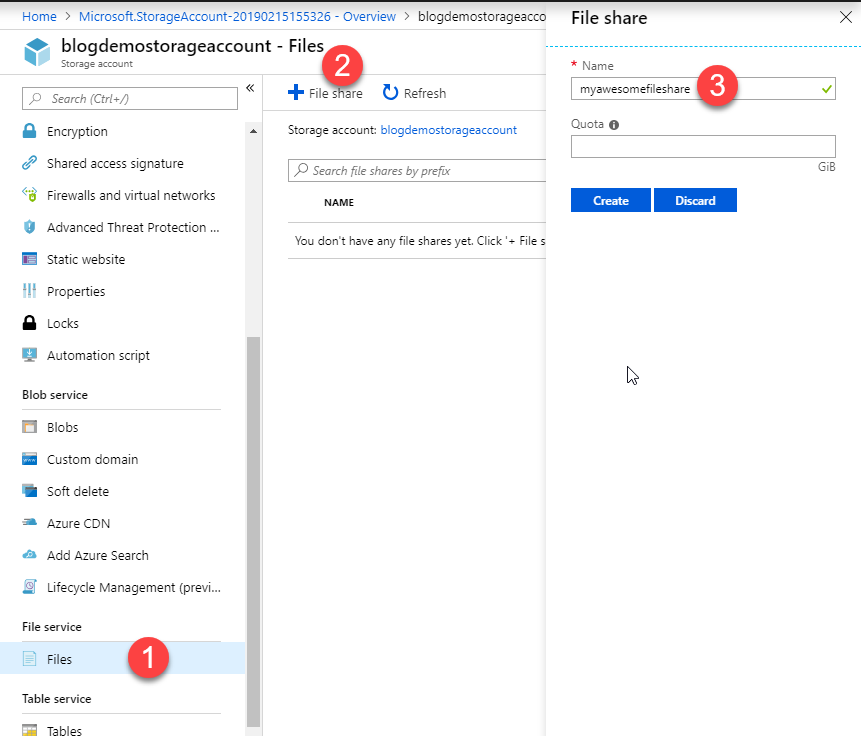
1. Create the Azure File share
In the Azure Portal, navigate to your desired Storage Account, and find the Files menu item on the left side and then click the + File share and input a name for it:
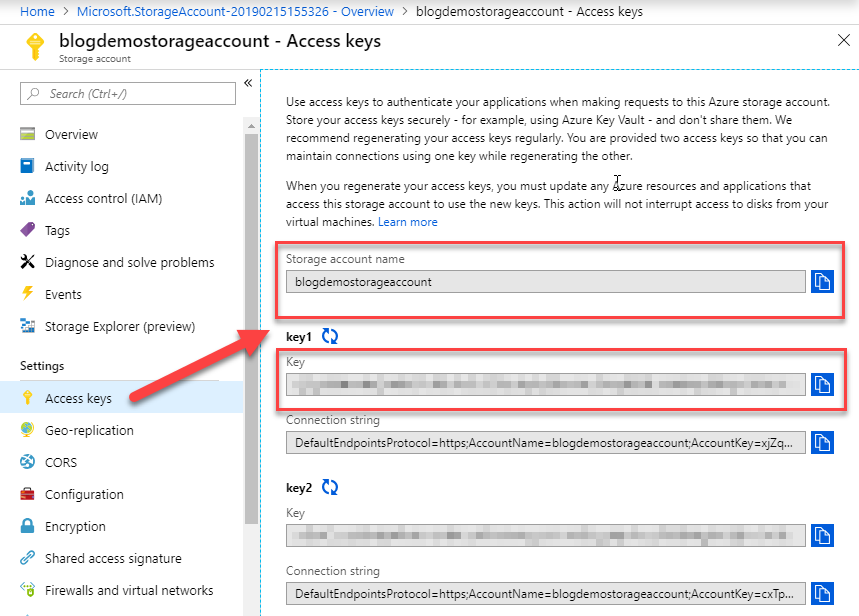
2. Grab the connection details
In the Azure Portal, go to the Access Keys section of your Storage Account and find the details here:
3. Base64 encode the connection details for use in the Kubernetes Secret
You can Base64 encode things with code, PowerShell, online websites*, and many other ways.
Usually, I do these steps from code with some provisioning infrastructure, but for the sake of clarity and ease here, we’ll use PowerShell to Base64-encode the values. Replace with your values. Mind the UTF8 encoding.
$accountName = "blogdemostorageaccount"
$accountNameBytes = [System.Text.Encoding]::UTF8.GetBytes($accountName)
$accountNameBase64 = [Convert]::ToBase64String($accountNameBytes)
Write-Host "Account Name Base 64: " $accountNameBase64

$accountKey = "FAKEyJ90HmAbQY4tR1SPxRGFAKEqdE8GEchJHBAKyGRlNywDKWeVM9QxsaoRqFAKSE=="
$accountKeyBytes = [System.Text.Encoding]::UTF8.GetBytes($accountKey)
$accountKeyBase64 = [Convert]::ToBase64String($accountKeyBytes)
Write-Host "Account Name Key 64: " $accountKeyBase64
Why avoid online websites for encoding sensitive data?
You should avoid the online encode/decode websites when dealing with credentials, sensitive data of any type, etc. I would instead recommend doing it locally on your safe machines, as you don’t know where the data goes on those online websites.
Using Opaque secrets in Kubernetes for sensitive data is another story altogether as well, which we might dive deeper into in another post. For now, let’s finish up the mounting of our new file share in a deployment. Tag along.
Define and Deploy to Kubernetes in AKS
In this section we’ll do these things:
- Create a new namespace for our deployment
- Create a secret that holds the connection details to our Storage account
- Create a deployment that deploys our image and mounts the Azure File share to the containers
1. Create a Kubernetes namespace
While this step isn’t required, keeping things separated with namespaces, it depends on your scenario and infrastructure whether you need it or not. Since I am an avid user of namespaces in a lot of my bigger clusters, I always try to separate things with them as a logical barrier.
Read more about namespaces and their use-case here, and find out whether or not they are right for you. For info, if you don’t want to continue using namespaces below, ignore the step of creating one, and remove the namespace definition in the following yaml files. It’s up to you.
Define demo-namespace.json:
{
    "kind": "Namespace",
    "apiVersion": "v1",
    "metadata": {
      "name": "blogdemodeployments",
      "labels": {
        "name": "blogdemodeployments"
      }
    }
  }
Create it with kubectl:
> kubectl create -f demo-namespace.json
namespace "blogdemodeployments" created
2. Create a Kubernetes Secret with the Azure Storage connection data
Define secret-sauce.yaml:
apiVersion: v1
kind: Secret
metadata:
  name: storage-secret
  namespace: blogdemodeployments
type: Opaque
data:
  azurestorageaccountname: Base64_Encoded_Value_Here
  azurestorageaccountkey: Base64_Encoded_Value_Here
Create the secret in the cluster:
> kubectl create -f secret-sauce.yaml
secret "storage-secret" created
Verify that the secret exists, mind the -n for the namespace (if you have one):
> kubectl get secret storage-secret -n blogdemodeployments
NAME             TYPE      DATA      AGE
storage-secret   Opaque    2         28s
3. Create Kubernetes Deployment and define the volume mounts
We have a namespace, we have a secret with the details to our Azure Storage Account, and we only have to create a new deployment that mounts the Azure File share to the containers.
Here’s my example deployment that I’m using in one of my environments, I’ll break it down after the full file. Read the notes below this snippet to learn where the highlights are.
apiVersion: apps/v1
kind: Deployment
metadata:
  name: deployment-azurestorage-test
  namespace: blogdemodeployments
spec:
  selector:
      matchLabels:
        app: azuretest
  template:
    metadata:
      labels:
        app: azuretest
    spec:
      containers:
      - name: azuretest
        image: your-registry.azurecr.io/demoapp:latest
        volumeMounts:
        - name: azurefileshare
          mountPath: /myawesomefileshare
      imagePullSecrets:
      - name: your-pull-secret-if-you-have-one
      volumes:
      - name: azurefileshare
        azureFile:
          secretName: storage-secret
          shareName: myawesomefileshare
          readOnly: false
The important things to note in the deployment are:
- volumeMounts: Here we specify the path we want to mount the file share inside the container. I’m going with the same name as my actual file share, for simplicity. You can choose whatever you want, of course.
- volumes: define the
azureFileentry with the secret name. This is the secret we created in an earlier step. The share namemyawesomefilesharerefers to the actual Azure File share we created in an earlier step.
4. Verify volume mounts in the Kubernetes Deployment
Next step is to verify that the mounts exist, which we can check on the deployment itself and then on any running pod.
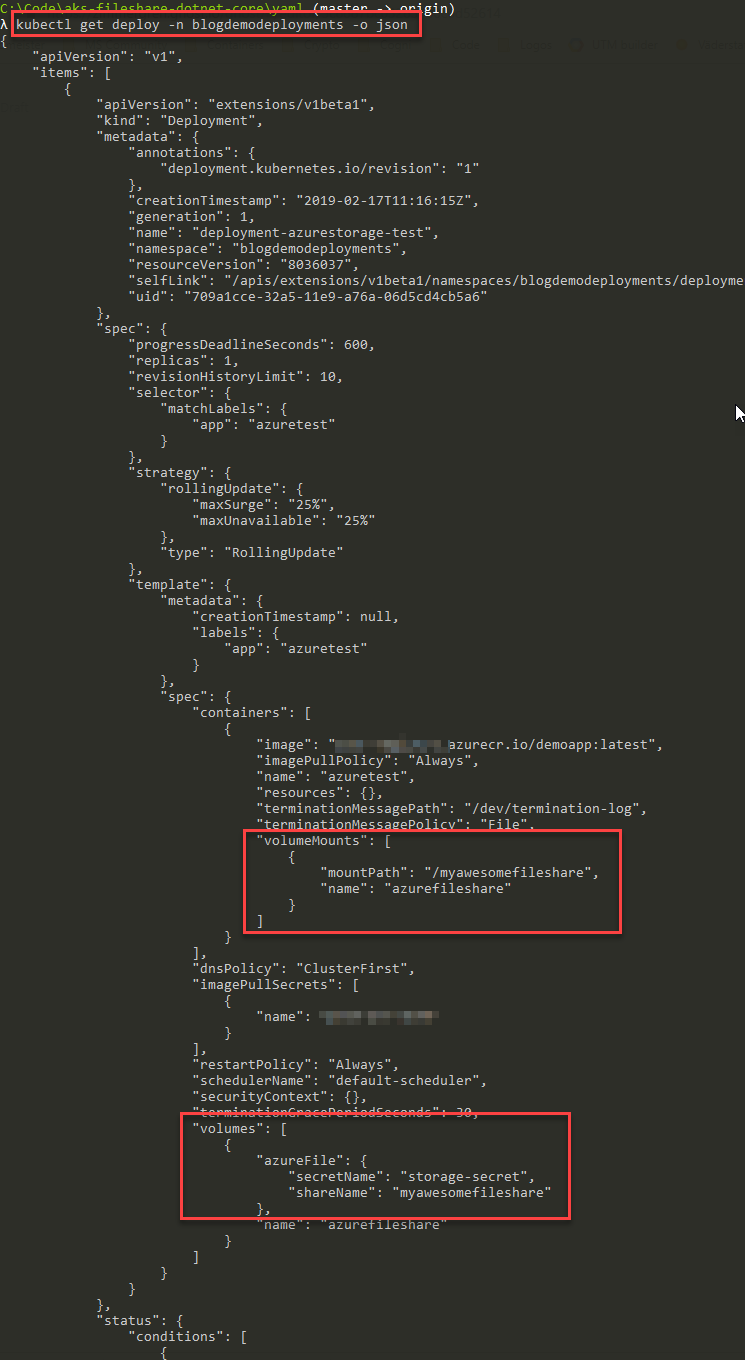
kubectl get deploy -n blogdemodeployments -o json
I’ve cropped away all the details that aren’t interesting for this information. We can now see that our deployment has defined a mount to the Azure file share as we had hoped:
"spec": {
    "containers": [
        {
            "image": "your-registry.azurecr.io/demoapp:latest",
            "imagePullPolicy": "Always",
            "name": "azuretest",
            "volumeMounts": [
                {
                    "mountPath": "/myawesomefileshare",
                    "name": "azurefileshare"
                }
            ]
        }
    ],
    "volumes": [
        {
            "azureFile": {
                "secretName": "storage-secret",
                "shareName": "myawesomefileshare"
            },
            "name": "azurefileshare"
        }
    ]
}
To make it visually more appealing and make it easier to read, the same data comes served here in a screenshot from kubectl:
To verify on a running pod, let’s quickly do a pod describe and find out what it looks like. Run the following commands in sequence to see the details of your own pods in the system.
List pods:
> kubectl get pod -n blogdemodeployments

Results:
NAME                                           READY     STATUS    RESTARTS   AGE
deployment-azurestorage-test-68b78cd79-l6grt   1/1       Running   0          1m
Describe pod:
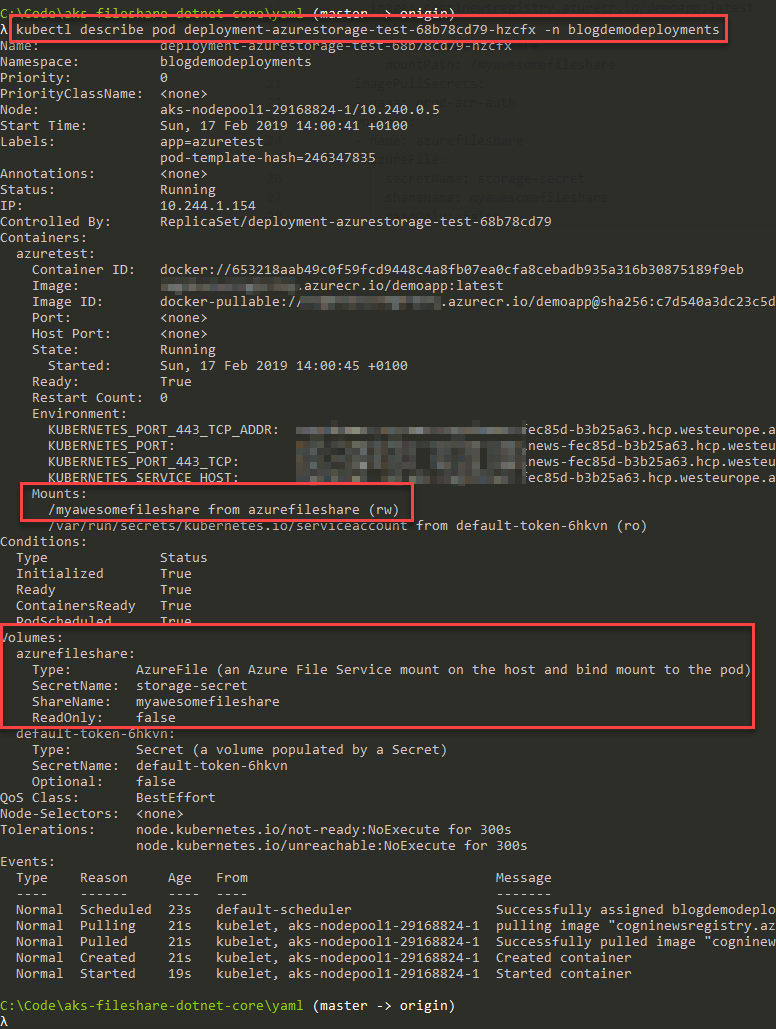
> kubectl describe pod deployment-azurestorage-test-68b78cd79-l6grt -n blogdemodeployments

Results:
...
    Mounts:
      /myawesomefileshare from azurefileshare (rw)
      /var/run/secrets/kubernetes.io/serviceaccount from default-token-6hkvn (ro)
...
Volumes:
  azurefileshare:
    Type:        AzureFile (an Azure File Service mount on the host and bind mount to the pod)
    SecretName:  storage-secret
    ShareName:   myawesomefileshare
    ReadOnly:    false
Again, to make it more visually appealing, I hereby serve you the same data as a screenshot for easier digestion:
Summary
That’s done and dusted. We have walked through an easy path for us to attach an Azure File share to our deployments.
If we now scale out this deployment to N number of containers, each of them will have this mount and be able to access that file share.
I hope this helps! Enjoy.
Comments are closed